Behringer iNUKE NU3000DSP Manual - Page 16
Programming BEHRINGER Amp Remote Software for, bi-amping
 |
View all Behringer iNUKE NU3000DSP manuals
Add to My Manuals
Save this manual to your list of manuals |
Page 16 highlights
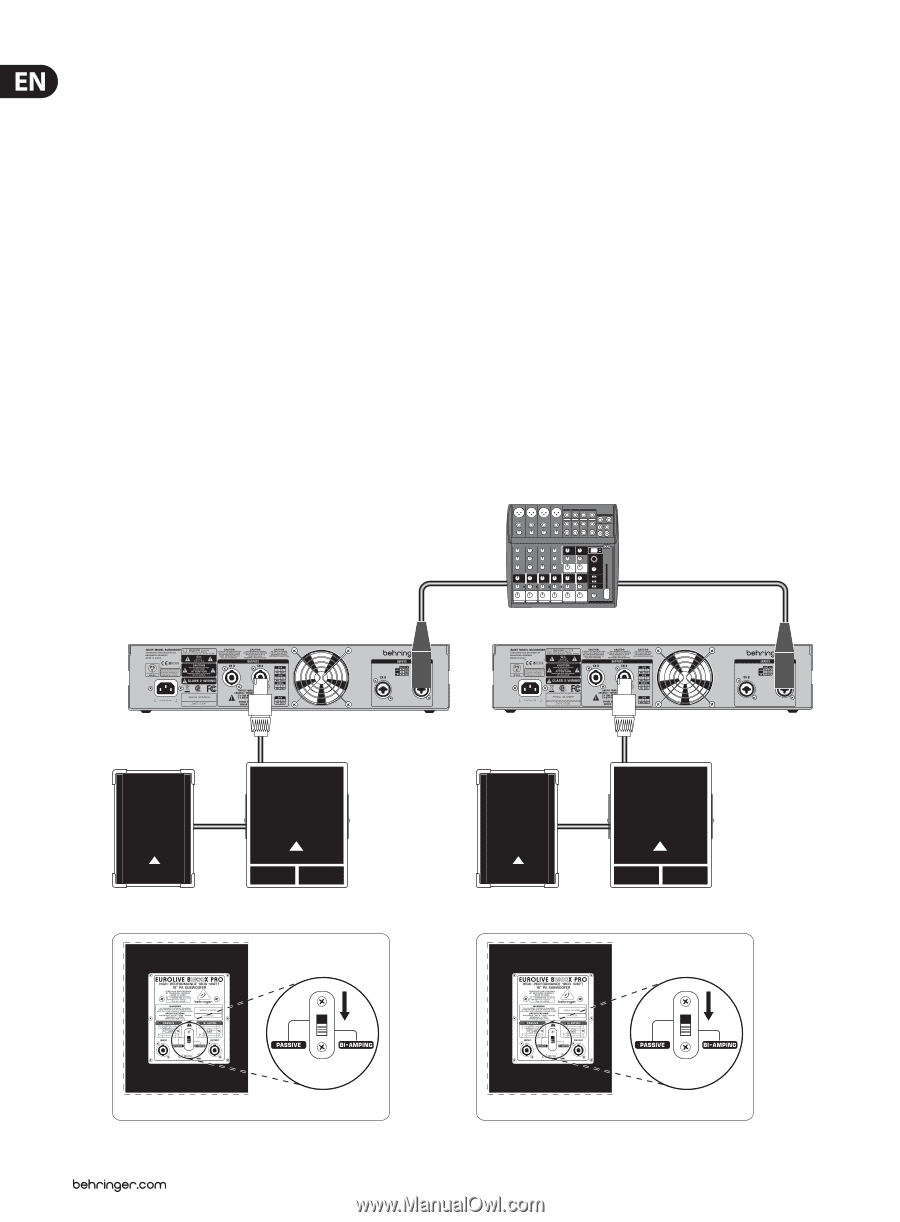
16 iNUKE NU6000DSP/NU3000DSP/NU1000DSP User Manual Programming BEHRINGER Amp Remote Software for bi-amping 1. Select the Configuration tab. 2. Choose the Bi-Amp 2 signal path in the Configuration tab. A confirmation window will pop up. 3. Click "Yes" on the Amp Mode confirmation window. 4. Select the Filter/Crossover tab. 5. Select the X-Over button below the Frequency Curve display. A confirmation window will up up asking if you wish to set a Default Crossover. 6. Click "Yes" in the confirmation window. The X-Over button will illuminate, and default crossover settings will appear in the Frequency Curve and Control View. 7. Choose a filter type from either the Low Pass 2 or High Pass 3 Type pulldown menus (the software defaults to a Butterworth filter). Any changes to the Low Pass 2 or High Pass 3 settings will also automatically appear in both filter's Control View settings. 8. Choose a filter slope setting from the Slope pulldown menu under either Low Pass 2 or High Pass 3 (the software defaults to a Butterworth filter). Again, matching parameters will automatically appear in both filter's Control View settings. 9. Set the crossover frequency by using any of these three methods: a) Rotate the Low Pass 2 or High Pass 3 virtual Freq knobs in the Control View. The crossover frequency displayed in the Freq box below the virtual knob will change simultaneously for both filters. b) Select the text box below either Freq virtual knob, and type your desired frequency directly into the text box. c) Go to the Frequency Curve display, click on the frequency line marked "2," and drag the frequency line to the desired area of the Frequency Curve. Parameter settings and virtual knobs in the Control View will automatically move and change as you drag the crossover frequency through the Frequency Curve window. 10. If necessary, adjust the Gain settings for Channel A and Channel B by rotating the respective Gain virtual knobs. NU3000DSP 4-pole 2-pole EUROLIVE B1520 PRO B1800X PRO Front XLR balanced XENYX 1202FX XLR balanced NU3000DSP 4-pole 2-pole EUROLIVE B1520 PRO B1800X PRO Front B1800X PRO Rear B1800X PRO Rear
-
 1
1 -
2
-
3
-
4
-
5
-
6
-
7
-
8
-
9
-
10
-
 11
11 -
 12
12 -
 13
13 -
 14
14 -
 15
15 -
 16
16 -
 17
17 -
 18
18 -
 19
19 -
 20
20 -
 21
21 -
22
 |
 |