Belkin F5D7000 User Manual - Page 11
Using The Belkin Wireless Lan Utility, Using The Belkin Wireless Lan Configuration Utility
 |
View all Belkin F5D7000 manuals
Add to My Manuals
Save this manual to your list of manuals |
Page 11 highlights
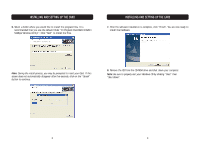
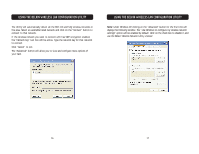
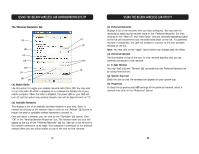
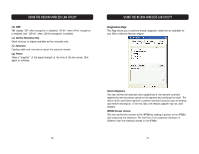
USING THE BELKIN WIRELESS LAN CONFIGURATION UTILITY The Wireless Networks Tab (a) (b) (c) (d) (i) (j) (k) (e) (l) (f) (g) (h) (a) Enable Radio Use this option to toggle your wireless network radio ON or OFF. You may want to turn the radio off while in airplanes or to conserve the battery life of your mobile computer. When the radio is disabled, the power LED on your Card will turn off and the system tray wireless network icon will be depicted with an "X". (b) Available Networks This displays a list of all available wireless networks in your area. Select a network by clicking on the network name or click on the "Refresh" (j) button to rescan the area for available wireless networks to connect to. Once you select a network, you can click on the "Configure" (i) button. Click "OK" in the "Wireless Network Properties" box. The network name and icon will appear at the top of the "Preferred Networks" (c) list. Wait up to one minute for the network connection to be made. Your computer is connected to the selected network when you see a blue bubble on top of the icon for that network. 18 USING THE BELKIN WIRELESS LAN UTILITY (c) Preferred Networks Displays a list of the networks that you have configured. You may rank the networks by selecting the network name in the "Preferred Networks" list then clicking on the "Move UP" and "Move Down" buttons. Networks appearing higher on the list will be preferred over networks listed lower on the list. If a preferred network is unavailable, the Card will attempt to connect to the next available network on the list. Note: You must click on the "Apply" button before any changes take into effect. (d) Preferred Network The blue bubble on top of the icon for that network specifies that you are currently connected to that network. (e, f) Add, Remove You may "Add" (e) and "Remove" (f) networks from the Preferred Networks list by using these buttons. (g) System Tray Icon Check this box so that the wireless icon appears on your system tray. (h) Properties To check the properties and WEP settings of the preferred network, select a network then click on the "Properties" button. 19
-
 1
1 -
2
-
3
-
4
-
5
-
 6
6 -
 7
7 -
 8
8 -
 9
9 -
 10
10 -
 11
11 -
 12
12 -
 13
13 -
 14
14 -
 15
15 -
 16
16 -
17
-
18
-
19
 |
 |
