BenQ DC 3400 User Manual - Page 11
Setting the Photo Effect, Adjusting the White Balance, Portrait, Scene, Black and White, Daylight
 |
View all BenQ DC 3400 manuals
Add to My Manuals
Save this manual to your list of manuals |
Page 11 highlights
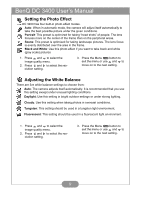
BenQ DC 3400 User's Manual Setting the Photo Effect The DC 3400 has four built-in photo effect modes. Auto: When in automatic mode, the camera will adjust itself automatically to take the best possible picture under the given conditions. Portrait: This preset is optimized for taking "head shots" of people. The lens focuses more on the center of the frame than on the peripheral areas. Scene: This preset is optimized for taking landscape pictures. The lens focus is evenly distributed over the area in the frame. Black and White: Use this photo effect if you want to take black and white (gray scale) pictures 1. Press and to select the image quality menu. 2. Press and to select the resolution setting. 3. Press the Menu MENU button to exit the menu or use and to move on to the next setting. Adjusting the White Balance There are five white balance settings to choose from: Auto: The camera adjusts itself automatically. It is recommended that you use this setting except under unusual lighting conditions. Daylight: Use this setting in bright outdoor settings or under strong lighting. Cloudy: Use this setting when taking photos in overcast conditions. Tungsten: This setting should be used in a tungsten light environment. Fluorescent: This setting should be used in a fluorescent light environment. 1. Press and to select the image quality menu. 2. Press and to select the resolution setting. 3. Press the Menu MENU button to exit the menu or use and to move on to the next setting. 9
-
 1
1 -
2
-
3
-
4
-
5
-
 6
6 -
 7
7 -
 8
8 -
 9
9 -
 10
10 -
 11
11 -
 12
12 -
 13
13 -
 14
14 -
 15
15 -
 16
16 -
17
-
18
-
19
-
20
-
21
-
22
-
23
-
24
-
25
-
26
 |
 |
