BenQ W7000 User Manual - Page 35
Displaying more than one image source simultaneously
 |
View all BenQ W7000 manuals
Add to My Manuals
Save this manual to your list of manuals |
Page 35 highlights
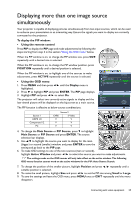
Displaying more than one image source simultaneously Your projector is capable of displaying pictures simultaneously from two input sources, which can be used to enhance your presentation in an interesting way. Ensure the signals you want to display are correctly connected to the projector. To display the PIP window: • Using the remote control Press PIP to display the PIP page and make adjustments by following the steps starting from step 3 in the section "Using the OSD menu" below. When the PIP window is on, to change the PIP window size, press SIZE repeatedly until a desired size is selected. When the PIP window is on, to change the PIP window position, press POSITION repeatedly until a desired position is selected. When the PIP window is on, to highlight one of the sources to make adjustments, press ACTIVE repeatedly until the source is selected. • Using the OSD menu 1. Press MENU and then press / until the Display menu is highlighted. 2. Press to highlight PIP and press ENTER. The PIP page displays. 3. Highlight PIP and press / to select On. The projector will select two currently active signals to display and the last viewed picture will be displayed on the big screen as a main source. The PIP function is effective at below source combinations. Display Aspect Ratio Keystone Position Overscan Adjustment 0 PIP PC & Component YPbPr Tuning Frame Interpolation 3D Anamorphic ENTER Low PC PIP PIP Main Source PIP Source Active Window Position Size Back On Main Top-Right Large Back Source 1 HDMI 1/2 Component 1/2 PC Source 2 CVBS S-Video V V V V V V 4. To change the Main Source or PIP Source, press to highlight Main Source or PIP Source and press ENTER. The source selection bar displays. 5. Use / to highlight the source you want to display for the main (bigger) or second (smaller) window, and press ENTER to save the setting and go back to the PIP page. 6. To make OSD settings to one of the two sources (main or second), highlight Active Window and press / to select the source you want to make adjustments. The settings made on the OSD menus will only take effect on the active window. The following OSD menu function cannot work on the active windows for the PIP: Auto Source Search. 7. To change the position of the smaller picture, highlight Position and press / repeatedly until a suitable position is selected. 8. To resize the small picture, highlight Size and press / to set the PIP size among Small or Large. 9. To save the settings and leave the OSD menu, press MENU once or EXIT repeatedly until the menu disappears. Connecting with video equipment 35
-
 1
1 -
2
-
3
-
4
-
5
-
6
-
7
-
8
-
9
-
10
-
11
-
12
-
13
-
14
-
15
-
16
-
17
-
18
-
19
-
20
-
21
-
22
-
23
-
24
-
25
-
26
-
27
-
28
-
29
-
 30
30 -
 31
31 -
 32
32 -
 33
33 -
 34
34 -
 35
35 -
 36
36 -
 37
37 -
 38
38 -
 39
39 -
 40
40 -
41
-
42
-
43
-
44
-
45
-
46
-
47
-
48
-
49
-
50
-
51
-
52
-
53
-
54
-
55
-
56
-
57
-
58
 |
 |
