BenQ mp777 User Manual - Page 32

Optimizing the image, Using Wall Color, Selecting a picture mode

Page 32 highlights

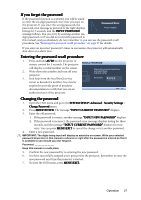
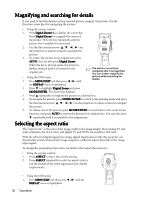
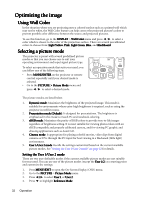
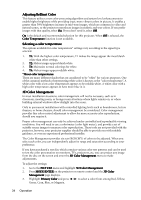
Optimizing the image Using Wall Color In the situation where you are projecting onto a colored surface such as a painted wall which may not be white, the Wall Color feature can help correct the projected picture's colors to prevent possible color difference between the source and projected pictures. To use this function, go to the DISPLAY > Wall Color menu and press / to select a color which is closest to the color of the projection surface. There are several precalibrated colors to choose from: Light Yellow, Pink, Light Green, Blue, and Blackboard. Selecting a picture mode The projector is preset with several predefined picture modes so that you can choose one to suit your operating environment and input signal picture type. To select an operation mode that suits your need, you can follow one of the following steps. • Press MODE/ENTER on the projector or remote control repeatedly until your desired mode is selected. • Go to the PICTURE > Picture Mode menu and press / to select a desired mode. The picture modes are listed below. 1. Dynamic mode: Maximizes the brightness of the projected image. This mode is suitable for environments where extra-high brightness is required, such as using the projector in well lit rooms. 2. Presentation mode (Default): Is designed for presentations. The brightness is emphasized in this mode to match PC and notebook coloring. 3. sRGB mode: Maximizes the purity of RGB colors to provide true-to-life images regardless of brightness setting. It is most suitable for viewing photos taken with an sRGB compatible and properly calibrated camera, and for viewing PC graphic and drawing applications such as AutoCAD. 4. Cinema mode: Is appropriate for playing colorful movies, video clips from digital cameras or DVs through the PC input for best viewing in a blackened (little light) environment. 5. User 1/User 2 mode: Recalls the settings customized based on the current available picture modes. See "Setting the User 1/User 2 mode" on page 32 for details. Setting the User 1/User 2 mode There are two user-definable modes if the current available picture modes are not suitable for your need. You can use one of the picture modes (except the User 1/2) as a starting point and customize the settings. 1. Press MENU/EXIT to open the On-Screen Display (OSD) menu. 2. Go to the PICTURE > Picture Mode menu. 3. Press / to select User 1 or User 2. 4. Press to highlight Reference Mode. 32 Operation

  • 1
  • 2
  • 3
  • 4
  • 5
  • 6
  • 7
  • 8
  • 9
  • 10
  • 11
  • 12
  • 13
  • 14
  • 15
  • 16
  • 17
  • 18
  • 19
  • 20
  • 21
  • 22
  • 23
  • 24
  • 25
  • 26
  • 27
  • 28
  • 29
  • 30
  • 31
  • 32
  • 33
  • 34
  • 35
  • 36
  • 37
  • 38
  • 39
  • 40
  • 41
  • 42
  • 43
  • 44
  • 45
  • 46
  • 47
  • 48
  • 49
  • 50
  • 51
  • 52
  • 53
  • 54
  • 55
  • 56
  • 57
  • 58
  • 59
  • 60
  • 61
  • 62
  • 63
  • 64
  • 65
  • 66
  • 67

Operation
32
Optimizing the image
Using Wall Color
Using Wall Color
Using Wall Color
Using Wall Color
In the situation where you are projecting onto a colored surface such as a painted wall which
may not be white, the Wall Color feature can help correct the projected picture’s colors to
prevent possible color difference between the source and projected pictures.
To use this function, go to the DISPLAY
DISPLAY
DISPLAY
DISPLAY > Wall Color
Wall Color
Wall Color
Wall Color menu and press
/
to select a
color which is closest to the color of the projection surface. There are several precalibrated
colors to choose from: Light Yellow
Light Yellow
Light Yellow
Light Yellow, Pink
Pink
Pink
Pink, Light Green
Light Green
Light Green
Light Green, Blue
Blue
Blue
Blue, and Blackboard
Blackboard
Blackboard
Blackboard.
Selecting a picture mode
The projector is preset with several predefined picture
modes so that you can choose one to suit your
operating environment and input signal picture type.
To select an operation mode that suits your need, you
can follow one of the following steps.
Press MODE/ENTER
MODE/ENTER
MODE/ENTER
MODE/ENTER on the projector or remote
control repeatedly until your desired mode is
selected.
Go to the PICTURE
PICTURE
PICTURE
PICTURE >
>
>
> Picture Mode
Picture Mode
Picture Mode
Picture Mode menu and
press
/
to select a desired mode.
The picture modes are listed below.
1.
Dynamic
Dynamic
Dynamic
Dynamic mode
mode
mode
mode: Maximizes the brightness of the projected image. This mode is
suitable for environments where extra-high brightness is required, such as using the
projector in well lit rooms.
2.
Presentation
Presentation
Presentation
Presentation mode (Default)
mode (Default)
mode (Default)
mode (Default): Is designed for presentations. The brightness is
emphasized in this mode to match PC and notebook coloring.
3.
sRGB
sRGB
sRGB
sRGB mode
mode
mode
mode: Maximizes the purity of RGB colors to provide true-to-life images
regardless of brightness setting. It is most suitable for viewing photos taken with an
sRGB compatible and properly calibrated camera, and for viewing PC graphic and
drawing applications such as AutoCAD.
4.
Cinema
Cinema
Cinema
Cinema mode
mode
mode
mode: Is appropriate for playing colorful movies, video clips from digital
cameras or DVs through the PC input for best viewing in a blackened (little light)
environment.
5.
User 1
User 1
User 1
User 1/User 2
User 2
User 2
User 2 mode
mode
mode
mode: Recalls the settings customized based on the current available
picture modes. See
"Setting the User 1/User 2 mode" on page 32
for details.
Setting the
Setting the
Setting the
Setting the User 1
User 1
User 1
User 1/User 2
User 2
User 2
User 2 mode
mode
mode
mode
There are two user-definable modes if the current available picture modes are not suitable
for your need. You can use one of the picture modes (except the User 1
User 1
User 1
User 1/2
/2
/2
/2) as a starting point
and customize the settings.
1.
Press MENU/EXIT
MENU/EXIT
MENU/EXIT
MENU/EXIT to open the On-Screen Display (OSD) menu.
2.
Go to the PICTURE
PICTURE
PICTURE
PICTURE > Picture Mode
Picture Mode
Picture Mode
Picture Mode menu.
3.
Press
/
to select User 1
User 1
User 1
User 1 or User 2
User 2
User 2
User 2.
4.
Press
to highlight Reference Mode
Reference Mode
Reference Mode
Reference Mode.