Black & Decker GH710 Type 1 Manual - GH710 - Page 10
Maintenance - repair
 |
View all Black & Decker GH710 manuals
Add to My Manuals
Save this manual to your list of manuals |
Page 10 highlights
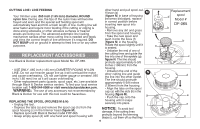
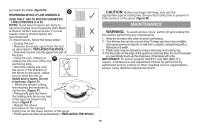
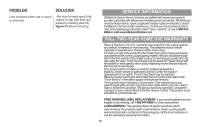
just reach the blade (figure M). O REWINDING SPOOL IF LINE UNRAVELS (USE ONLY .065 IN. ROUND DIAMETER LINE) (FIGURES O & P) NOTE: Hand wound spools are likely to become tangled more frequently than Black & Decker factory wound spools. For best results, factory wound spools are recommended. To rewind spools, follow the steps below: • Unplug the tool. • Remove the empty spool from the tool as described in "REPLACING THE SPOOL". • First wind new line onto the uppermost part of the spool. • Feed 3/4 inch (19mm) of P cutting line into one of the line anchoring slots. • Wind the cutting line onto the spool in the direction of the arrow on the spool. Make sure to wind the line on neatly and in layers. Do not crisscross (figure O). • When the wound cutting j line reaches the recesses (j), cut the line. (figure P). k k • Temporarily park the line in the holding slots (k) on one side of the spool as shown in the inset in figure P. • Repeat the above procedure for the second cutting line on the lower section of the spool. • Fit the spool onto the tool as described in "REPLACING THE SPOOL". CAUTION: Before you begin trimming, only use the appropriate type of cutting line. Ensure that cutting line is present in both sections of the spool (figure M). MAINTENANCE WARNING: To avoid serious injury, switch off and unplug the tool before performing any maintenance. 1. Keep the air intake slots clean to avoid overheating. 2. Your trimmer line can dry out over time. To keep your line in top condition, store spare pre-wound spools or bulk line in a plastic, sealable bag with a tablespoon of water. 3. Plastic parts may be cleaned by using a mild soap and a damp rag. 4. The line cutter on the edge of the guard can dull over time. It is recommended you periodically touch-up the sharpness of the blade with a file. IMPORTANT: To assure product SAFETY and RELIABILITY, repairs, maintenance and adjustment should be performed by authorized service centers or other qualified service organizations, always using identical replacement parts. 10
-
 1
1 -
2
-
3
-
4
-
 5
5 -
 6
6 -
 7
7 -
 8
8 -
 9
9 -
 10
10 -
 11
11 -
 12
12 -
 13
13 -
 14
14 -
 15
15 -
16
-
17
-
18
-
19
-
20
-
21
-
22
-
23
-
24
-
25
-
26
-
27
-
28
-
29
-
30
-
31
-
32
-
33
-
34
-
35
-
36
-
37
-
38
-
39
-
40
 |
 |
