Black & Decker GH710 Type 1 Manual - GH710 - Page 6
Attaching The Auxiliary Handle, D, E, F, Height Adjustment, G
 |
View all Black & Decker GH710 manuals
Add to My Manuals
Save this manual to your list of manuals |
Page 6 highlights
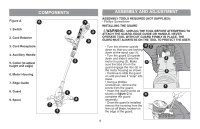
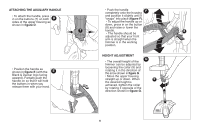
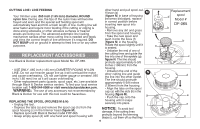
ATTACHING THE AUXILIARY HANDLE • Push the handle completely onto the housing F • To attach the handle, press in on the buttons (7) on both D and position it slightly until it "snaps" into place (figure F). sides of the upper housing as • To adjust the handle up or shown in figure D. down, press in on the button (8) and raise or lower the 7 handle. 8 • The handle should be adjusted so that your front arm is straight when the trimmer is in the working position. • Position the handle as shown in figure E (with the E Black & Decker logo facing upward). Partially push the handle on so that it will hold the buttons in when you release them with your hand. HEIGHT ADJUSTMENT G • The overall height of the trimmer can be adjusted by loosening the collar (9) and rotating it in the direction of the arrow shown in figure G. • Move the upper housing straight up or down. When 9 the desired height is achieved, tighten the collar by rotating it opposite of the direction shown in figure G. 6
-
 1
1 -
 2
2 -
 3
3 -
 4
4 -
 5
5 -
 6
6 -
 7
7 -
 8
8 -
 9
9 -
 10
10 -
 11
11 -
 12
12 -
13
-
14
-
15
-
16
-
17
-
18
-
19
-
20
-
21
-
22
-
23
-
24
-
25
-
26
-
27
-
28
-
29
-
30
-
31
-
32
-
33
-
34
-
35
-
36
-
37
-
38
-
39
-
40
 |
 |
