Bosch B18IF800SP Installation Instructions - Page 18
Switching the appliance ON, 4. Preparing the door panels, 5. Loading the appliance door
 |
View all Bosch B18IF800SP manuals
Add to My Manuals
Save this manual to your list of manuals |
Page 18 highlights
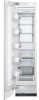
en-us 3. Switching the appliance ON To guarantee the accuracy of the following working steps and thus the appearance of the overall kitchen front later on, the appliance should now be operated. 1. Open the appliance door. 2. Press the POWER button. 3. Press the POWER button again to shut off. Only for appliances with a water connection: In order to avoid the risk of damage caused by leaking water from damage possibly caused to the water pipe feeding the appliance, keep the shut-off valve closed. 4. Preparing the door panels Important note: When performing any work on the door panels, always observe the following: ■ Always screw into the best load-bearing material of the door panel. ■ Never screw into fillers, decorative strips or similar. ■ Select a screw length which is always shorter than the thickness of the door panel. ■ To prevent damage, protect surfaces of the door panels during installation. The total weight of the door panel must not exceed the following values: 18" Appliance 30" Appliance 44 Ibs/20 kg 64 Ibs/29 kg 5. Loading the appliance door When attaching the door panels, it is recommended to load the door storage compartments in the appliance with weights in order to ensure that the gap width is as precise as possible. Recommendations: 18" Appliance 30" Appliance 22 Ibs/10 kg 44 Ibs/20 kg 6. Removing the installation support part Unscrew the positioning aid from the appliance door. Note: Store the positioning aids, there will be used in an installation step later. 7. Attaching the adjusting rail to the door panel 1. Measure the distance A between the adjusting rail and the overhead cabinet/fixtures. 2. Loosen the 2 nuts (a) and remove the adjusting rail (b). 3. Mark this amount A on the rear of the door panel. 4. Determine and mark the centerline of the door panel. 5. Put on the adjusting rail and align along the marks. Mark the drill holes. 6. Drill the holes. 18
-
 1
1 -
2
-
3
-
4
-
5
-
6
-
7
-
8
-
9
-
10
-
11
-
12
-
 13
13 -
 14
14 -
 15
15 -
 16
16 -
 17
17 -
 18
18 -
 19
19 -
 20
20 -
 21
21 -
 22
22 -
 23
23 -
24
-
25
-
26
-
27
-
28
-
29
-
30
-
31
-
32
-
33
-
34
-
35
-
36
-
37
-
38
-
39
-
40
-
41
-
42
-
43
-
44
-
45
-
46
-
47
-
48
-
49
-
50
-
51
-
52
-
53
-
54
-
55
-
56
-
57
-
58
-
59
-
60
-
61
-
62
-
63
-
64
-
65
-
66
-
67
-
68
-
69
-
70
-
71
-
72
-
73
-
74
-
75
-
76
-
77
-
78
-
79
-
80
-
81
-
82
-
83
-
84
 |
 |
