Bosch B18IF800SP Installation Instructions - Page 3

en-us

Page 3 highlights

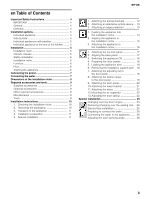
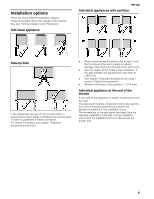
en Table of Contents enOpagiruostcn Important Safety Instructions 4 IMPORTANT 4 General 4 Definition 4 Installation options 5 Individual appliance 5 Side-by-Side 5 Individual appliances with partition 5 Individual appliance at the end of the kitchen.......... 5 Installation 6 Installation room 6 Climatic classes 6 Stable installation 6 Installation niche 6 Furniture 6 Floor 6 Aligning the appliance 6 Connecting the power 7 Connecting the water 7 Dimensions of the installation niche 8 Required accessories and tools 9 Supplied accessories 9 Optional accessories 9 Other required accessories 9 Miscellaneous 9 Tools 9 Installation instructions 10 1. Checking the installation niche 10 2. Removing the packaging 10 3. Transport of the appliance 11 4. Installation preparation 11 5. Special installation 11 en-us 1. Attaching the anti-tip-brackets 12 2. Attaching an alternative anti-tip device .. 13 3. Attaching an edge protection 13 1. Pushing the appliance into the installation niche 14 2. Aligning the appliance in the installation niche 15 3. Attaching the appliance to the installation niche 16 1. Attaching the toe kick panel 17 2. Aligning the base panel 17 3. Switching the appliance ON 18 4. Preparing the door panels 18 5. Loading the appliance door 18 6. Removing the installation support part . 18 7. Attaching the adjusting rail to the door panel 18 8. Attaching the fixation strips to the door panel 19 9. Attaching the door panel 20 10. Attaching the lower bracket 21 11. Attaching the strips 22 12. Mounting the air separator 22 13. Adjusting the door spring 22 Special installation 23 Changing over the door hinges 23 Removing/changing over the sealing mat ... 26 Side-by-Side installation 26 Preparing to connect the water 28 Connecting the water to the appliance ......... 28 Adjusting the door opening angle 28 3

  • 1
  • 2
  • 3
  • 4
  • 5
  • 6
  • 7
  • 8
  • 9
  • 10
  • 11
  • 12
  • 13
  • 14
  • 15
  • 16
  • 17
  • 18
  • 19
  • 20
  • 21
  • 22
  • 23
  • 24
  • 25
  • 26
  • 27
  • 28
  • 29
  • 30
  • 31
  • 32
  • 33
  • 34
  • 35
  • 36
  • 37
  • 38
  • 39
  • 40
  • 41
  • 42
  • 43
  • 44
  • 45
  • 46
  • 47
  • 48
  • 49
  • 50
  • 51
  • 52
  • 53
  • 54
  • 55
  • 56
  • 57
  • 58
  • 59
  • 60
  • 61
  • 62
  • 63
  • 64
  • 65
  • 66
  • 67
  • 68
  • 69
  • 70
  • 71
  • 72
  • 73
  • 74
  • 75
  • 76
  • 77
  • 78
  • 79
  • 80
  • 81
  • 82
  • 83
  • 84

en-us
3
en Table of Contents
enOpe
r
a
t
i
ng
i
ns
t
r
uc
t
i
ons
Important Safety Instructions
.....................................
4
IMPORTANT
....................................................................
4
General
.............................................................................
4
Definition
..........................................................................
4
Installation options
............................................................
5
Individual appliance
.......................................................
5
Side-by-Side
.....................................................................
5
Individual appliances with partition
.............................
5
Individual appliance at the end of the kitchen
..........
5
Installation
....................................................................
6
Installation room
.............................................................
6
Climatic classes
..............................................................
6
Stable installation
...........................................................
6
Installation niche
.............................................................
6
Furniture
...........................................................................
6
Floor
..................................................................................
6
Aligning the appliance
...................................................
6
Connecting the power
..................................................
7
Connecting the water
...................................................
7
Dimensions of the installation niche
..........................
8
Required accessories and tools
.................................
9
Supplied accessories
...................................................
9
Optional accessories
....................................................
9
Other required accessories
.........................................
9
Miscellaneous
................................................................
9
Tools
................................................................................
9
Installation instructions
.............................................
10
1.
Checking the installation niche
........................
10
2.
Removing the packaging
..................................
10
3.
Transport of the appliance
................................
11
4.
Installation preparation
.......................................
11
5.
Special installation
..............................................
11
1.
Attaching the anti-tip-brackets
.................
12
2.
Attaching an alternative anti-tip device .. 13
3.
Attaching an edge protection
..................
13
1.
Pushing the appliance into
the installation niche
.................................
14
2.
Aligning the appliance in
the installation niche
.................................
15
3.
Attaching the appliance to
the installation niche
...................................
16
1.
Attaching the toe kick panel
....................
17
2.
Aligning the base panel
...........................
17
3.
Switching the appliance ON
....................
18
4.
Preparing the door panels
.......................
18
5.
Loading the appliance door
....................
18
6.
Removing the installation support part . 18
7.
Attaching the adjusting rail to
the door panel
............................................
18
8.
Attaching the fixation strips
to the door panel
.......................................
19
9.
Attaching the door panel
..........................
20
10.Attaching the lower bracket
.....................
21
11.Attaching the strips
...................................
22
12.Mounting the air separator
......................
22
13.Adjusting the door spring
........................
22
Special installation
.....................................................
23
Changing over the door hinges
......................
23
Removing/changing over the sealing mat... 26
Side-by-Side installation
...................................
26
Preparing to connect the water
......................
28
Connecting the water to the appliance
.........
28
Adjusting the door opening angle
..................
28