Brother International 2340CV Users Manual - English and Spanish
Brother International 2340CV Manual
 |
View all Brother International 2340CV manuals
Add to My Manuals
Save this manual to your list of manuals |
Brother International 2340CV manual content summary:
- Brother International 2340CV | Users Manual - English and Spanish - Page 1
functions 3 II. Preparation before threading 8 III. Threading 9 IV. Types of stitches 11 Tri-cover stitch 11 Two needle three threads cover stitch ........ 12 Chain stitch sewing 14 V. Sewing 15 VI. Maintenance 19 VII. Machine specifications 19 INDICE: ESPAÑOL I. Nombres de las partes y sus - Brother International 2340CV | Users Manual - English and Spanish - Page 2
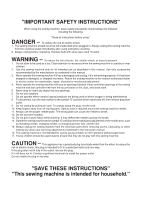
needle, changing needle, or changing presser foot, and the like. 15. Always unplug the sewing machine from the electrical outlet when removing covers, lubricating, or when making any other user servicing adjustments mentioned in the instruction manual. 16. This sewing machine is not intended for use - Brother International 2340CV | Users Manual - English and Spanish - Page 3
servicing the sewing machine, or when removing covers or changing lamps, the machine or the electrical set must be disconnected from the supply by removing the plug from the socket-outlet. FOR USERS IN THE UK Always replace the fuse cover, never use plugs with the fuse cover omitted. WARNING: DO - Brother International 2340CV | Users Manual - English and Spanish - Page 4
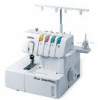
THIS COMPACT COVER STITCH MACHINE Your machine is a high quality, easy-to-use product. To fully enjoy all the features, we suggest that you study this booklet. If you need more information regarding the use of your machine, your nearest authorized dealer is always happy to be of service. Enjoy - Brother International 2340CV | Users Manual - English and Spanish - Page 5
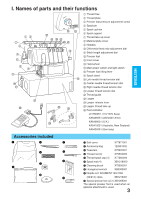
Spool pin 5 Spool cushion 6 Spool support 7 Thread take-up cover 8 Material plate cover 9 Needles 0 Differential feed raito adjustment dial A Stitch length adjustment dial B Presser foot C Front cover D Hand wheel E Main power switch and light switch F Presser foot lifting lever G Spool stand H Left - Brother International 2340CV | Users Manual - English and Spanish - Page 6
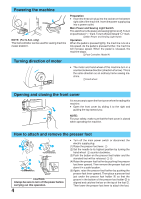
to open the front cover when threading this machine. • Open the front cover by sliding it to the right and guiding the top toward you. NOTE: For your safety, make sure that the front cover is closed when operating the machine. How to attach and remove the presser foot 41 2 1 2 3 A B C4 CAUTION - Brother International 2340CV | Users Manual - English and Spanish - Page 7
mm (5/64 inch). (3) The normal stitch length setting is 3 mm to 4 mm (1/8 to 5/32 inch) Instructions for the differential feed mechanism This machine is equipped with two sets of feed dogs under the presser foot to move the fabric through the machine. The differential feed controls the movement - Brother International 2340CV | Users Manual - English and Spanish - Page 8
. CAUTION When sewing thick non-stretchable material such as denim, do not use the differential feed as it may damage the fabric. • The pressure of the presser foot can be adjusted by turning the pressure adjustment screw at the top left of this machine. Since this machine has already been - Brother International 2340CV | Users Manual - English and Spanish - Page 9
machine uses a standard home sewing machine needle. The recommended needle is SCHMETZ 130/705H (90/#14). To remove the needle (1) Turn the main power switch to the OFF position. (2) Turn the hand wheel counter-clockwise by hand until the needle is at its highest position. (3) Loosen the needle set - Brother International 2340CV | Users Manual - English and Spanish - Page 10
sewing with loosely spun nylon thread, we recom- mend that you cover the spool with the net supplied to prevent 2 the thread from slipping off the spool. 1 Adapt the net to the shape of the spool. 1 Spool support 2 Spool cushion 3 Net 3 1 Spool support 2 Spool mat 3 Spool cap 2 Needle - Brother International 2340CV | Users Manual - English and Spanish - Page 11
ENGLISH III. Threading Needle threading 333 333 6 F 5 4 G 444 • Pass each thread from 333 to 444 as shown in this illustration. • Pass the thread through the proper thread guide. • Slide and hold the thread tension release button to the right, then pass the thread through the tension disc - Brother International 2340CV | Users Manual - English and Spanish - Page 12
to thread the looper. 1 Open the front cover by sliding to the right and guiding the top toward you. 2 Run the thread in the needle, as shown by D in the illustration, move the looper back in the direction of the arrow to lock it. 5 Close the front cover. C A 10 B D 7 08 6 9 NOTE: When using - Brother International 2340CV | Users Manual - English and Spanish - Page 13
to sew a 6 mm (15/64 inch) cover stitch. Use: Ideal for hemming and for decorative stitching. Threading • For details on threading the machine, refer to "III. Threading" on page 9 to 10. < Threading the left, center and right needle > < Threading the looper > Tension adjustments A (1) First, set - Brother International 2340CV | Users Manual - English and Spanish - Page 14
64 inch) (Wide) Use three threads, two front needles and the looper thread to sew a 6 mm (15/64 inch) or 3 mm (1/8 inch) cover stitch. Use: Ideal for hemming and for decorative stitching. Needles and threading • For details on installing and removing the needle, refer to "Needle" on page 7. 1 Left - Brother International 2340CV | Users Manual - English and Spanish - Page 15
the thread through the tension discs. (2) Sew a test stitch. (Refer to "V. Sewing" on page 15.) (3) Adjust the tension of each thread according to the condition of the stitch. Stitching direction Balanced tension The needle thread sews a straight seam on the top side and the looper thread forms - Brother International 2340CV | Users Manual - English and Spanish - Page 16
Chain stitch sewing (One needle two threads double chain stitch) A 1 Use two threads. The center needle thread and looper thread. Use: For straight stitching, basting and decorative chain stitch. Needle and threading • For details on installing and removing the needle, refer to "Needle" on page 7. - Brother International 2340CV | Users Manual - English and Spanish - Page 17
for the needle thread to be on top of the presser foot, sew with it positioned under the presser foot when you begin sewing. If necessary, turn the handwheel toward you a few times by hand, and then cut the thread as shown in the illustration. NOTE Removing the fabric from the machine (1) By hand - Brother International 2340CV | Users Manual - English and Spanish - Page 18
16 (3) While firmly taking the fabric with your hand, push the thread release button to the right for the needle thread currently being used to open the thread tension disc. NOTE: Do not take the seam. CAUTION Be careful when taking the fabric since the light bulb is very - Brother International 2340CV | Users Manual - English and Spanish - Page 19
folded fabric is positioned. (4) Place the bottom of the presser foot onto the top of fabric, and then check that the drawn mark is just barely to the right of the left needle. (5) Sew exactly on the mark. (6) After sewing is finished, refer to "Removing the fabric from the machine" in "V. Sewing - Brother International 2340CV | Users Manual - English and Spanish - Page 20
Actual examples of two needles three threads cover stitch sewing 1) Hems of T-shirts (Simple stitch) 2) Stitches (Top stitched seams/Ribbing/Yokes) 3) Attaching tape (edges of collars, etc) (Binding) 4) Decorative stitching (Decorative stitching) 5) Attaching elastic (Hem with sewn-in elastic) - Brother International 2340CV | Users Manual - English and Spanish - Page 21
bulb cover 5 Light bulb 4 VII. Machine specifications Stitch One needle two thread double chain stitch Two needles three thread cover stitch (Wide 6 mm (15/64 inch)/Narrow 3 mm(1/8 inch)) Three needles four thread cover stitch (6 mm (15/64 inch)) Presser foot Free presser type Presser foot lift - Brother International 2340CV | Users Manual - English and Spanish - Page 22
de una eficacia y calidad excelentes; así pues, a fin de disfrutar completamente de todas las características incorporadas, le sugerimo estudie el manual. Si se necesitara mayor información sobre el uso de esta máquina, el proveedor autorizado más cercano estará encantado de ofrecerle sus servicios - Brother International 2340CV | Users Manual - English and Spanish - Page 23
de hilo del áncora P Pedal: J01780051 (zona con 110/120V) XA6406051 (zona con 220/240V) XA6408051 (Reino Unido) XA6410051 (Australia, Nueva Zelanda) XA6420051 (Alemania) ESPAÑOL Accesorios incluidos 1 3 7 4 8 9 5 2 6 0 1 Funda X77871001 2 Bolsa de accesorios 122991002 3 Pinzas X75902001 - Brother International 2340CV | Users Manual - English and Spanish - Page 24
baja velocidad. A medida que se apriete más, la máquina incrementará su velocidad. La máquina se parará tan pronto como se suelte el pedal. 2 Pedal: Model N Para cambiar la dirección del motor • El motor y la ruedecilla de esta máquina funcionan en el sentido contrario al de las manecillas del - Brother International 2340CV | Users Manual - English and Spanish - Page 25
Largo de puntada Para cambiar el largo de las puntada: (1) Busque el disco de ajuste del largo de las puntadas en al lado izquierdo de la máquina. (2) Gire el disco de ajuste del largo de las puntadas hacia adelante para alargar la puntada a un máximo de 4 mm. Gire el disco de ajuste del largo de - Brother International 2340CV | Users Manual - English and Spanish - Page 26
Presión del prensatelas 1 2 3 5 10mm • Ejemplo en que se requiere ajuste Al coser tejidos elásticos sin utilizar una alimentación con diferencial, el tejido va a ser oleado. Para remediar el problema y mejorar la apariencia del tejido, ajuste la velocidad de alimentación de 1,0 hacia 2,0. (El - Brother International 2340CV | Users Manual - English and Spanish - Page 27
Aguja 5 Está máquina funciona con una aguja normal para má- quinas domésticas. Así mismo, se recomienda el uso de una aguja SCHMETZ 130/705H (90/#14). 3 2 4 Para sacar la aguja (1) Apague el interruptor principal (posición OFF). 1 (2) Gire la ruedecilla a mano, en contra de las manecillas - Brother International 2340CV | Users Manual - English and Spanish - Page 28
II. Preparación antes del enhebrado Arbol del hilo 4 1 2 3 Levante el árbol telescópico del hilo hasta su posición más alta. Compruebe que los corchetes de hilos quedan alineados sobre los portabobinas como se ilustra a continuación. 1 Portahilos en el árbol del hilo 2 Portabobina 3 En los modelos - Brother International 2340CV | Users Manual - English and Spanish - Page 29
III. Enhebrado Enhebrado de la aguja 333 333 6 F 5 4 G 444 • Pase cada hilo de 333 a 444 tal como se muestra en la ilustración. • Pase el hilo por la guía de hilo correspondiente. • Deslice y retenga el botón de liberación de la tensión del hilo hacia la derecha y pase el hilo por el disco - Brother International 2340CV | Users Manual - English and Spanish - Page 30
Enhebrado del áncora 3 3 6 A 5 4 B 4 PRECAUCIÓN Asegúrese siempre de desconectar la alimentación antes de realizar la operación siguiente. • Pase cada hilo de 3 a 4 tal como se muestra en la ilustración. • Pase el hilo por la guía de hilo correspondiente. • Deslice y retenga el botón de - Brother International 2340CV | Users Manual - English and Spanish - Page 31
IV. Tipos de puntadas Puntada de recubierto triple (puntada de recubierto de cuatro hilos y tres agujas) Utilice tres agujas delanteras con cuatro hilos y el hilo del áncora para coser una puntada de recubierto de 6 mm. Uso: ideal para dobladillos y costura decorativa. Enhebrado • Si desea más - Brother International 2340CV | Users Manual - English and Spanish - Page 32
Puntada de recubierto de dos agujas con tres hilos 6 mm (Ancha) Utilice tres hilos, dos agujas delanteras y el hilo del áncora para coser una puntada de recubierto de 6 mm o de 3 mm. Uso: ideal para dobladillos y costura decorativa. Agujas y enhebrado • Para información más detallada sobre cómo - Brother International 2340CV | Users Manual - English and Spanish - Page 33
Ajustes de tensión (1) En primer lugar, ajuste cada disco de tensión del hilo en el número indicado más abajo. A Marca de selección de tención 6 mm (Ancha) Disco de la aguja izquierda (amarillo) 4 Disco de la aguja derecha (verde) 4 Disco de la aguja central (rosado) - Disco de la aguja del áncora - Brother International 2340CV | Users Manual - English and Spanish - Page 34
Costura de puntada de cadena (puntada de cadena doble de una aguja y dos hilos) A 1 Utilice dos hilos: el hilo de la aguja central y el hilo del áncora. Uso: para costura recta, costura de hilvanado y costura de cadena decorativa. Agujas y enhebrado • Para información más detallada sobre cómo - Brother International 2340CV | Users Manual - English and Spanish - Page 35
V. Costura Costura de tejido plano (por ejemplo, costura de prueba) (1) Levante el prensatelas y, a continuación, coloque el tejido en la posición de entrada de la aguja. ESPAÑOL (1) (2) Baje el prensatelas, gire un poco hacia usted la polea con la mano y luego pise ligeramente el pedal para - Brother International 2340CV | Users Manual - English and Spanish - Page 36
34 (3) Mientras sujeta firmemente el tejido con la mano, presione hacia la derecha el botón de liberación del hilo de la aguja que está utilizando actualmente para abrir el disco de tensión del hilo. NOTA: No retire la costura. PRECAUCIÓN Tenga cuidado al retirar el tejido ya que la (3) - Brother International 2340CV | Users Manual - English and Spanish - Page 37
Costura de puntada de recubierto 3 1 2 4 6 5 (1) Determine cuánto tejido se va a doblar. (2) Doble el tejido que desee y, a continuación, plánchelo. (3) Utilice una regla para medirlo y después utilice un marcador para tela para marcar el derecho del tejido y ver dónde está colocado el borde del - Brother International 2340CV | Users Manual - English and Spanish - Page 38
Ejemplos reales de puntada de recubierto de tres hilos y dos agujas 1) Dobladillo de camisetas (puntada simple) 2) Puntadas (costuras sobrepuestas/cintas/canesús) 3) Colocación de cintas (bordes de cuellos, etc.) (juntas) 4) Costura decorativa (costura decorativa) 5) Colocación de gomas 6) - Brother International 2340CV | Users Manual - English and Spanish - Page 39
VI. Mantenimiento Cambio de la bombilla de luz 2 1 4 3 5 PRECAUCION Asegúrese siempre de desconectar la alimentación antes de realizar la operación siguiente. La placa de cristal encima de la bombilla se calentará inmediatamente después de utilizar la máquina; por tanto, antes de cambiar la - Brother International 2340CV | Users Manual - English and Spanish - Page 40
ENGLISH / ESPAÑOL 884-500 XB1148-001 0308 Printed in Taiwan
-
 1
1 -
 2
2 -
 3
3 -
 4
4 -
 5
5 -
 6
6 -
 7
7 -
8
-
9
-
10
-
11
-
12
-
13
-
14
-
15
-
16
-
17
-
18
-
19
-
20
-
21
-
22
-
23
-
24
-
25
-
26
-
27
-
28
-
29
-
30
-
31
-
32
-
33
-
34
-
35
-
36
-
37
-
38
-
39
-
40
 |
 |
Cover Stitch Machine Operation Manual
Manual de instrucciones de la máquina de
puntada de recubierto
CONTENTS: ENGLISH
I. Names of parts and their functions
.............
3
II. Preparation before threading
.....................
8
III. Threading
..................................................
9
IV. Types of stitches
.....................................
11
Tri-cover stitch
.............................................
11
Two needle three threads cover stitch
........
12
Chain stitch sewing
.....................................
14
V. Sewing
.....................................................
15
VI. Maintenance
...........................................
19
VII. Machine specifications
..........................
19
INDICE: ESPAÑOL
I. Nombres de las partes y sus funciones
....
21
II. Preparación antes del enhebrado
............
26
III. Enhebrado
..............................................
27
IV. Tipos de puntadas
...................................
29
Puntada de recubierto triple
.......................
29
Puntada de recubierto de
dos agujas con tres hilos
.................
30
Costura de puntada de cadena
..................
32
V. Costura
....................................................
33
VI. Mantenimiento
........................................
37
VII. Especificaciones de la máquina
............
37
ENGLISH
ESPAÑOL