Brother International 2340CV Users Manual - English and Spanish - Page 6
Powering the machine, Turning direction of motor, Opening and closing the front cover, How to attach - model is
 |
View all Brother International 2340CV manuals
Add to My Manuals
Save this manual to your list of manuals |
Page 6 highlights
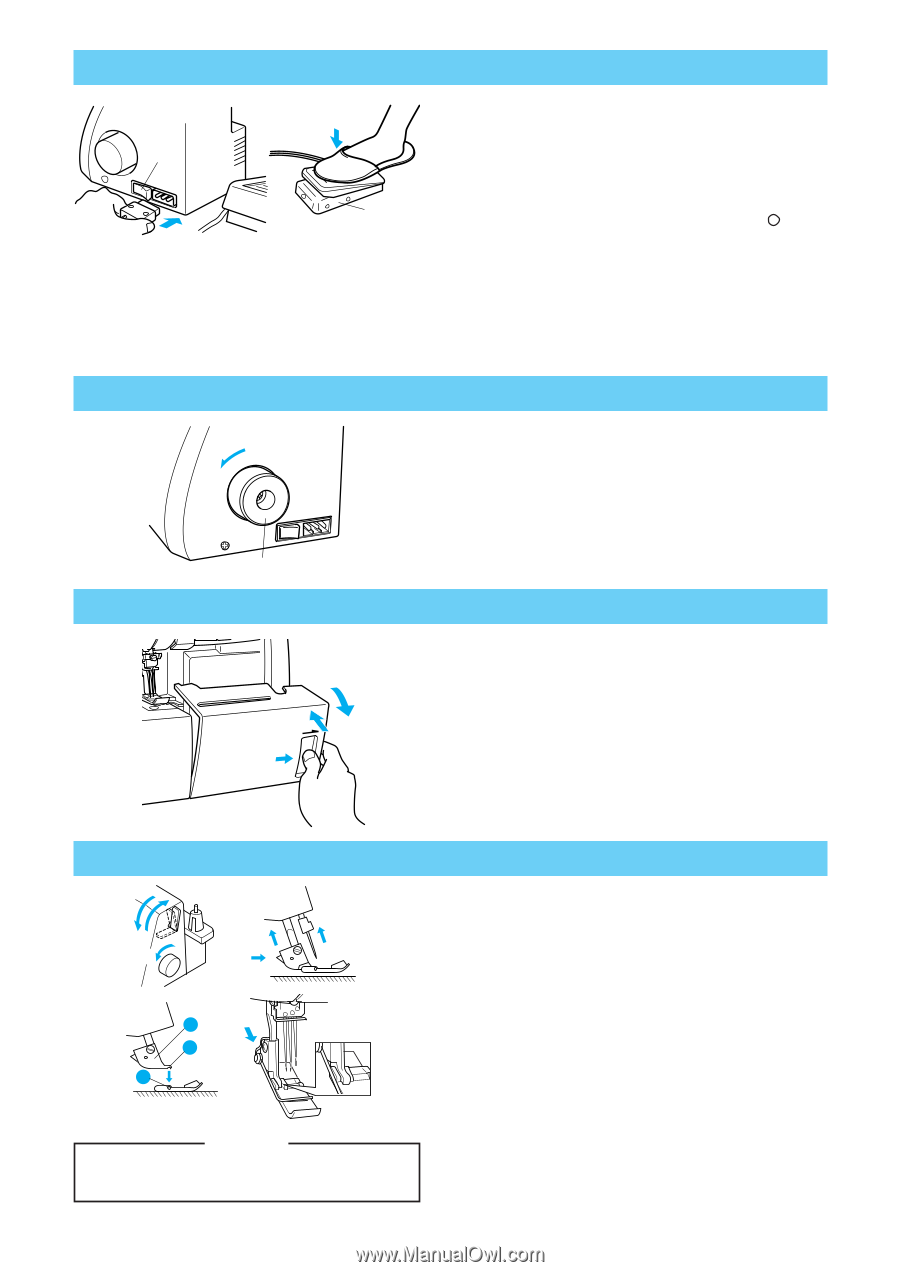
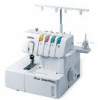
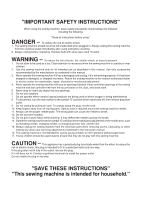
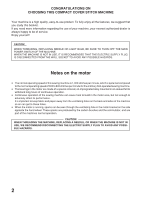
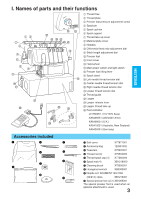
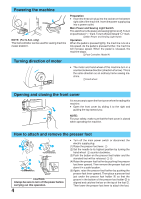
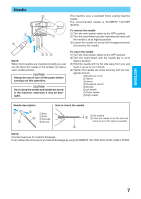
Powering the machine 1 2 NOTE: (For U.S.A. only) This foot controller can be used for sewing machine model 2340CV. Preparation • Insert the three-pin plug into the socket on the bottom right side of the machine. Insert the power supply plug into a power outlet. Main Power and Sewing Light Switch This switch turns the power and sewing light on or off. To turn on push toward " - " mark. To turn off push toward " " mark. 1 Main Power and Sewing Light Switch Operation When the pedal is pressed lightly, the machine runs at a low speed. As the pedal is pressed further, the machine will increase speed. When the pedal is released, the machine stops. 2 Foot Controller: Model N Turning direction of motor • The motor and hand wheel of this machine turn in a counterclockwise direction (direction of arrow). This is the same direction as an ordinary home sewing machine. 1 Hand wheel 1 Opening and closing the front cover It is necessary to open the front cover when threading this machine. • Open the front cover by sliding it to the right and guiding the top toward you. NOTE: For your safety, make sure that the front cover is closed when operating the machine. How to attach and remove the presser foot 41 2 1 2 3 A B C4 CAUTION Always be sure to turn off the power before carrying out this operation. 4 • Turn off the main power switch or disconnect the electric supply plug. (1) Raise the presser foot lever. 1 (2) Set the needle to its highest position by turning the hand wheel 2 counter clockwise. (3) Push the button on the presser foot holder and the standard foot will be released. 3 4 (4) Raise the presser foot farther by pushing the presser foot lever upward. Then remove the presser foot and store it in a safe location. (5) Again, raise the presser foot farther by pushing the presser foot lever upward. Then place a presser foot just under the presser foot holder A so that the groove in the bottom of the presser foot holder B is aligned and catches the bar on the top of the foot C. Then lower the presser foot lever to attach the foot.
-
 1
1 -
 2
2 -
 3
3 -
 4
4 -
 5
5 -
 6
6 -
 7
7 -
 8
8 -
 9
9 -
 10
10 -
 11
11 -
 12
12 -
13
-
14
-
15
-
16
-
17
-
18
-
19
-
20
-
21
-
22
-
23
-
24
-
25
-
26
-
27
-
28
-
29
-
30
-
31
-
32
-
33
-
34
-
35
-
36
-
37
-
38
-
39
-
40
 |
 |