Brother International ADS-3600W Users Guide - Page 215
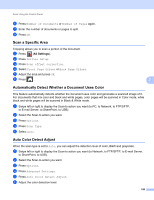
Scan a Specific Area, Automatically Detect Whether a Document Uses Color, Auto Color Detect Adjust
 |
View all Brother International ADS-3600W manuals
Add to My Manuals
Save this manual to your list of manuals |
Page 215 highlights
Scan Using the Control Panel 6 Press Number of Documents or Number of Pages again. 7 Enter the number of documents or pages to split. 8 Press OK. Scan a Specific Area Cropping allows you to scan a portion of the document. 1 Press (All Settings). 2 Press Initial Setup. 3 Press Scan offset correction. 4 Select Front Page Offset or Back Page Offset. 5 Adjust the area and press OK. 6 Press . 7 7 Automatically Detect Whether a Document Uses Color 7 This feature automatically detects whether the document uses color and generates a scanned image of it. For documents that mix color and black and white pages, color pages will be scanned in Color mode, while black and white pages will be scanned in Black & White mode. 1 Swipe left or right to display the Scan-to action you want (to PC, to Network, to FTP/SFTP, to E-mail Server, to SharePoint, to USB). 2 Select the Scan-to action you want. 3 Press Options. 4 Press Scan Type. 5 Select Auto. Auto Color Detect Adjust 7 When the scan type is set to Auto, you can adjust the detection level of color, B&W and grayscale. 1 Swipe left or right to display the Scan-to action you want (to Network, to FTP/SFTP, to E-mail Server, to SharePoint, to USB). 2 Select the Scan-to action you want. 3 Press Options. 4 Press Advanced Settings. 5 Press Auto Color Detect Adjust. 6 Adjust the color detection level. 199
-
 1
1 -
2
-
3
-
4
-
5
-
6
-
7
-
8
-
9
-
10
-
11
-
12
-
13
-
14
-
15
-
16
-
17
-
18
-
19
-
20
-
21
-
22
-
23
-
24
-
25
-
26
-
27
-
28
-
29
-
30
-
31
-
32
-
33
-
34
-
35
-
36
-
37
-
38
-
39
-
40
-
41
-
42
-
43
-
44
-
45
-
46
-
47
-
48
-
49
-
50
-
51
-
52
-
53
-
54
-
55
-
56
-
57
-
58
-
59
-
60
-
61
-
62
-
63
-
64
-
65
-
66
-
67
-
68
-
69
-
70
-
71
-
72
-
73
-
74
-
75
-
76
-
77
-
78
-
79
-
80
-
81
-
82
-
83
-
84
-
85
-
86
-
87
-
88
-
89
-
90
-
91
-
92
-
93
-
94
-
95
-
96
-
97
-
98
-
99
-
100
-
101
-
102
-
103
-
104
-
105
-
106
-
107
-
108
-
109
-
110
-
111
-
112
-
113
-
114
-
115
-
116
-
117
-
118
-
119
-
120
-
121
-
122
-
123
-
124
-
125
-
126
-
127
-
128
-
129
-
130
-
131
-
132
-
133
-
134
-
135
-
136
-
137
-
138
-
139
-
140
-
141
-
142
-
143
-
144
-
145
-
146
-
147
-
148
-
149
-
150
-
151
-
152
-
153
-
154
-
155
-
156
-
157
-
158
-
159
-
160
-
161
-
162
-
163
-
164
-
165
-
166
-
167
-
168
-
169
-
170
-
171
-
172
-
173
-
174
-
175
-
176
-
177
-
178
-
179
-
180
-
181
-
182
-
183
-
184
-
185
-
186
-
187
-
188
-
189
-
190
-
191
-
192
-
193
-
194
-
195
-
196
-
197
-
198
-
199
-
200
-
201
-
202
-
203
-
204
-
205
-
206
-
207
-
208
-
209
-
 210
210 -
 211
211 -
 212
212 -
 213
213 -
 214
214 -
 215
215 -
 216
216 -
 217
217 -
 218
218 -
 219
219 -
 220
220 -
221
-
222
-
223
-
224
-
225
-
226
-
227
-
228
-
229
-
230
-
231
-
232
-
233
-
234
-
235
-
236
-
237
-
238
-
239
-
240
-
241
-
242
-
243
-
244
-
245
-
246
-
247
-
248
-
249
-
250
-
251
-
252
-
253
-
254
-
255
-
256
-
257
-
258
-
259
-
260
-
261
-
262
-
263
-
264
-
265
-
266
-
267
-
268
-
269
-
270
-
271
-
272
-
273
-
274
-
275
-
276
-
277
-
278
-
279
-
280
-
281
-
282
-
283
-
284
-
285
-
286
-
287
-
288
-
289
-
290
 |
 |
