Brother International BES-961BC Instruction Manual - English - Page 162
Attaching Bobbin Winder
 |
View all Brother International BES-961BC manuals
Add to My Manuals
Save this manual to your list of manuals |
Page 162 highlights
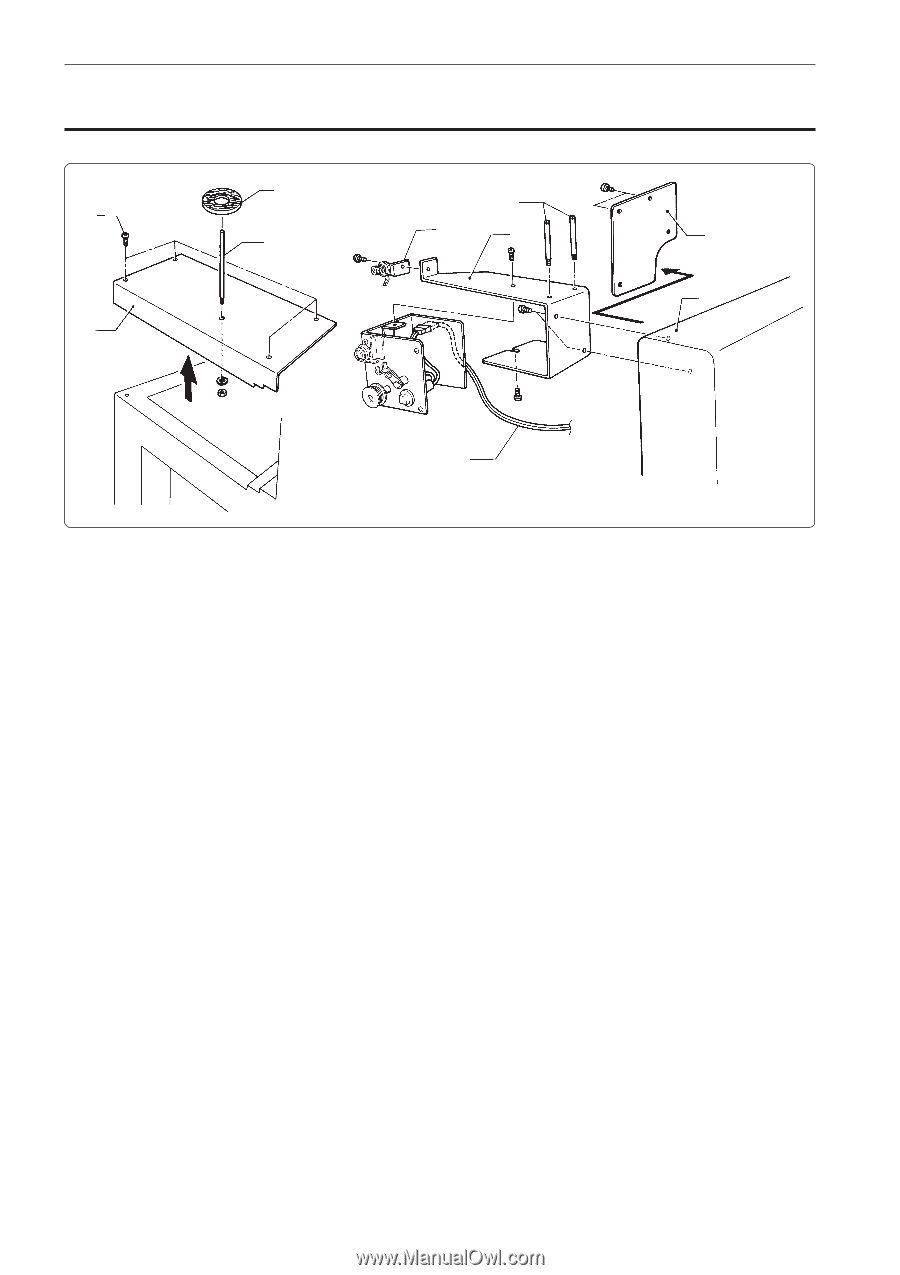
Connection and Installation of Optional Equipment Attaching Bobbin Winder r i q e o y t u w !0 1. Remove four screws q and dismount the side cover LB w. 2. Set the spool shaft B e into the hole of the removed side cover LB w and fix the shaft with a nut and a spring washer. Then put the spool mat A r through the spool shaft B e. 3. Remove two screws and dismount the bridge cover B t. 4. Mount the bobbin winder stay y on the bridge u along with the bridge cover B t using two screws removed from the bridge cover. Then mount the bobbin stand L i on the bobbin winder stay y. 5. Mount the bobbin winder assembly o on the bobbin winder stay y using screws. 6. Insert the bobbin winder harness !0 in the 2P (No. 6) connector on the rear side of the control box. Note) Be careful not to allow the bobbin winder harness to come into contact with the hoop in motion. 7. Mount the side cover LB w using four screws q. 160 BES-961BC • BES-1261BC
-
 1
1 -
2
-
3
-
4
-
5
-
6
-
7
-
8
-
9
-
10
-
11
-
12
-
13
-
14
-
15
-
16
-
17
-
18
-
19
-
20
-
21
-
22
-
23
-
24
-
25
-
26
-
27
-
28
-
29
-
30
-
31
-
32
-
33
-
34
-
35
-
36
-
37
-
38
-
39
-
40
-
41
-
42
-
43
-
44
-
45
-
46
-
47
-
48
-
49
-
50
-
51
-
52
-
53
-
54
-
55
-
56
-
57
-
58
-
59
-
60
-
61
-
62
-
63
-
64
-
65
-
66
-
67
-
68
-
69
-
70
-
71
-
72
-
73
-
74
-
75
-
76
-
77
-
78
-
79
-
80
-
81
-
82
-
83
-
84
-
85
-
86
-
87
-
88
-
89
-
90
-
91
-
92
-
93
-
94
-
95
-
96
-
97
-
98
-
99
-
100
-
101
-
102
-
103
-
104
-
105
-
106
-
107
-
108
-
109
-
110
-
111
-
112
-
113
-
114
-
115
-
116
-
117
-
118
-
119
-
120
-
121
-
122
-
123
-
124
-
125
-
126
-
127
-
128
-
129
-
130
-
131
-
132
-
133
-
134
-
135
-
136
-
137
-
138
-
139
-
140
-
141
-
142
-
143
-
144
-
145
-
146
-
147
-
148
-
149
-
150
-
151
-
152
-
153
-
154
-
155
-
156
-
 157
157 -
 158
158 -
 159
159 -
 160
160 -
 161
161 -
 162
162 -
 163
163 -
 164
164
 |
 |