Brother International BES-961BC Instruction Manual - English - Page 65
then press, Select an area for registration, using ten keys or
 |
View all Brother International BES-961BC manuals
Add to My Manuals
Save this manual to your list of manuals |
Page 65 highlights
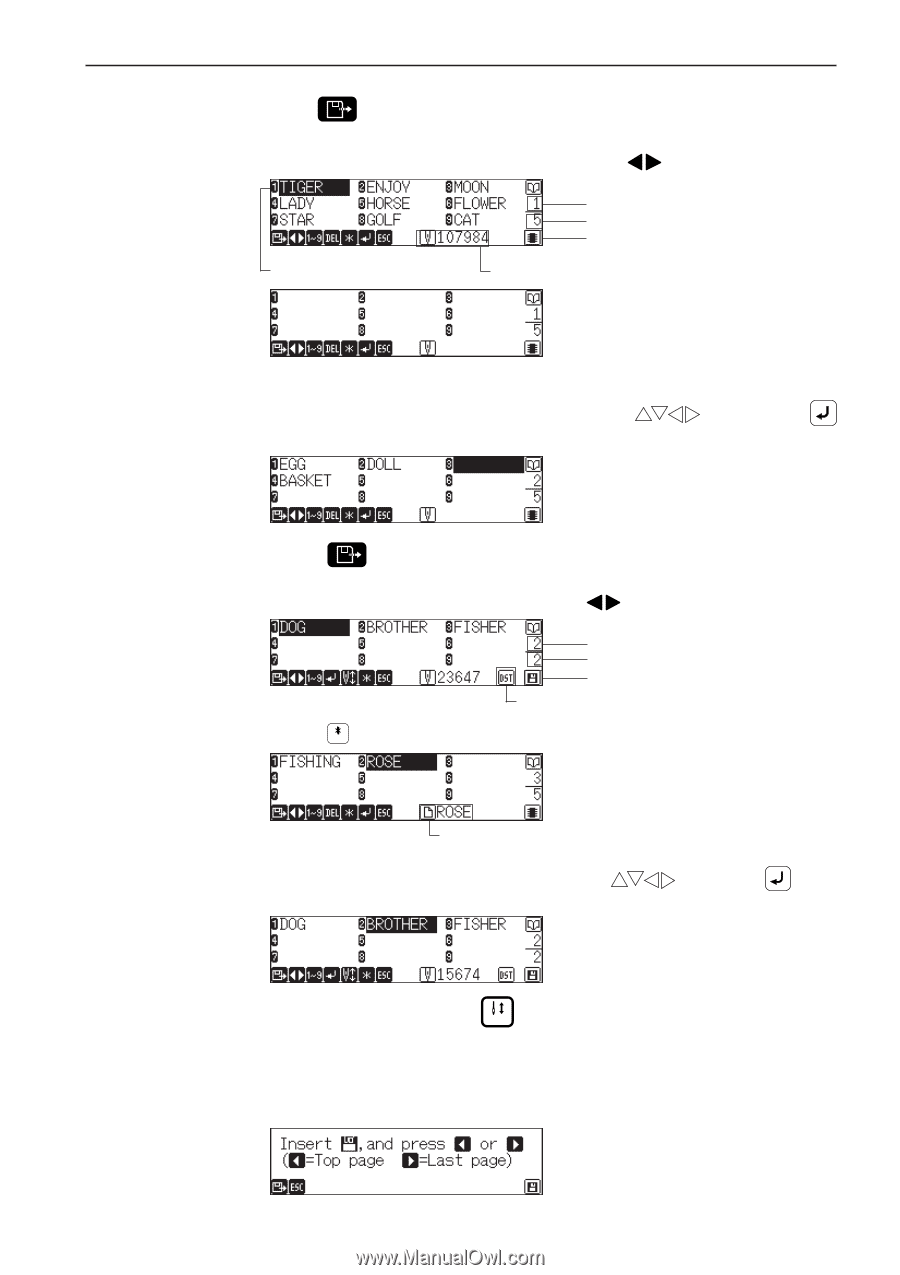
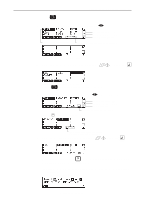
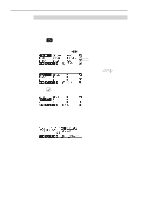
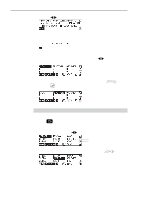
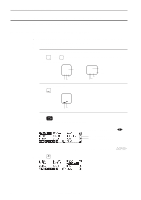
Chapter 3 Selection of Data and Embroidering 2. Press . 3. Select a screen for data registration by pressing . Currently selected embroidery data Currently displayed screen No. of screens to be selected Data in machine memory Number of stitches in selected embroidery data When there is no data 4. Select an area for registration, using ten keys or . , then press A space available is automatically selected. Pressing automatically locates the first space in the memory. 5. Data in the floppy disk is displayed. Press to select a screen. Pressing Currently displayed screen No. of screens to be selected Data in floppy disk Icon indicating a kind of selected data displays a pattern name. Name of a selected embroidery pattern (It may be the same as a file name.) 6. Select data to register by pressing ten keys or Data is newly registered in the machine memory. then press . Select embroidery data and press . START The selected data is automatically registered in the memory and the machine enters a standby status. If registration is done without loading a floppy disk, the following screen is displayed after the step 4 is finished. Load a floppy disk for data registration. BES-961BC • BES-1261BC 63
-
 1
1 -
2
-
3
-
4
-
5
-
6
-
7
-
8
-
9
-
10
-
11
-
12
-
13
-
14
-
15
-
16
-
17
-
18
-
19
-
20
-
21
-
22
-
23
-
24
-
25
-
26
-
27
-
28
-
29
-
30
-
31
-
32
-
33
-
34
-
35
-
36
-
37
-
38
-
39
-
40
-
41
-
42
-
43
-
44
-
45
-
46
-
47
-
48
-
49
-
50
-
51
-
52
-
53
-
54
-
55
-
56
-
57
-
58
-
59
-
 60
60 -
 61
61 -
 62
62 -
 63
63 -
 64
64 -
 65
65 -
 66
66 -
 67
67 -
 68
68 -
 69
69 -
 70
70 -
71
-
72
-
73
-
74
-
75
-
76
-
77
-
78
-
79
-
80
-
81
-
82
-
83
-
84
-
85
-
86
-
87
-
88
-
89
-
90
-
91
-
92
-
93
-
94
-
95
-
96
-
97
-
98
-
99
-
100
-
101
-
102
-
103
-
104
-
105
-
106
-
107
-
108
-
109
-
110
-
111
-
112
-
113
-
114
-
115
-
116
-
117
-
118
-
119
-
120
-
121
-
122
-
123
-
124
-
125
-
126
-
127
-
128
-
129
-
130
-
131
-
132
-
133
-
134
-
135
-
136
-
137
-
138
-
139
-
140
-
141
-
142
-
143
-
144
-
145
-
146
-
147
-
148
-
149
-
150
-
151
-
152
-
153
-
154
-
155
-
156
-
157
-
158
-
159
-
160
-
161
-
162
-
163
-
164
 |
 |