Brother International CS-6000/6000b/6000t Operation Manual - Page 20
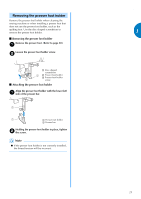
Installing the needle clamp
 |
View all Brother International CS-6000/6000b/6000t manuals
Add to My Manuals
Save this manual to your list of manuals |
Page 20 highlights
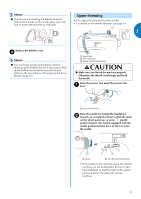
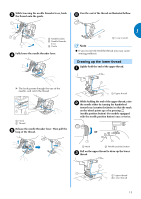
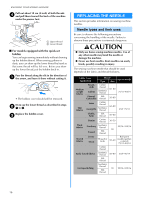
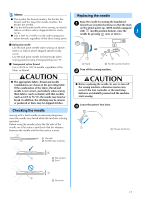
KNOWING YOUR SEWING MACHINE Remove the needle by turning the needle clamp d screw counterclockwise. Note ● If the needle clamp screw is loosened too much, the needle clamp (which holds the needle) may fall off. Therefore, do not loosen the needle clamp screw too much. a Disc-shaped screwdriver b Needle clamp screw • Do not apply strong force when loosening or tightening the needle clamp screw, otherwise certain parts of the sewing machine may be damaged. Install the twin needle in the same way. CAUTION ● Be sure to insert the needle until it touches the needle stopper and securely tighten the needle clamp screw with the disc-shaped screwdriver, otherwise the needle may break or damage may result. ■ Installing the needle clamp If the needle clamp is removed, follow the procedure below to attach it to the needle bar. As seen from the front of the machine, slide the a needle clamp onto the needle bar so that the needle clamp screw is on the right side and the needle bar thread guide is at the bottom. With the flat side of the needle toward the rear e of the machine, insert the needle until it touches the needle stopper. a Needle stopper Tighten the needle clamp screw by turning it f clockwise. a Needle clamp screw b Needle bar thread guide c Needle bar Align the bottom edge of the needle holder with b the end of the needle bar, and then tighten the needle clamp screw. a Needle bar b Needle holder c Needle clamp screw d Align 18
-
 1
1 -
2
-
3
-
4
-
5
-
6
-
7
-
8
-
9
-
10
-
11
-
12
-
13
-
14
-
 15
15 -
 16
16 -
 17
17 -
 18
18 -
 19
19 -
 20
20 -
 21
21 -
 22
22 -
 23
23 -
 24
24 -
 25
25 -
26
-
27
-
28
-
29
-
30
-
31
-
32
-
33
-
34
-
35
-
36
-
37
-
38
-
39
-
40
-
41
-
42
-
43
-
44
-
45
-
46
-
47
-
48
-
49
-
50
-
51
-
52
-
53
-
54
-
55
-
56
-
57
-
58
-
59
-
60
 |
 |
