Brother International CS-6000/6000b/6000t Operation Manual - Page 35
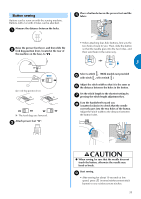
Button sewing
 |
View all Brother International CS-6000/6000b/6000t manuals
Add to My Manuals
Save this manual to your list of manuals |
Page 35 highlights
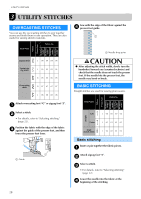
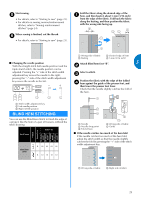
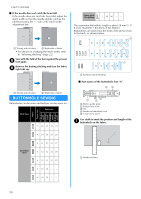
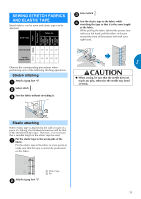
Button sewing Buttons can be sewn on with the sewing machine. Buttons with 2 or with 4 holes can be attached. Measure the distance between the holes. a Place a button between the presser foot and the d fabric. Raise the presser foot lever, and then slide the b feed dog position lever, located at the rear of the machine on the base, to . • When attaching four-hole buttons, first sew the two holes closest to you. Then, slide the button so that the needle goes into the two holes, and then sew them in the same way. 3 a Feed dog position lever The feed dogs are lowered. Attach presser foot "M". c Select a stitch . (With models not provided e with stitch , select stitch .) Adjust the stitch width so that it is the same as f the distance between the holes in the button. Set the stitch length to the shortest setting by g pressing the stitch length adjustment key. Turn the handwheel toward you h (counterclockwise) to check that the needle correctly goes into the two holes of the button. Adjust the stitch width to the distance between the button holes. CAUTION ● When sewing, be sure that the needle does not touch the button, otherwise the needle may bend or break. Start sewing. i • After sewing for about 10 seconds at low speed, press (reverse/reinforcement stitch button) to sew reinforcement stitches. 33
-
 1
1 -
2
-
3
-
4
-
5
-
6
-
7
-
8
-
9
-
10
-
11
-
12
-
13
-
14
-
15
-
16
-
17
-
18
-
19
-
20
-
21
-
22
-
23
-
24
-
25
-
26
-
27
-
28
-
29
-
 30
30 -
 31
31 -
 32
32 -
 33
33 -
 34
34 -
 35
35 -
 36
36 -
 37
37 -
 38
38 -
 39
39 -
 40
40 -
41
-
42
-
43
-
44
-
45
-
46
-
47
-
48
-
49
-
50
-
51
-
52
-
53
-
54
-
55
-
56
-
57
-
58
-
59
-
60
 |
 |
