Brother International DCP 110c Users Manual - English - Page 87
Replacing the ink cartridges, Ink Empty Black, Cover is Open
 |
UPC - 012502613244
View all Brother International DCP 110c manuals
Add to My Manuals
Save this manual to your list of manuals |
Page 87 highlights
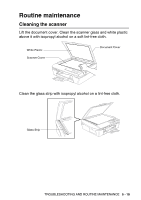
Replacing the ink cartridges Your DCP is equipped with an ink dot counter. The ink dot counter automatically monitors the level of ink in each of the four cartridges. When the DCP detects an ink cartridge is running out of ink, the DCP will notify you with a message on the LCD. The LCD will inform you which ink cartridge is low or needs replacing. Be sure to follow the LCD prompts to replace the ink cartridges in the correct order. Even though the DCP informs you that an ink cartridge is empty, there will be a small amount of ink remaining in the ink cartridge. It is necessary to keep some ink in the ink cartridge to prevent air from drying out and damaging the print head assembly. 1 Lift the scanner cover from the right-hand side of the DCP until it locks securely into the open position. If one or more ink cartridges are empty, for example Black, the LCD shows Ink Empty Black and Cover is Open. 2 Pull the ink cartridge hook toward you and remove the ink cartridge for the color shown on the LCD. Ink Cartridge Hook Empty Ink Cartridge 3 Open the new ink cartridge bag for the color shown on the LCD, and then take out the ink cartridge. TROUBLESHOOTING AND ROUTINE MAINTENANCE 5 - 20
-
 1
1 -
2
-
3
-
4
-
5
-
6
-
7
-
8
-
9
-
10
-
11
-
12
-
13
-
14
-
15
-
16
-
17
-
18
-
19
-
20
-
21
-
22
-
23
-
24
-
25
-
26
-
27
-
28
-
29
-
30
-
31
-
32
-
33
-
34
-
35
-
36
-
37
-
38
-
39
-
40
-
41
-
42
-
43
-
44
-
45
-
46
-
47
-
48
-
49
-
50
-
51
-
52
-
53
-
54
-
55
-
56
-
57
-
58
-
59
-
60
-
61
-
62
-
63
-
64
-
65
-
66
-
67
-
68
-
69
-
70
-
71
-
72
-
73
-
74
-
75
-
76
-
77
-
78
-
79
-
80
-
81
-
 82
82 -
 83
83 -
 84
84 -
 85
85 -
 86
86 -
 87
87 -
 88
88 -
 89
89 -
 90
90 -
 91
91 -
 92
92 -
93
-
94
-
95
-
96
-
97
-
98
-
99
-
100
-
101
-
102
-
103
-
104
-
105
-
106
-
107
 |
 |
