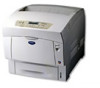
Brother International HL-4200CN Quick Setup Guide - English - Page 14
Install the Print Head Cartridge, Pull the protective sheet on the cartridge - windows 7 driver
 |
View all Brother International HL-4200CN manuals
Add to My Manuals
Save this manual to your list of manuals |
Page 14 highlights
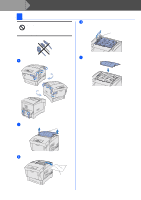
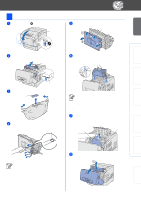
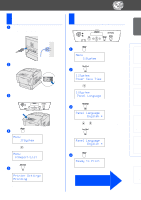
Setting Up Your Printer 2 Install the Print Head Cartridge 1 Push up button to open the front cover. Front Cover 5 Remove the protective packing. Protective Packing Windows® USB Windows® Parallel Installing the Driver Windows® Network Macintosh ® USB 2 Push the button to open the paper outlet cover. Paper Outlet Cover 6 Align the rollers of the print head cartridge with the slots, and then gently lower it into the printer. Button 3 Unpack the print head cartridge. Tear off Protective Packing Print Head Cartridge 4 Pull the 4 seals firmly to remove them completely. Check for a circle on the end of the seal. ■ Lowering the cartridge into the printer without correctly aligning the rollers with the slots can damage the cartridge. ■ Do not allow the surface covered with a protective sheet to come to into the contact with anything. 7 Pull the protective sheet on the cartridge straight up to remove it. Note: Do not touch the transfer roller. Protective Sheet Transfer Roller Seals If there is no circle on the end of the seal, you can not use this print head cartridge. Contact your dealer for assistance. 8 Close the paper outlet cover. Close the front cover. 13 Macintosh ® Network Fo r Administrators
-
 1
1 -
2
-
3
-
4
-
5
-
6
-
7
-
8
-
 9
9 -
 10
10 -
 11
11 -
 12
12 -
 13
13 -
 14
14 -
 15
15 -
 16
16 -
 17
17 -
 18
18 -
 19
19 -
20
-
21
-
22
-
23
-
24
-
25
-
26
-
27
-
28
-
29
-
30
-
31
-
32
-
33
-
34
-
35
-
36
-
37
-
38
-
39
-
40
-
41
 |
 |
