Brother International HL-4200CN Quick Setup Guide - English - Page 33
For Network Interface Cable Users, For Mac OS® 8.6 to 9.2 Users
 |
View all Brother International HL-4200CN manuals
Add to My Manuals
Save this manual to your list of manuals |
Page 33 highlights
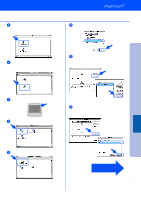
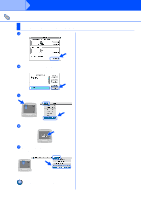
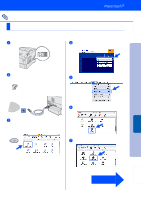
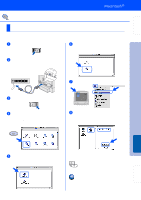
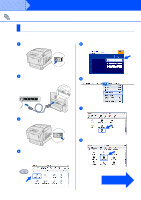
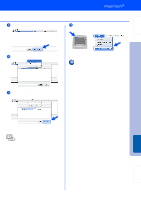
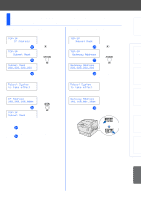
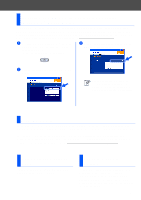
Setting Up Your Printer For Network Interface Cable Users For Mac OS® 8.6 to 9.2 Users Connecting the Printer to Your Network & Installing the PPD File and Adobe PS Driver 1 Turn off the printer power switch. 6 Double-click the AdobePS Installer icon to install the PS driver. Follow the instructions on the screen. 2 Connect the network interface cable to the printer, and then connect it to a free port on your hub. Hub 7 Open the Chooser from the Apple Menu. 3 Turn on the printer power switch. 4 Insert the CD-ROM for Macintosh into your CD-ROM drive. Open the Mac OS 9 folder. Open your language folder. 8 Click the AdobePS icon, and then select BRN_xxxxxx_P1_AT. *1 Click the Create button. Close the Chooser. Installing the Driver Macintosh® Network Fo r Administrators 5 Double-click the PPD Installer icon to install the PPD file. Follow the instructions on the screen. *1 xxxxxx are the last six digits of the Ethernet address. Network User's Guide Chapter 7. The setup is now complete. 32
-
 1
1 -
2
-
3
-
4
-
5
-
6
-
7
-
8
-
9
-
10
-
11
-
12
-
13
-
14
-
15
-
16
-
17
-
18
-
19
-
20
-
21
-
22
-
23
-
24
-
25
-
26
-
27
-
 28
28 -
 29
29 -
 30
30 -
 31
31 -
 32
32 -
 33
33 -
 34
34 -
 35
35 -
 36
36 -
 37
37 -
 38
38 -
39
-
40
-
41
 |
 |
