Brother International HL-4200CN Quick Setup Guide - English - Page 26
For Network Shared Printer Users
 |
View all Brother International HL-4200CN manuals
Add to My Manuals
Save this manual to your list of manuals |
Page 26 highlights
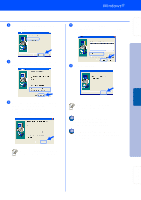
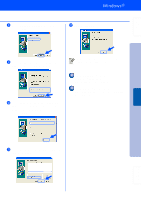
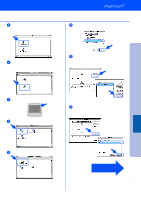
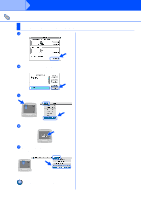
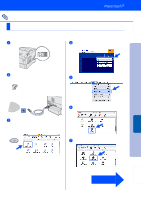
Step 2 Installing the Driver For Network Interface Cable Users For Network Shared Printer Users If you are going to connect the printer to your network, we recommended that you contact your system administrator prior to installation. Connecting the Cable, Installing the Driver and Selecting the Appropriate Printer Queue or 'Share name' 1 Turn off the printer power switch. 5 Click Install Software on the Menu screen. 2 Connect the network interface cable to the printer, and then connect it to a free port on your hub. Hub 6 Depending on the paper size you plan on using, select Standard Driver - default A4 (Recommended) or Standard Driver default Letter (Recommended). 3 Turn on the printer power switch. 7 Click the Next button. Follow the instructions on the screen. 4 Insert the CD-ROM for Windows into your CD-ROM drive. The opening screen will appear automatically. Follow the instructions on the screen. 25
-
 1
1 -
2
-
3
-
4
-
5
-
6
-
7
-
8
-
9
-
10
-
11
-
12
-
13
-
14
-
15
-
16
-
17
-
18
-
19
-
20
-
 21
21 -
 22
22 -
 23
23 -
 24
24 -
 25
25 -
 26
26 -
 27
27 -
 28
28 -
 29
29 -
 30
30 -
 31
31 -
32
-
33
-
34
-
35
-
36
-
37
-
38
-
39
-
40
-
41
 |
 |
