Brother International HL-L3270CDW Online Users Guide HTML - Page 80
Con Your Machine for a Wireless Network Using the One Push Method of Wi-Fi Protected Setup™ (WPS)
 |
View all Brother International HL-L3270CDW manuals
Add to My Manuals
Save this manual to your list of manuals |
Page 80 highlights
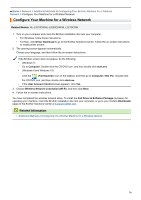
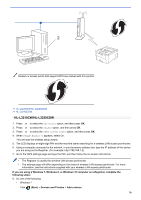
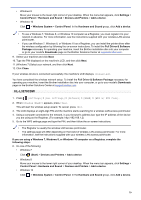
Home > Network > Additional Methods of Configuring Your Brother Machine for a Wireless Network > Configure Your Machine for a Wireless Network Using the One Push Method of Wi-Fi Protected Setup™ (WPS) Configure Your Machine for a Wireless Network Using the One Push Method of Wi-Fi Protected Setup™ (WPS) Related Models: HL-L3210CW/HL-L3230CDW/HL-L3270CDW If your wireless access point/router supports WPS (PBC: Push Button Configuration), you can use WPS from your machine's control panel menu to configure your wireless network settings. Routers or access points that support WPS are marked with this symbol: >> HL-L3210CW/HL-L3230CDW >> HL-L3270CDW HL-L3210CW/HL-L3230CDW 1. Press a or b to select the [Network] option, and then press OK. 2. Press a or b to select the [WLAN] option, and then press OK. 3. Press a or b to select the [WPS] option, and then press OK. 4. When [WLAN Enable?] appears, select On. This will start the wireless setup wizard. 5. When the LCD displays [Press Key on rtr], press the WPS button on your wireless access point/router. Press a on the machine's control panel. Your machine will automatically detect your wireless access point/ router and try to connect to your wireless network. If your wireless device is connected successfully, the machine's LCD displays [Connected]. You have completed the wireless network setup. To install the Full Driver & Software Package necessary for operating your machine, insert the Brother installation disc into your computer, or go to your model's Downloads page on the Brother Solutions Center at support.brother.com. HL-L3270CDW 1. Press [Settings] > [All Settings] > [Network] > [WLAN] > [WPS]. 2. When [Enable WLAN?] appears, press [Yes]. This will start the wireless setup wizard. To cancel, press [No]. 3. When the touchscreen displays [Start WPS on your wireless access point/router, then press [OK].], press the WPS button on your wireless access point/router. Then press [OK] on your machine. Your machine will automatically detect your wireless access point/router and try to connect to your wireless network. If your wireless device is connected successfully, the machine's LCD displays [Connected]. 75
-
 1
1 -
2
-
3
-
4
-
5
-
6
-
7
-
8
-
9
-
10
-
11
-
12
-
13
-
14
-
15
-
16
-
17
-
18
-
19
-
20
-
21
-
22
-
23
-
24
-
25
-
26
-
27
-
28
-
29
-
30
-
31
-
32
-
33
-
34
-
35
-
36
-
37
-
38
-
39
-
40
-
41
-
42
-
43
-
44
-
45
-
46
-
47
-
48
-
49
-
50
-
51
-
52
-
53
-
54
-
55
-
56
-
57
-
58
-
59
-
60
-
61
-
62
-
63
-
64
-
65
-
66
-
67
-
68
-
69
-
70
-
71
-
72
-
73
-
74
-
 75
75 -
 76
76 -
 77
77 -
 78
78 -
 79
79 -
 80
80 -
 81
81 -
 82
82 -
 83
83 -
 84
84 -
 85
85 -
86
-
87
-
88
-
89
-
90
-
91
-
92
-
93
-
94
-
95
-
96
-
97
-
98
-
99
-
100
-
101
-
102
-
103
-
104
-
105
-
106
-
107
-
108
-
109
-
110
-
111
-
112
-
113
-
114
-
115
-
116
-
117
-
118
-
119
-
120
-
121
-
122
-
123
-
124
-
125
-
126
-
127
-
128
-
129
-
130
-
131
-
132
-
133
-
134
-
135
-
136
-
137
-
138
-
139
-
140
-
141
-
142
-
143
-
144
-
145
-
146
-
147
-
148
-
149
-
150
-
151
-
152
-
153
-
154
-
155
-
156
-
157
-
158
-
159
-
160
-
161
-
162
-
163
-
164
-
165
-
166
-
167
-
168
-
169
-
170
-
171
-
172
-
173
-
174
-
175
-
176
-
177
-
178
-
179
-
180
-
181
-
182
-
183
-
184
-
185
-
186
-
187
-
188
-
189
-
190
-
191
-
192
-
193
-
194
-
195
-
196
-
197
-
198
-
199
-
200
-
201
-
202
-
203
-
204
-
205
-
206
-
207
-
208
-
209
-
210
-
211
-
212
-
213
-
214
-
215
-
216
-
217
-
218
-
219
-
220
-
221
-
222
-
223
-
224
-
225
-
226
-
227
-
228
-
229
-
230
-
231
-
232
-
233
-
234
-
235
-
236
-
237
-
238
-
239
-
240
-
241
-
242
-
243
-
244
-
245
-
246
-
247
-
248
-
249
-
250
-
251
-
252
-
253
-
254
-
255
-
256
-
257
-
258
-
259
-
260
-
261
-
262
-
263
-
264
-
265
-
266
-
267
-
268
-
269
-
270
-
271
-
272
-
273
-
274
-
275
-
276
-
277
-
278
-
279
-
280
-
281
-
282
-
283
-
284
-
285
-
286
-
287
-
288
-
289
-
290
-
291
-
292
-
293
-
294
-
295
-
296
-
297
-
298
-
299
-
300
-
301
-
302
-
303
-
304
-
305
-
306
-
307
-
308
-
309
-
310
-
311
-
312
-
313
-
314
-
315
-
316
-
317
-
318
-
319
-
320
-
321
-
322
-
323
-
324
-
325
-
326
-
327
-
328
-
329
-
330
-
331
-
332
-
333
-
334
-
335
-
336
-
337
-
338
-
339
-
340
-
341
-
342
-
343
-
344
-
345
-
346
-
347
-
348
-
349
-
350
-
351
-
352
-
353
-
354
-
355
-
356
-
357
 |
 |