Brother International Innov-is 85e Operation Manual - Page 136
bobbin case part code: XE7560-001
 |
View all Brother International Innov-is 85e manuals
Add to My Manuals
Save this manual to your list of manuals |
Page 136 highlights
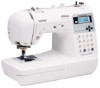
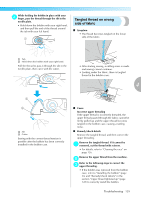
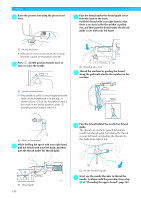
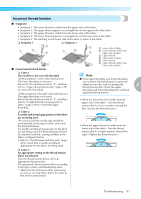
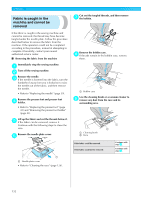
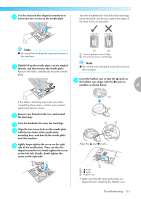
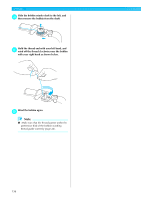
APPENDIX CAUTION ● Never use a bobbin case that is scratched, otherwise the upper thread may become tangled, the needle may break or sewing performance may suffer. For a new bobbin case (part code: XE7560-001), contact your nearest authorized service center. ● Make sure that you fit the bobbin case properly, otherwise the needle may break. ■ Checking machine operations If the needle plate has been removed, check machine operations to confirm that installation has been completed correctly. Turn on the machine. a Select 02 (middle needle position stitch). b Note z Do not yet install the presser foot and thread. Attach the needle plate cover according to q steps i in "Cleaning the race" (page 127). Check the condition of the needle, and then r install it. If the needle is in a poor condition, for example, if it is bent, be sure to install a new needle. • Refer to "Checking the needle" (page 39) and "Replacing the needle" (page 39). Slowly turn the handwheel toward you c (counterclockwise), and look from all sides to check that the needle falls at the center of the hole in the needle plate. If the needle contacts the needle plate, remove the needle plate, and then install it again, starting with step m in "Removing the fabric from the machine" (page 133). CAUTION ● Never use bent needles. Bent needles can easily break, possibly resulting in injuries. Note z After completing this procedure, continue with the following procedure in "Checking machine operations" to check that the machine is operating correctly. Memo z Since the needle may have been damaged when the fabric was caught in the machine, we recommend replacing it with a new one. a Hole in the needle plate b Handwheel Select zigzag stitch 05 . At this time, increase d the stitch length and width to their maximum settings. • For details on changing the settings, refer to "Adjusting the Stitch Width and Length" (page 58). Slowly turn the handwheel toward you e (counterclockwise) and check that the needle bar and feed dogs operate correctly. If the needle or feed dogs contact the needle plate, the machine may be malfunctioning; therefore, contact your nearest authorized service center. Turn off the machine, and then install the f bobbin and presser foot. • Refer to "Installing the bobbin" (page 26) and "Replacing the presser foot" (page 41). 134
-
 1
1 -
2
-
3
-
4
-
5
-
6
-
7
-
8
-
9
-
10
-
11
-
12
-
13
-
14
-
15
-
16
-
17
-
18
-
19
-
20
-
21
-
22
-
23
-
24
-
25
-
26
-
27
-
28
-
29
-
30
-
31
-
32
-
33
-
34
-
35
-
36
-
37
-
38
-
39
-
40
-
41
-
42
-
43
-
44
-
45
-
46
-
47
-
48
-
49
-
50
-
51
-
52
-
53
-
54
-
55
-
56
-
57
-
58
-
59
-
60
-
61
-
62
-
63
-
64
-
65
-
66
-
67
-
68
-
69
-
70
-
71
-
72
-
73
-
74
-
75
-
76
-
77
-
78
-
79
-
80
-
81
-
82
-
83
-
84
-
85
-
86
-
87
-
88
-
89
-
90
-
91
-
92
-
93
-
94
-
95
-
96
-
97
-
98
-
99
-
100
-
101
-
102
-
103
-
104
-
105
-
106
-
107
-
108
-
109
-
110
-
111
-
112
-
113
-
114
-
115
-
116
-
117
-
118
-
119
-
120
-
121
-
122
-
123
-
124
-
125
-
126
-
127
-
128
-
129
-
130
-
 131
131 -
 132
132 -
 133
133 -
 134
134 -
 135
135 -
 136
136 -
 137
137 -
 138
138 -
 139
139 -
 140
140 -
 141
141 -
142
-
143
-
144
-
145
-
146
-
147
-
148
-
149
-
150
-
151
-
152
 |
 |
