Brother International Innov-is NQ1600E Operation Manual - Page 20
Using the settings key
 |
View all Brother International Innov-is NQ1600E manuals
Add to My Manuals
Save this manual to your list of manuals |
Page 20 highlights
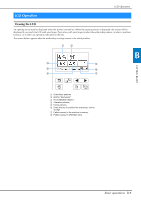
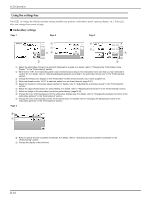
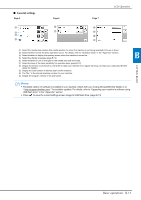
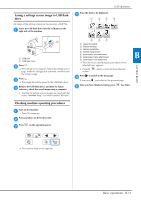
LCD Operation Using the settings key Press to change the default machine settings (needle stop position, embroidery speed, opening display, etc.). Press , after you changed necessary settings. ■ Embroidery settings Page 1 Page 2 Page 3 3 4 15 6 7 8 2 9 1 Select the embroidery frame to be used and displayed as a guide. For details, refer to "Changing the "Embroidery Frame Display"" in the "Embroidering" section. 2 When set to "ON", the embroidery pattern can be selected according to the embroidery frame size that you have selected in number 1. For details, refer to "Selecting/displaying patterns according to the embroidery frame size" in the "Embroidering" section. 3 Change the thread color display on the "Embroidery" screen; thread number, color name. (page B-37). 4 When the thread number "#123" is selected, select from six thread brands. (page B-37). 5 Adjust the maximum embroidery speed setting. For details, refer to "Adjusting the embroidery speed" in the "Embroidering" section. 6 Adjust the upper thread tension for embroidering. For details, refer to "Adjusting thread tension" in the "Embroidering" section. 7 Select the height of the embroidery foot during embroidering. (page B-29). 8 Change the color of the background for the embroidery display area. For details, refer to "Changing the background colors of the embroidery patterns" in the "Embroidering" section. 9 Change the color of the background for the thumbnail area. For details, refer to "Changing the background colors of the embroidery patterns" in the "Embroidering" section. Page 4 0 A 0 Press to specify the size of pattern thumbnails. For details, refer to "Specifying the size of pattern thumbnails" in the "Embroidering" section. A Change the display units (mm/inch). B-10
-
 1
1 -
2
-
3
-
4
-
5
-
6
-
7
-
8
-
9
-
10
-
11
-
12
-
13
-
14
-
 15
15 -
 16
16 -
 17
17 -
 18
18 -
 19
19 -
 20
20 -
 21
21 -
 22
22 -
 23
23 -
 24
24 -
 25
25 -
26
-
27
-
28
-
29
-
30
-
31
-
32
-
33
-
34
-
35
-
36
-
37
-
38
-
39
-
40
-
41
-
42
-
43
-
44
-
45
-
46
-
47
-
48
-
49
-
50
-
51
-
52
-
53
-
54
-
55
-
56
-
57
-
58
-
59
-
60
-
61
-
62
-
63
-
64
-
65
-
66
-
67
-
68
-
69
-
70
-
71
-
72
-
73
-
74
-
75
-
76
-
77
-
78
-
79
-
80
-
81
-
82
-
83
-
84
-
85
-
86
-
87
-
88
-
89
-
90
-
91
-
92
-
93
-
94
-
95
-
96
-
97
-
98
-
99
-
100
 |
 |
