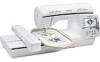
Brother International Innov-is NQ1600E Operation Manual - Page 8

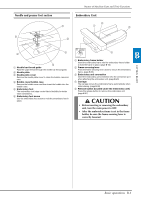
Basic operations, Embroidering - hoops

Page 8 highlights

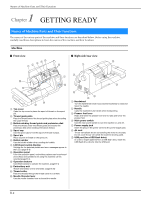
CONTENTS CONTENTS INTRODUCTION i IMPORTANT SAFETY INSTRUCTIONS i TRADEMARKS iv WHAT YOU CAN DO WITH THIS MACHINE ..... v B Basic operations Chapter 1 GETTING READY 2 Names of Machine Parts and Their Functions....... 2 Machine 2 Needle and presser foot section 3 Embroidery Unit 3 Operation buttons 4 Operation panel and operation keys 4 Included accessories 5 Optional accessories 6 Turning the Machine On/Off 7 Turning on the machine 8 Turning off the machine 8 Select machine setting for the first time 8 LCD Operation 9 Viewing the LCD 9 Using the settings key 10 Adjusting input sensitivity for operation keys 12 Saving a settings screen image to USB flash drive 13 Checking machine operating procedures 13 Winding/Installing the Bobbin 14 Winding the bobbin 14 Installing the bobbin 17 Upper Threading 19 Threading the upper thread 19 Threading the needle 21 Threading the needle manually (without using the needle threader 22 Replacing the Needle 23 Checking the needle 23 Replacing the needle 23 Chapter 2 STARTING TO EMBROIDER 25 Embroidery Step by Step 25 Attaching the Embroidery Unit 26 Embroidery Attractive Finishes 28 Preparing the Fabric 29 Attaching iron-on stabilizers (backing) to the fabric 29 Hooping the fabric in the embroidery frame 30 Embroidering small fabrics or fabric edges 32 Attaching the Embroidery Frame 33 Selecting Embroidery Patterns 34 Copyright information 34 Embroidery pattern types 34 Selecting an embroidery pattern 34 Confirming the Pattern Position 35 Checking the pattern position 35 Previewing the selected pattern 35 Embroidering 36 Embroidering a pattern 36 Changing the thread color display 37 E Embroidering Chapter 1 EMBROIDERY 2 Selecting Patterns 2 Selecting embroidery patterns/Brother "Exclusives"/floral alphabet patterns 2 Selecting character patterns 2 Selecting frame patterns 4 Editing Patterns 5 Moving the pattern 6 Changing the size of the pattern 6 Rotating the pattern 6 Changing the thread color 7 Creating a horizontal mirror image 7 Changing the density (alphabet character and frame patterns only 7 Deleting the pattern 7 Displaying patterns in the screen magnification 8 After editing 8 Editing Character Patterns 9 Changing the colors of alphabet character patterns 9 Switching between text written vertically and horizontally .... 9 Changing the font of entered characters 10 Changing character spacing 10 Reducing character spacing 10 Separating combined character patterns 10 Editing single characters 11 Changing the configuration of character patterns 12 Combining Patterns 13 Editing combined patterns 13 Embroidering combined patterns 14 Editing All Patterns 15 Moving the pattern 15 Rotating the pattern 15 Aligning the pattern and the needle 15 Embroidering linked characters 16 Embroidery Applications 18 Sewing embroidery patterns which use appliqu 18 Using a frame pattern to make an appliqué (1 20 Using a frame pattern to make an appliqué (2 21 Sewing split embroidery patterns 22 Adjustments During the Embroidery Process ..... 23 If the bobbin runs out of thread 23 If the thread breaks during sewing 24 Restarting from the beginning 24 Resuming embroidery after turning off the power 24 Making Embroidery Adjustments 26 Adjusting thread tension 26 Adjusting the bobbin case (with no color on the screw) ....... 27 Using the automatic thread cutting function (END COLOR TRIM 28 Using the Thread Trimming Function (JUMP STITCH TRIM 28 Adjusting the embroidery speed 28 Changing the "Embroidery Frame Display 29 Selecting/displaying patterns according to the embroidery frame size 30 Changing the background colors of the embroidery patterns 30 Specifying the size of pattern thumbnails 31 Using the Memory Function 32 Embroidery data precautions 32 Saving embroidery patterns in the machine's memory ......... 33 Saving embroidery patterns to USB flash drive 34 Retrieving patterns from the machine's memory 34 Recalling from USB flash drive 35 vi

  • 1
  • 2
  • 3
  • 4
  • 5
  • 6
  • 7
  • 8
  • 9
  • 10
  • 11
  • 12
  • 13
  • 14
  • 15
  • 16
  • 17
  • 18
  • 19
  • 20
  • 21
  • 22
  • 23
  • 24
  • 25
  • 26
  • 27
  • 28
  • 29
  • 30
  • 31
  • 32
  • 33
  • 34
  • 35
  • 36
  • 37
  • 38
  • 39
  • 40
  • 41
  • 42
  • 43
  • 44
  • 45
  • 46
  • 47
  • 48
  • 49
  • 50
  • 51
  • 52
  • 53
  • 54
  • 55
  • 56
  • 57
  • 58
  • 59
  • 60
  • 61
  • 62
  • 63
  • 64
  • 65
  • 66
  • 67
  • 68
  • 69
  • 70
  • 71
  • 72
  • 73
  • 74
  • 75
  • 76
  • 77
  • 78
  • 79
  • 80
  • 81
  • 82
  • 83
  • 84
  • 85
  • 86
  • 87
  • 88
  • 89
  • 90
  • 91
  • 92
  • 93
  • 94
  • 95
  • 96
  • 97
  • 98
  • 99
  • 100

CONTENTS
vi
INTRODUCTION
..................................................
i
IMPORTANT SAFETY INSTRUCTIONS
.................
i
TRADEMARKS
.....................................................
iv
WHAT YOU CAN DO WITH THIS MACHINE
.....
v
B
Basic operations
Chapter 1 GETTING READY
2
Names of Machine Parts and Their Functions
.......
2
Machine
.................................................................................
2
Needle and presser foot section
...................................................
3
Embroidery Unit
.....................................................................
3
Operation buttons
..................................................................
4
Operation panel and operation keys
.......................................
4
Included accessories
..............................................................
5
Optional accessories
..............................................................
6
Turning the Machine On/Off
................................
7
Turning on the machine
.........................................................
8
Turning off the machine
.........................................................
8
Select machine setting for the first time
..................................
8
LCD Operation
.....................................................
9
Viewing the LCD
....................................................................
9
Using the settings key
...........................................................
10
Adjusting input sensitivity for operation keys
........................
12
Saving a settings screen image to USB flash drive
.................
13
Checking machine operating procedures
..............................
13
Winding/Installing the Bobbin
............................
14
Winding the bobbin
.............................................................
14
Installing the bobbin
.............................................................
17
Upper Threading
................................................
19
Threading the upper thread
..................................................
19
Threading the needle
............................................................
21
Threading the needle manually (without using the needle
threader)
...............................................................................
22
Replacing the Needle
..........................................
23
Checking the needle
.............................................................
23
Replacing the needle
............................................................
23
Chapter 2 STARTING TO EMBROIDER
25
Embroidery Step by Step
.....................................
25
Attaching the Embroidery Unit
...........................
26
Embroidery Attractive Finishes
...........................
28
Preparing the Fabric
...........................................
29
Attaching iron-on stabilizers (backing) to the fabric
..............
29
Hooping the fabric in the embroidery frame
.........................
30
Embroidering small fabrics or fabric edges
...........................
32
Attaching the Embroidery Frame
........................
33
Selecting Embroidery Patterns
............................
34
Copyright information
..........................................................
34
Embroidery pattern types
......................................................
34
Selecting an embroidery pattern
...........................................
34
Confirming the Pattern Position
.........................
35
Checking the pattern position
...............................................
35
Previewing the selected pattern
............................................
35
Embroidering
......................................................
36
Embroidering a pattern
.........................................................
36
Changing the thread color display
........................................
37
E
Embroidering
Chapter 1 EMBROIDERY
2
Selecting Patterns
.................................................
2
Selecting embroidery patterns/Brother “Exclusives”/floral
alphabet patterns
...................................................................
2
Selecting character patterns
...................................................
2
Selecting frame patterns
.........................................................
4
Editing Patterns
....................................................
5
Moving the pattern
................................................................
6
Changing the size of the pattern
.............................................
6
Rotating the pattern
...............................................................
6
Changing the thread color
.....................................................
7
Creating a horizontal mirror image
........................................
7
Changing the density (alphabet character and frame
patterns only)
.........................................................................
7
Deleting the pattern
...............................................................
7
Displaying patterns in the screen magnification
.....................
8
After editing
...........................................................................
8
Editing Character Patterns
...................................
9
Changing the colors of alphabet character patterns
................
9
Switching between text written vertically and horizontally
....
9
Changing the font of entered characters
...............................
10
Changing character spacing
.................................................
10
Reducing character spacing
.................................................
10
Separating combined character patterns
..............................
10
Editing single characters
......................................................
11
Changing the configuration of character patterns
.................
12
Combining Patterns
............................................
13
Editing combined patterns
...................................................
13
Embroidering combined patterns
.........................................
14
Editing All Patterns
.............................................
15
Moving the pattern
..............................................................
15
Rotating the pattern
.............................................................
15
Aligning the pattern and the needle
.....................................
15
Embroidering linked characters
............................................
16
Embroidery Applications
....................................
18
Sewing embroidery patterns which use appliqué
.................
18
Using a frame pattern to make an appliqué (1)
.....................
20
Using a frame pattern to make an appliqué (2)
.....................
21
Sewing split embroidery patterns
.........................................
22
Adjustments During the Embroidery Process
.....
23
If the bobbin runs out of thread
............................................
23
If the thread breaks during sewing
.......................................
24
Restarting from the beginning
..............................................
24
Resuming embroidery after turning off the power
................
24
Making Embroidery Adjustments
.......................
26
Adjusting thread tension
......................................................
26
Adjusting the bobbin case (with no color on the screw)
.......
27
Using the automatic thread cutting function
(END COLOR TRIM)
............................................................
28
Using the Thread Trimming Function
(JUMP STITCH TRIM)
..........................................................
28
Adjusting the embroidery speed
...........................................
28
Changing the “Embroidery Frame Display”
..........................
29
Selecting/displaying patterns according to the embroidery
frame size
............................................................................
30
Changing the background colors of the embroidery
patterns
................................................................................
30
Specifying the size of pattern thumbnails
.............................
31
Using the Memory Function
...............................
32
Embroidery data precautions
...............................................
32
Saving embroidery patterns in the machine’s memory
.........
33
Saving embroidery patterns to USB flash drive
.....................
34
Retrieving patterns from the machine’s memory
..................
34
Recalling from USB flash drive
............................................
35
CONTENTS