Brother International MFC 3220C Quick Setup Guide - English - Page 11
Step A: Color Block Quality Check, Step B: Alignment Check, Is Step A OK?, Yes 2.No, Black OK?
 |
UPC - 012502607106
View all Brother International MFC 3220C manuals
Add to My Manuals
Save this manual to your list of manuals |
Page 11 highlights
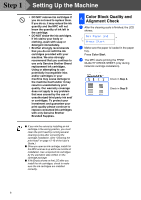
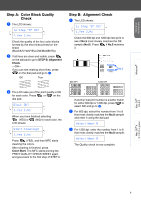
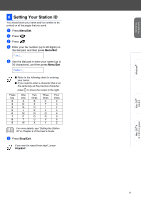
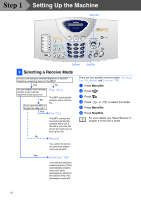
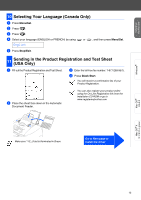
Setting Up the Machine Windows® Step A: Color Block Quality Check 1 The LCD shows: Is Step "A" OK? 1.Yes 2.No Check the quality of the four color blocks formed by the short lines printed on the sheet. (BLACK/CYAN/YELLOW/MAGENTA) 2 If all lines are clear and visible, press on the dial pad to go to STEP B: Alignment Check. ---OR--If you can see missing short lines, press on the dial pad and go to 3. OK Poor Step B: Alignment Check 1 The LCD shows: Is Step "B" OK? 1.Yes 2.No Check the 600 dpi and 1200 dpi test print to see if No.5 most closely matches the OK sample (No.0). Press if No.5 matches it. 600 DPI No.5 1200 DPI 3 The LCD asks you if the print quality is OK for each color. Press or on the dial pad. Black OK? 1.Yes 2.No When you have finished selecting (YES) or (NO) for each color, the LCD shows: Start Cleaning? 1.Yes 2.No Press (YES), and then MFC starts cleaning the colors. After cleaning is finished, press Color Start. The MFC starts printing the PRINT QUALITY CHECK SHEET again and goes back to the first step of STEP A. If another test print number is a better match for either 600 dpi or 1200 dpi, press to select NO and go to 2. 2 For 600 dpi, select the number from 1 to 8 that most closely matches the No.0 sample and enter it using the dial pad. Select Best # 3 For 1200 dpi, enter the number from 1 to 8 that most closely matches the No.0 sample. Select Best # The Quality check is now complete. Mac OS® 8.6-9.2 Mac OS® X 10.1/10.2.1 or greater 9
-
 1
1 -
2
-
3
-
4
-
5
-
 6
6 -
 7
7 -
 8
8 -
 9
9 -
 10
10 -
 11
11 -
 12
12 -
 13
13 -
 14
14 -
 15
15 -
 16
16 -
17
-
18
-
19
-
20
-
21
-
22
-
23
-
24
-
25
-
26
-
27
-
28
-
29
-
30
-
31
 |
 |
