Brother International MFC 7440N Quick Setup Guide - English - Page 20
Con IP Address, Change the Firewall - driver windows 10
 |
UPC - 012502620631
View all Brother International MFC 7440N manuals
Add to My Manuals
Save this manual to your list of manuals |
Page 20 highlights
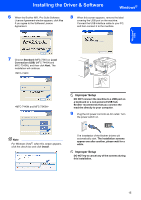
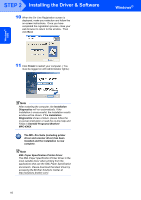
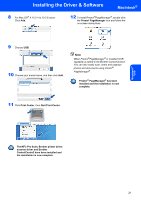
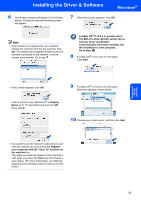
Windows® Wired Network STEP 2 Installing the Driver & Software Windows® 7 After reading and accepting the ScanSoft™ PaperPort™ 11SE License Agreement, click Yes. 10 For Windows® XP SP2/XP Professional x64 Edition/Windows Vista® users, when this screen appears, choose Change the Firewall port settings to enable network connection and continue with the installation. (Recommended) and click Next. The installation of ScanSoft™ PaperPort™ 11SE will automatically start and is followed by the installation of MFL-Pro Suite. 8 When the Brother MFL-Pro Suite Software License Agreement window appears, click Yes if you agree to the Software License Agreement. 9 Choose Network Connection, and then click Next. If you are not using the Windows® Firewall, see the User's Guide for your software for information on how to add the following network ports. „ For network scanning, add UDP port 54925. „ For network PC-Fax receiving, add UDP port 54926. „ If you still have trouble with your network connection, add UDP port 137. 11 If the machine is configured for your network, choose the machine from the list, and then click Next. If your machine shows APIPA in the IP Address field, click Configure IP Address and enter an IP address for your machine that is suitable for your network. Note • You can find your machine's IP address and the node name by printing out the Network Configuration List. See Print the Network Configuration List on page 27 • If the machine is not yet configured for use on your network, the following screen appears. 18
-
 1
1 -
2
-
3
-
4
-
5
-
6
-
7
-
8
-
9
-
10
-
11
-
12
-
13
-
14
-
 15
15 -
 16
16 -
 17
17 -
 18
18 -
 19
19 -
 20
20 -
 21
21 -
 22
22 -
 23
23 -
 24
24 -
 25
25 -
26
-
27
-
28
-
29
-
30
-
31
-
32
 |
 |
