Table of Contents
1
Getting Started
Carton components
......................................................................................................................................
2
Control panel
................................................................................................................................................
3
STEP 1 –
Setting Up the Machine
Installing the drum unit and toner cartridge assembly
..................................................................................
4
Loading paper in the paper tray
...................................................................................................................
5
Install the power cord and phone line
..........................................................................................................
6
Selecting your language
..............................................................................................................................
7
Setting the LCD contrast
..............................................................................................................................
7
Setting the date and time
.............................................................................................................................
7
Setting your station ID
..................................................................................................................................
8
Automatic Daylight Savings Time
................................................................................................................
8
Choosing the correct Receive Mode
............................................................................................................
9
Tone and pulse dialing mode (Canada only)
.............................................................................................
10
Dial Prefix
...................................................................................................................................................
10
Sending in the product registration and test sheet (USA only)
..................................................................
11
STEP 2 –
Installing the Driver & Software
Windows
®
For USB Interface Cable Users
(For Windows
®
2000 Professional/XP/XP Professional x64 Edition/Windows Vista
®
)
.............................
14
For Wired Network Interface Users (MFC-7440N and MFC-7345N only)
(For Windows
®
2000 Professional/XP/XP Professional x64 Edition/Windows Vista
®
)
.............................
17
For Windows Server® 2003, see the Network User’s Guide on the CD-ROM.
Macintosh
®
For USB Interface Cable Users
.................................................................................................................
20
For Mac OS
®
X 10.2.4 or greater
.........................................................................................................
20
For Wired Network Interface Users (MFC-7440N and MFC-7345N only)
.................................................
22
For Mac OS
®
X 10.2.4 or greater
.........................................................................................................
22
For Network Users
BRAdmin Light utility (For Windows
®
users)
..............................................................................................
25
Installing the BRAdmin Light configuration utility
..................................................................................
25
Setting your IP address, Subnet Mask and Gateway using BRAdmin Light
........................................
25
BRAdmin Light utility (For Mac OS
®
X users)
............................................................................................
26
Setting your IP address, Subnet Mask and Gateway using BRAdmin Light
........................................
26
Web Based Management (web browser)
...................................................................................................
27
Restoring the network settings to factory default
.......................................................................................
27
Print the Network Configuration List
...........................................................................................................
27
Consumables and Options
Consumables
.............................................................................................................................................
28
 1
1 2
2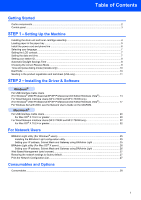 3
3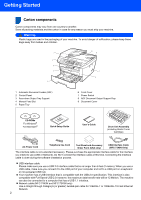 4
4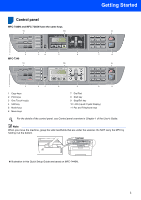 5
5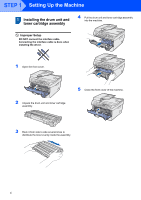 6
6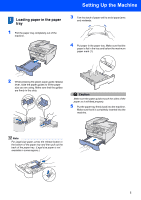 7
7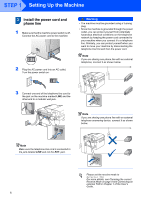 8
8 9
9