Brother International QL-810W Users Guide - Page 20
Turning Power On/Off, Setting LCD Language (QL-820NWB only), Setting the Time and Date (QL-820NWB
 |
View all Brother International QL-810W manuals
Add to My Manuals
Save this manual to your list of manuals |
Page 20 highlights
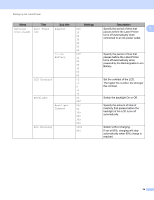
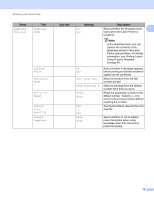
Setting Up the Label Printer Turning Power On/Off On: Press the Power ( ) Button to turn the Label Printer On. The Status LED turns green. Off: Press and hold the Power ( ) Button again to turn the Label Printer Off. Important When turning the Label Printer Off, do not remove the battery or disconnect the AC Adapter until the orange Status LED turns Off. 1 1 Setting LCD Language (QL-820NWB only) 1 a Press the Menu Button. b Press the ▲ or ▼ Button to select the [Administration] menu, and then press the OK Button. c Select [ Language], scroll to select your language, and then press the OK Button. Note The first time you start up the Label Printer, the language configuration is automatically displayed without going through the menu. Setting the Time and Date (QL-820NWB only) 1 Adjust the clock to the current time and date. The time and date set here are displayed on the main screen. a Press the Menu, ▲, or ▼ Button to select the [Settings] menu, and then press the OK Button. b Select [Set Clock] using ▲ or ▼ Button, and then press the OK Button. The clock setting screen appears. c Use ▲ or ▼ to specify the last two digits of the year, and then press the OK Button. Specify two digits for the month and day in the same way. d Use ▲ or ▼ to specify two digits each for the hours and minutes, and then select [AM], [PM] or [24]. e Press the OK Button. The [Settings] menu is displayed. Note The format for the time and date can be changed. Select [Administration], and then select [Date Format] or [Time Format] to specify the setting. 10
-
 1
1 -
2
-
3
-
4
-
5
-
6
-
7
-
8
-
9
-
10
-
11
-
12
-
13
-
14
-
 15
15 -
 16
16 -
 17
17 -
 18
18 -
 19
19 -
 20
20 -
 21
21 -
 22
22 -
 23
23 -
 24
24 -
 25
25 -
26
-
27
-
28
-
29
-
30
-
31
-
32
-
33
-
34
-
35
-
36
-
37
-
38
-
39
-
40
-
41
-
42
-
43
-
44
-
45
-
46
-
47
-
48
-
49
-
50
-
51
-
52
-
53
-
54
-
55
-
56
-
57
-
58
-
59
-
60
-
61
-
62
-
63
-
64
-
65
-
66
-
67
-
68
-
69
-
70
-
71
-
72
-
73
-
74
-
75
-
76
-
77
-
78
-
79
-
80
-
81
-
82
-
83
-
84
-
85
-
86
-
87
-
88
-
89
-
90
-
91
-
92
-
93
-
94
-
95
-
96
-
97
-
98
-
99
-
100
-
101
-
102
-
103
-
104
-
105
-
106
-
107
-
108
-
109
-
110
-
111
-
112
-
113
-
114
-
115
-
116
-
117
-
118
-
119
-
120
-
121
-
122
-
123
-
124
-
125
-
126
-
127
-
128
-
129
-
130
-
131
-
132
-
133
-
134
-
135
-
136
-
137
-
138
-
139
-
140
-
141
-
142
-
143
-
144
-
145
-
146
-
147
-
148
-
149
-
150
-
151
-
152
-
153
-
154
-
155
-
156
-
157
-
158
-
159
-
160
-
161
-
162
-
163
-
164
-
165
-
166
-
167
-
168
-
169
-
170
-
171
-
172
-
173
-
174
-
175
-
176
-
177
-
178
-
179
-
180
-
181
-
182
-
183
-
184
-
185
-
186
-
187
-
188
-
189
-
190
-
191
-
192
-
193
-
194
-
195
-
196
-
197
-
198
-
199
-
200
-
201
-
202
-
203
-
204
-
205
-
206
-
207
-
208
-
209
-
210
-
211
-
212
-
213
-
214
 |
 |
