Brother International QL-810W Users Guide - Page 35
Infrastructure and Wireless Direct, Infrastructure or Ad-hoc
 |
View all Brother International QL-810W manuals
Add to My Manuals
Save this manual to your list of manuals |
Page 35 highlights
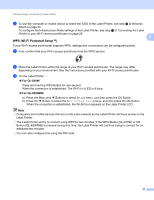
Printing Using a Computer (P-touch Editor) 2 Press and hold the Cutter ( ) Button and the Power ( ) Button for about one second. The Status LED starts blinking in green. 3 The Status LED is lit in orange, the Editor Lite LED flashes in green and the Wi-Fi LED flashes in blue. While pressing the Power ( ) Button, press the Cutter ( ) Button once and the Status LED lights in 2 orange. 4 Release the Power ( ) Button. Then the Status LED is lit in orange, the Editor Lite LED flashes in green and the Wi-Fi LED flashes in blue. The Wi-Fi settings of the printer is reset. For QL-820NWB Select [Network Reset] from the menu. For more information, see LCD Settings on page 12. Note • We recommend making a note of the SSID (network name) and password (network key) of the wireless network in advance. • To achieve the best results with normal everyday document printing, use the Label Printer as close to the Wi-Fi access point/router as possible with minimal obstructions. Large objects and walls between the two devices as well as interference from other electronic devices can affect communication, or the data transfer speed of your documents. Connecting the Label Printer to your Wi-Fi access point/router a First, write down the SSID (network name) and password (network key) of your Wi-Fi access point/router. b Connect the Label Printer and computer with a USB cable. c Configure the Infrastructure Mode settings of the Label Printer. Using the Label Printer (QL-820NWB only) 1 Press the Menu and ▼ Buttons to select the [WLAN] menu, and then press the OK Button. 2 Press the ▼ Button to select the [Network Mode] menu, and then press the OK Button. 3 Select [Infrastructure Mode], and then press the OK Button. Note The SSID can also be entered using the LCD. Press the Menu and ▼ Buttons to select the [WLAN] menu, and then press the OK Button. Press the ▼ Button to select the [Infra Manual Setting]. Push the Cancel Button several times to return to the previous screen until it is displayed. For Windows 1 Start the Printer Setting Tool on your computer, and click [Communication Settings]. Select [Infrastructure or Ad-hoc] or [Infrastructure and Wireless Direct] for [Selected Interface] in [Communication Settings] in the [General] tab, and select [Infrastructure] for [Communication Mode] in [Wireless Settings] in the [Wireless LAN] tab. 25
-
 1
1 -
2
-
3
-
4
-
5
-
6
-
7
-
8
-
9
-
10
-
11
-
12
-
13
-
14
-
15
-
16
-
17
-
18
-
19
-
20
-
21
-
22
-
23
-
24
-
25
-
26
-
27
-
28
-
29
-
 30
30 -
 31
31 -
 32
32 -
 33
33 -
 34
34 -
 35
35 -
 36
36 -
 37
37 -
 38
38 -
 39
39 -
 40
40 -
41
-
42
-
43
-
44
-
45
-
46
-
47
-
48
-
49
-
50
-
51
-
52
-
53
-
54
-
55
-
56
-
57
-
58
-
59
-
60
-
61
-
62
-
63
-
64
-
65
-
66
-
67
-
68
-
69
-
70
-
71
-
72
-
73
-
74
-
75
-
76
-
77
-
78
-
79
-
80
-
81
-
82
-
83
-
84
-
85
-
86
-
87
-
88
-
89
-
90
-
91
-
92
-
93
-
94
-
95
-
96
-
97
-
98
-
99
-
100
-
101
-
102
-
103
-
104
-
105
-
106
-
107
-
108
-
109
-
110
-
111
-
112
-
113
-
114
-
115
-
116
-
117
-
118
-
119
-
120
-
121
-
122
-
123
-
124
-
125
-
126
-
127
-
128
-
129
-
130
-
131
-
132
-
133
-
134
-
135
-
136
-
137
-
138
-
139
-
140
-
141
-
142
-
143
-
144
-
145
-
146
-
147
-
148
-
149
-
150
-
151
-
152
-
153
-
154
-
155
-
156
-
157
-
158
-
159
-
160
-
161
-
162
-
163
-
164
-
165
-
166
-
167
-
168
-
169
-
170
-
171
-
172
-
173
-
174
-
175
-
176
-
177
-
178
-
179
-
180
-
181
-
182
-
183
-
184
-
185
-
186
-
187
-
188
-
189
-
190
-
191
-
192
-
193
-
194
-
195
-
196
-
197
-
198
-
199
-
200
-
201
-
202
-
203
-
204
-
205
-
206
-
207
-
208
-
209
-
210
-
211
-
212
-
213
-
214
 |
 |
