Campbell Scientific Vibrating CRVW3 3-Channel Vibrating-Wire Datalogger - Page 20
Individual Devices and Radio Considerations, 7.2 Software Requirements
 |
View all Campbell Scientific Vibrating manuals
Add to My Manuals
Save this manual to your list of manuals |
Page 20 highlights
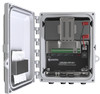
CRVW3 3-Channel Vibrating-Wire Datalogger Campbell Scientific Field-Deployment Philosophy Pre-configure and test your measurement system before taking it to the field. Issues that are unresolved before placing instrumentation in the field will usually be more difficult to resolve once in-field. Campbell Scientific equipment and software are among the best available, but the integration process can be demanding and involves trial and error; contingencies should be developed to address possible problems. Perform the bulk of the integration work in a comfortable and dry location that has a communications link with Campbell Scientific during regular business hours. If you are experienced with field deployments, set aside at least a full day for pre-configuration work. Otherwise, set aside three to seven days for system development before traveling to the field. 7.1 Individual Devices and Radio Considerations Each CRVW3 device can be deployed to the field as an independent data collection station. Additionally, radio communication options are provided to allow CRVW3 devices to communicate with each other, with repeater stations, and with a base radio station. This enables CRVW3 devices to interact from the field with LoggerNet software running in the lab or office, or other IThosted location. Automatic data collection (i.e., collection without technician field visits) is one of the most useful benefits provided by a radio network configuration of multiple CRVW3 devices. When installing CRVW3 devices, consider the deployment issues for both individual stations (Section 8, Installation of Individual CRVW3 Stations) and also the planning and configuration of radio communications within a multiCRVW3 network (Section 9, Radio Networks, and Section 10, Complex (Large) Radio Networks). 7.2 Software Requirements To use the computer software described in this manual, you must have a version that includes CRVW3 support. These software versions are: • LoggerNet version 4.3 or higher (MS-Windows or Linux platforms) • PC400 version 4.3 or higher (MS-Windows only) • PC200W version 4.3 or higher (MS-Windows only) • DevConfig version 2.10 or higher (MS-Windows only) You should periodically check the Campbell Scientific website for updates to these software packages, and also for updates to the firmware/OS of the CRVW3: www.campbellsci.com/downloads 8. Installation of Individual CRVW3 Stations The installation of an individual CRVW3 station includes two critical steps: 1. Connecting with and configuring the CRVW3 device in the lab or office (Section 8.1, Lab Connection and Configuration) 10
-
 1
1 -
2
-
3
-
4
-
5
-
6
-
7
-
8
-
9
-
10
-
11
-
12
-
13
-
14
-
 15
15 -
 16
16 -
 17
17 -
 18
18 -
 19
19 -
 20
20 -
 21
21 -
 22
22 -
 23
23 -
 24
24 -
 25
25 -
26
-
27
-
28
-
29
-
30
-
31
-
32
-
33
-
34
-
35
-
36
-
37
-
38
-
39
-
40
-
41
-
42
-
43
-
44
-
45
-
46
-
47
-
48
-
49
-
50
-
51
-
52
-
53
-
54
-
55
-
56
-
57
-
58
-
59
-
60
-
61
-
62
-
63
-
64
-
65
-
66
-
67
-
68
-
69
-
70
-
71
-
72
-
73
-
74
-
75
-
76
-
77
-
78
-
79
-
80
-
81
-
82
-
83
-
84
-
85
-
86
-
87
-
88
-
89
-
90
-
91
-
92
-
93
-
94
-
95
-
96
-
97
-
98
-
99
-
100
-
101
-
102
-
103
-
104
-
105
-
106
-
107
-
108
-
109
-
110
-
111
-
112
 |
 |
