Campbell Scientific Vibrating CRVW3 3-Channel Vibrating-Wire Datalogger - Page 27
Settings Editor, Logger Control, Monitor, Send OS, Troubleshoot, Terminal, PakBus, Channel 1, Radio
 |
View all Campbell Scientific Vibrating manuals
Add to My Manuals
Save this manual to your list of manuals |
Page 27 highlights
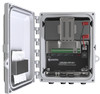
CRVW3 3-Channel Vibrating-Wire Datalogger After a few moments, you should see the Settings Editor and Main tabs for the CRVW3 device, as shown here: If you are having trouble when pressing Connect, refer to Section 13, Troubleshooting CRVW3 Networks. The top set of tabs should include: Settings Editor, Logger Control, Data Monitor, Send OS, Troubleshoot, and Terminal. With the Settings Editor tab selected, the tabs should include: Main, PakBus, Channel 1, Channel 2, and Channel 3. When using the -RF451 option you should see Radio and Radio Advanced tabs. Ensure you have selected the Settings Editor and Main tabs. The Model setting for your CRVW3 should be shown. This should show CRVW3-RF451 if you have the -RF451 communications option. If you have the -RF407 communications option, you should see the value CRVW3-RF407. For the -NoRadio option, you should simply see CRVW3 for the model. You can use the OS Version box to determine which version of the device's firmware (operating system) is currently loaded in the device. For details on how to update the firmware of the device, see Appendix A, Updating CRVW3 Firmware. The Serial Number box shows the factory serial number of your device. The Company box should read as Campbell Scientific, Inc. Choose the Logger Control tab. You should see the Station Time update once every second. This behavior confirms that you have a good connection with the CRVW3 device. You may update the device's clock to match the clock on the computer by using the Set Clock button. 17
-
 1
1 -
2
-
3
-
4
-
5
-
6
-
7
-
8
-
9
-
10
-
11
-
12
-
13
-
14
-
15
-
16
-
17
-
18
-
19
-
20
-
21
-
 22
22 -
 23
23 -
 24
24 -
 25
25 -
 26
26 -
 27
27 -
 28
28 -
 29
29 -
 30
30 -
 31
31 -
 32
32 -
33
-
34
-
35
-
36
-
37
-
38
-
39
-
40
-
41
-
42
-
43
-
44
-
45
-
46
-
47
-
48
-
49
-
50
-
51
-
52
-
53
-
54
-
55
-
56
-
57
-
58
-
59
-
60
-
61
-
62
-
63
-
64
-
65
-
66
-
67
-
68
-
69
-
70
-
71
-
72
-
73
-
74
-
75
-
76
-
77
-
78
-
79
-
80
-
81
-
82
-
83
-
84
-
85
-
86
-
87
-
88
-
89
-
90
-
91
-
92
-
93
-
94
-
95
-
96
-
97
-
98
-
99
-
100
-
101
-
102
-
103
-
104
-
105
-
106
-
107
-
108
-
109
-
110
-
111
-
112
 |
 |
