Canon 3200B002 User Manual - Page 28
Connecting the Scanner to the Computer, Interface Connector Locations, Using a USB Connection
 |
View all Canon 3200B002 manuals
Add to My Manuals
Save this manual to your list of manuals |
Page 28 highlights
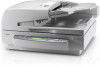
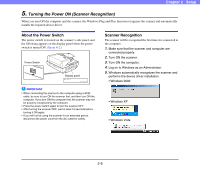
Chapter 2 Setup 4. Connecting the Scanner to the Computer There are two methods for connecting the DR-7090C scanner to a computer: a USB connection to a standard USB port built in to the computer, or SCSI connection to a SCSI card installed in an expansion slot of the computer. Select the method that is best suited to your computer environment. Interface Connector Locations The USB port and SCSI connector are located on the scanner as shown below. 2. Connect the power cord into an AC outlet. b SCSI ID, terminator 120 V model Type USB Connector SCSI Connector IMPORTANT • Do not connect both USB and SCSI cables to the scanner at the same time. • Use only the supplied power cord. • The scanner and computer should both be turned OFF when making connections. • Make sure that the computer is turned OFF before connecting the SCSI cable. The scanner may not be properly recognized by the computer if it is connected while the computer is turned ON. • A SCSI cable is not supplied with the scanner. Obtain a cable with connectors that match the SCSI connectors on both the scanner and the computer. Using a USB Connection 1. Connect the supplied power cord into the power connector on the back of the scanner. a 220 - 240 V model Type 3. Use the supplied USB cable to connect the scanner to the computer. Connect the square plug (Type B) of the USB cable to the scanner. Type A Type B WARNING When using a USB connection, make sure to set the SCSI terminator to ON. If the SCSI terminator is set to OFF, proper scanning may not be possible. 2-6
-
 1
1 -
2
-
3
-
4
-
5
-
6
-
7
-
8
-
9
-
10
-
11
-
12
-
13
-
14
-
15
-
16
-
17
-
18
-
19
-
20
-
21
-
22
-
 23
23 -
 24
24 -
 25
25 -
 26
26 -
 27
27 -
 28
28 -
 29
29 -
 30
30 -
 31
31 -
 32
32 -
 33
33 -
34
-
35
-
36
-
37
-
38
-
39
-
40
-
41
-
42
-
43
-
44
-
45
-
46
-
47
-
48
-
49
-
50
-
51
-
52
-
53
-
54
-
55
-
56
-
57
-
58
-
59
-
60
-
61
-
62
-
63
-
64
-
65
-
66
-
67
-
68
-
69
-
70
-
71
-
72
-
73
-
74
-
75
-
76
-
77
-
78
-
79
-
80
-
81
-
82
-
83
-
84
-
85
-
86
-
87
-
88
-
89
-
90
-
91
-
92
-
93
-
94
-
95
-
96
-
97
-
98
-
99
-
100
-
101
-
102
-
103
-
104
-
105
-
106
-
107
-
108
-
109
-
110
-
111
-
112
-
113
-
114
-
115
-
116
-
117
-
118
-
119
-
120
-
121
-
122
-
123
-
124
-
125
-
126
-
127
-
128
-
129
 |
 |
