Canon 3200B002 User Manual - Page 29
Using a SCSI Connection, Setting the SCSI ID and terminator
 |
View all Canon 3200B002 manuals
Add to My Manuals
Save this manual to your list of manuals |
Page 29 highlights
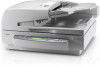
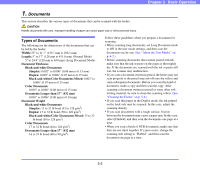
Using a SCSI Connection IMPORTANT Make sure that the computer is turned OFF before connecting the SCSI cable. If the cable is connected while the computer is on, the scanner may not be properly recognized by the computer. 1. Shut down Windows and turn the computer's power OFF. 2. Connect the supplied power cord into the power connector on the back of the scanner. a 3. Connect the power cord into an AC outlet. b Chapter 2 Setup ■ Setting the SCSI ID and terminator Set the SCSI ID and terminator using the DIP switches located between the SCSI connectors and power cord connector. Slide a DIP switch up to set it OFF, and slide it down to set it ON. SCSI ID Terminator 1 2 3 4 120 V model Type 220 - 240 V model Type 4. Use the SCSI cable to connect the scanner to the computer. SCSI ID 0 1 2 3 4 5 6 7 SW1 OFF ON OFF ON OFF ON OFF ON SW2 OFF OFF ON ON OFF OFF ON ON SW3 OFF OFF OFF OFF ON ON ON ON Refer to the table when setting the SCSI ID. If other SCSI devices are connected to or built into the computer, make sure that none of the SCSI IDs overlap. IMPORTANT • The SCSI ID is factory set to 2. • You can set the SCSI ID between 0 and 7. However, do not use ID 7 as this ID is usually assigned to the SCSI controller. In addition, when the SCSI hard disk drive is built in, do not use IDs 0 and 1 as these IDs are usually assigned to the hard disk. Set the terminator on the last SCSI device in the daisy chain connection to ON. 2-7
-
 1
1 -
2
-
3
-
4
-
5
-
6
-
7
-
8
-
9
-
10
-
11
-
12
-
13
-
14
-
15
-
16
-
17
-
18
-
19
-
20
-
21
-
22
-
23
-
 24
24 -
 25
25 -
 26
26 -
 27
27 -
 28
28 -
 29
29 -
 30
30 -
 31
31 -
 32
32 -
 33
33 -
 34
34 -
35
-
36
-
37
-
38
-
39
-
40
-
41
-
42
-
43
-
44
-
45
-
46
-
47
-
48
-
49
-
50
-
51
-
52
-
53
-
54
-
55
-
56
-
57
-
58
-
59
-
60
-
61
-
62
-
63
-
64
-
65
-
66
-
67
-
68
-
69
-
70
-
71
-
72
-
73
-
74
-
75
-
76
-
77
-
78
-
79
-
80
-
81
-
82
-
83
-
84
-
85
-
86
-
87
-
88
-
89
-
90
-
91
-
92
-
93
-
94
-
95
-
96
-
97
-
98
-
99
-
100
-
101
-
102
-
103
-
104
-
105
-
106
-
107
-
108
-
109
-
110
-
111
-
112
-
113
-
114
-
115
-
116
-
117
-
118
-
119
-
120
-
121
-
122
-
123
-
124
-
125
-
126
-
127
-
128
-
129
 |
 |
