Canon BJC 6000 Service Manual - Page 131
TROUBLESHOOTING, 1 Troubleshooting Overview, 1.1 Overview, 1.2 Notes on troubleshooting
 |
View all Canon BJC 6000 manuals
Add to My Manuals
Save this manual to your list of manuals |
Page 131 highlights
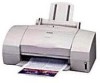
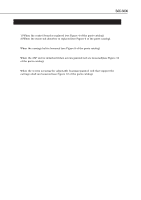
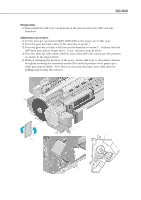
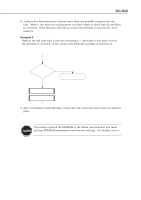
BJC-6000 Part 5: Maintenance 6. TROUBLESHOOTING 6.1 Troubleshooting Overview 6.1.1 Overview This chapter consists of two sections: diagnosis and action. If you do not know the possible cause of the problem, consult the diagnosis section first. If you know the possible cause of the problem, skip to the action section. 6.1.2 Notes on troubleshooting 1. Before starting diagnostic procedures, ensure that all connectors and ribbon cables are correctly connected. 2. If you are diagnosing the problem with the printer's covers removed and with power supplied, be careful not to get an electric shock from the power supply or shortcircuit the PC boards. 3. The flowcharts use the following symbols: Start/End Operation Judgement Action/ Replace Jump Stop 4. If you have replaced or repaired a part, be sure to make a test print to check that the problem is corrected. If the indicated measures of a specific step still fail to correct the trouble, try again, skipping to the next step. Example 1 Do print problems No appear? Yes 1. Replace the ink tank 2. Replace the BJ cartridge END Poor print quality? No Do print problems still appear? Yes END 5-13
-
 1
1 -
2
-
3
-
4
-
5
-
6
-
7
-
8
-
9
-
10
-
11
-
12
-
13
-
14
-
15
-
16
-
17
-
18
-
19
-
20
-
21
-
22
-
23
-
24
-
25
-
26
-
27
-
28
-
29
-
30
-
31
-
32
-
33
-
34
-
35
-
36
-
37
-
38
-
39
-
40
-
41
-
42
-
43
-
44
-
45
-
46
-
47
-
48
-
49
-
50
-
51
-
52
-
53
-
54
-
55
-
56
-
57
-
58
-
59
-
60
-
61
-
62
-
63
-
64
-
65
-
66
-
67
-
68
-
69
-
70
-
71
-
72
-
73
-
74
-
75
-
76
-
77
-
78
-
79
-
80
-
81
-
82
-
83
-
84
-
85
-
86
-
87
-
88
-
89
-
90
-
91
-
92
-
93
-
94
-
95
-
96
-
97
-
98
-
99
-
100
-
101
-
102
-
103
-
104
-
105
-
106
-
107
-
108
-
109
-
110
-
111
-
112
-
113
-
114
-
115
-
116
-
117
-
118
-
119
-
120
-
121
-
122
-
123
-
124
-
125
-
 126
126 -
 127
127 -
 128
128 -
 129
129 -
 130
130 -
 131
131 -
 132
132 -
 133
133 -
 134
134 -
 135
135 -
 136
136 -
137
-
138
-
139
-
140
-
141
-
142
-
143
-
144
-
145
-
146
-
147
-
148
-
149
-
150
-
151
-
152
-
153
-
154
-
155
-
156
-
157
-
158
-
159
-
160
-
161
-
162
-
163
-
164
-
165
-
166
-
167
-
168
-
169
-
170
-
171
-
172
-
173
-
174
 |
 |