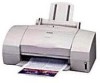
Canon BJC 6000 Service Manual - Page 57
Print Position Adjustment Pattern, 3.4 Aligning the print heads - printer drivers
 |
View all Canon BJC 6000 manuals
Add to My Manuals
Save this manual to your list of manuals |
Page 57 highlights
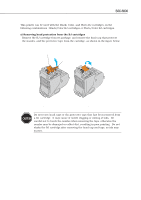
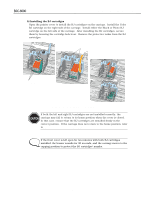
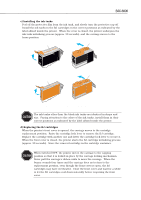
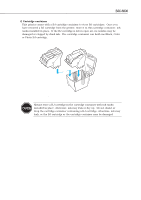
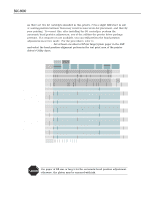
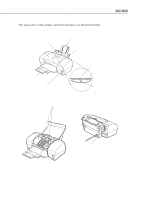
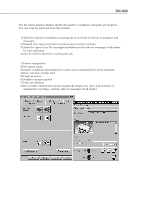
BJC-6000 Part 3: Operating Instructions 1.3.4 Aligning the print heads As there are two BJ cartridges installed in this printer, even a slight difference in size or seating position between them may result in inaccurate dot placement, and thereby poor printing. To correct this, after installing the BJ cartridges, perform the automatic head position adjustment, one of the utilities the printer driver package provides. If a computer is not available, you can still perform the head position adjustment in service mode. For the procedures, refer to Part 3: 3.6.1 Service mode operations (Page 3-18). Set at least one sheet of B5 (or larger) plain paper in the ASF, and select the head position alignment pattern in the test print area of the printer driver's Utility sheet. LED calibration 360-dpi vertical alignment adjustment 360-dpi bi-directional rough adjustment 360-dpi bi-directional fine adjustment 180-dpi bi-directional rough adjustment 180-dpi bi-directional fine adjustment 360-dpi horizontal alignment forward rough adjustment 360-dpi horizontal alignment forward fine adjustment 360-dpi horizontal alignment reverse rough adjustment 360-dpi horizontal alignment reverse fine adjustment 180-dpi horizontal alignment forward rough adjustment 180-dpi horizontal alignment forward fine adjustment 180-dpi horizontal alignment reverse rough adjustment 180-dpi horizontal alignment reverse fine adjustment 720-dpi horizontal alignment forward rough adjustment 720-dpi horizontal alignment forward fine adjustment 1440-dpi horizontal alignment forward rough adjustment 1440-dpi horizontal alignment forward fine adjustment Printing position check pattern Figure 3-10 Print Position Adjustment Pattern CAUTION Use paper of B5 size or larger for the automatic head position adjustment, otherwise, the platen may be smeared with ink. 3-9
-
 1
1 -
2
-
3
-
4
-
5
-
6
-
7
-
8
-
9
-
10
-
11
-
12
-
13
-
14
-
15
-
16
-
17
-
18
-
19
-
20
-
21
-
22
-
23
-
24
-
25
-
26
-
27
-
28
-
29
-
30
-
31
-
32
-
33
-
34
-
35
-
36
-
37
-
38
-
39
-
40
-
41
-
42
-
43
-
44
-
45
-
46
-
47
-
48
-
49
-
50
-
51
-
 52
52 -
 53
53 -
 54
54 -
 55
55 -
 56
56 -
 57
57 -
 58
58 -
 59
59 -
 60
60 -
 61
61 -
 62
62 -
63
-
64
-
65
-
66
-
67
-
68
-
69
-
70
-
71
-
72
-
73
-
74
-
75
-
76
-
77
-
78
-
79
-
80
-
81
-
82
-
83
-
84
-
85
-
86
-
87
-
88
-
89
-
90
-
91
-
92
-
93
-
94
-
95
-
96
-
97
-
98
-
99
-
100
-
101
-
102
-
103
-
104
-
105
-
106
-
107
-
108
-
109
-
110
-
111
-
112
-
113
-
114
-
115
-
116
-
117
-
118
-
119
-
120
-
121
-
122
-
123
-
124
-
125
-
126
-
127
-
128
-
129
-
130
-
131
-
132
-
133
-
134
-
135
-
136
-
137
-
138
-
139
-
140
-
141
-
142
-
143
-
144
-
145
-
146
-
147
-
148
-
149
-
150
-
151
-
152
-
153
-
154
-
155
-
156
-
157
-
158
-
159
-
160
-
161
-
162
-
163
-
164
-
165
-
166
-
167
-
168
-
169
-
170
-
171
-
172
-
173
-
174
 |
 |
