Canon CanoScan D1230UF CanoScan D1230U/D2400U Toolbox1.6 for Mac Guide - Page 12
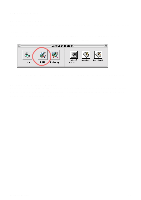
Saving Film, Push the Film Scan Button to start the CanoScan Toolbox.
 |
View all Canon CanoScan D1230UF manuals
Add to My Manuals
Save this manual to your list of manuals |
Page 12 highlights
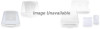
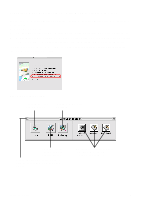
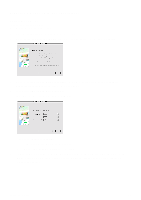
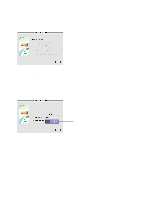
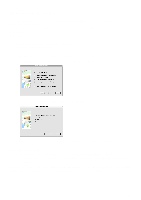
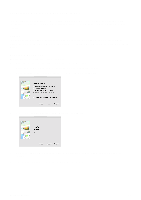
Saving Film To save the scanned film; 1. Set the film in the film guide and place it on the scanner. 2. Push the Film Scan Button to start the CanoScan Toolbox. 3. Select [Scan and Save the Image] from theCanon Scanner Assistant and click [Next]. 4. Select either [Quick and Easy Scanning](displaying scanner driver window) or [Expert Scanning](without displaying scanner driver window). 5. If you select [Quick and Easy Scanning]; (1) Specify the setting items and click [Next]. When you scan the 35mm film without displaying the driver software, the scanned area is slightly smaller than the actual frame. If you select [Expert Scanning]; With 35mm sleeve film, up to 3 frames can be scanned continuously. Select [Sleeve] in [Scan Frames] and specify the scanned frames in [Frame Selection]. When you scan 2 or 3 frames continuously, sometimes the gap between frames may be scanned and the vertical stripe may appear in the image. This occurs because the width between frames differing from the film type and setting position causes slight disalignment of the scanned area. In this case, place the objective frame in the first position and scan one frame at a time. (1) The Plug-in Module window displays. (2) Select [Film] from [Preferences] menu and specify [Film Size] and [Film Type] in the [Film] menu. (3) Adjust the previewed image and click [Scan]. 6. The document is scanned. Enter the file name and specify the folder and the drive in which the image is saved (Initially, the file name is set to Image0001 and the folder is set to [Photo] in [CanoScan Toolbox]). CanoScan Toolbox 12
-
 1
1 -
2
-
3
-
4
-
5
-
6
-
 7
7 -
 8
8 -
 9
9 -
 10
10 -
 11
11 -
 12
12 -
 13
13 -
 14
14 -
 15
15 -
 16
16 -
 17
17 -
18
-
19
-
20
-
21
-
22
-
23
-
24
-
25
-
26
-
27
 |
 |