Canon DR-2080C Startup Guide - Page 16
Names and Functions of Parts
 |
View all Canon DR-2080C manuals
Add to My Manuals
Save this manual to your list of manuals |
Page 16 highlights
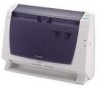
Names and Functions of Parts This section explains the name and function of each part. Familiarize yourself with the parts before connecting the scanner. ■ Front and right views Top cover Open this cover to set your document. Power indicator This lights when you turn on the scanner. Paper feed tray Open this cover if the document is protruding from the document feed opening. Document eject opening Scanned documents are ejected from here. Stop key Press this key to stop the document scanning. Start key Press this key to start the document scanning. Feed selection lever Sets the feeding method of documents. To feed the sheets of a multi-page document individually, set the lever in the down position (page separation mode). To feed all the sheets of a non-separable multi-page document, set the lever in the up position to bypass separation. (bypass mode). Feed indicator This shows the position of the feed selection lever. ■ Front view (with top cover and paper feed cover open) Paper feed extension plate Pull this out if the document falls forward. Paper side guide adapters Set these adapters into the paper side guides if paper skews during feeding. Document positioning mark Align the paper side guides with this mark according to the size of the document to be scanned. Document feed opening Set the document that you want to scan here. Front unit Document stop To prevent ejected documents from scattering, set this in a position apart from the document eject opening by at least the length of the document. 14 Before Using the Unit Paper side guides Adjust these to the width of the document. OPEN release Use this to open the front unit.
-
 1
1 -
2
-
3
-
4
-
5
-
6
-
7
-
8
-
9
-
10
-
 11
11 -
 12
12 -
 13
13 -
 14
14 -
 15
15 -
 16
16 -
 17
17 -
 18
18 -
 19
19 -
 20
20 -
 21
21 -
22
-
23
-
24
-
25
-
26
-
27
-
28
-
29
-
30
-
31
-
32
-
33
-
34
-
35
-
36
-
37
-
38
-
39
-
40
-
41
-
42
-
43
-
44
-
45
-
46
-
47
-
48
-
49
-
50
-
51
-
52
-
53
-
54
-
55
-
56
-
57
-
58
-
59
-
60
-
61
-
62
-
63
-
64
-
65
-
66
-
67
-
68
-
69
-
70
-
71
-
72
-
73
-
74
-
75
-
76
 |
 |
