Canon DR 5020 Instruction Manual - Page 25
Connecting to a Computer - scanner driver
 |
UPC - 030275656367
View all Canon DR 5020 manuals
Add to My Manuals
Save this manual to your list of manuals |
Page 25 highlights
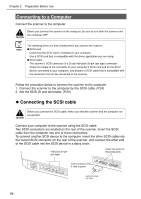
Chapter 2 Preparation Before Use Connecting to a Computer Connect the scanner to the computer. CAUTION Before you connect the scanner to the computer, be sure to turn both the scanner and the computer OFF. HINT The following items are also needed when you connect the scanner: G SCSI card Check that the SCSI card is installed on your computer. Use a SCSI card that is compatible with the driver application you are using. G SCSI cable The scanner's SCSI connector is a D-sub half-pitch 50-pin (pin type) connector. Check the shape of the connector on your computer's SCSI card and on the SCSI device connected to your computer, and prepare a SCSI cable that is compatible with the connector that can be connected to the scanner. Follow the procedure below to connect the scanner to the computer. 1. Connect the scanner to the computer by the SCSI cable. (P.24) 2. Set the SCSI ID and terminator. (P.25) N Connecting the SCSI cable CAUTION Before you connect the SCSI cable, make sure that the scanner and the computer are turned OFF. Connect your computer to the scanner using the SCSI cable. Two SCSI connectors are located on the rear of the scanner. Insert the SCSI cable from the computer into one of these connectors. To connect another SCSI device to the computer, insert the other SCSI cable into the vacant SCSI connector on the rear of the scanner, and connect the other end of the SCSI cable into the SCSI device in a daisy chain. Half-pitch 50-pin (pin type) Insert into either of these two ports. Insert until you hear it click in place. Half-pitch 50-pin (pin type) 24
-
 1
1 -
2
-
3
-
4
-
5
-
6
-
7
-
8
-
9
-
10
-
11
-
12
-
13
-
14
-
15
-
16
-
17
-
18
-
19
-
 20
20 -
 21
21 -
 22
22 -
 23
23 -
 24
24 -
 25
25 -
 26
26 -
 27
27 -
 28
28 -
 29
29 -
 30
30 -
31
-
32
-
33
-
34
-
35
-
36
-
37
-
38
-
39
-
40
-
41
-
42
-
43
-
44
-
45
-
46
-
47
-
48
-
49
-
50
-
51
-
52
-
53
-
54
-
55
-
56
-
57
-
58
-
59
-
60
-
61
-
62
-
63
-
64
-
65
-
66
-
67
-
68
-
69
-
70
-
71
-
72
-
73
-
74
-
75
-
76
-
77
-
78
-
79
-
80
-
81
-
82
-
83
-
84
-
85
-
86
-
87
-
88
-
89
-
90
-
91
-
92
-
93
-
94
-
95
 |
 |
