Canon EOS M3 EF-M 18-55mm IS STM Kit User Guide - Page 127
Printing Images Wirelessly from a, Connected Printer
 |
View all Canon EOS M3 EF-M 18-55mm IS STM Kit manuals
Add to My Manuals
Save this manual to your list of manuals |
Page 127 highlights
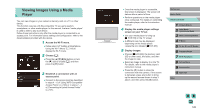
●● Connections require that a memory card with saved images be in the camera. ●● Once you have connected to devices via the Wi-Fi menu, recent destinations will be listed first when you access the Wi-Fi menu. You can easily connect again by pressing the [ ][ ] buttons to choose the device and then pressing the [ ] button. To add a new device, display the device selection screen by pressing the [ ][ ] buttons, and then configure the setting. ●● Media player connections will be displayed as "MediaServ." in the connection history. ●● RAW images and movies are not displayed. ●● Information overlay and details displayed on the TV set vary depending on the media player. Depending on the media player, image information may not be displayed, or vertical images may be shown in horizontal orientation. ●● Icons with labels such as "1-100" contain images grouped by file number in the selected folder. ●● Dates shown for cards or folders may reflect the date on the camera's clock when the card or folder was last viewed. Printing Images Wirelessly from a Connected Printer Connect the camera to a printer via Wi-Fi to print as follows. These steps show how to use the camera as an access point, but you can also use an existing access point (=119). 1 Access the Wi-Fi menu. ●●Access the Wi-Fi menu as described in step 2 of "Adding a Smartphone Using the Wi-Fi Menu" (=118). 2 Choose [ ]. ●●Press the buttons or turn the [ ] dial to choose [ ], and then press the [ ] button. 3 Choose [Add a Device]. ●●Press the [ ][ ] buttons or turn the [ ] dial to choose [Add a Device], and then press the [ ] button. ●●The camera's SSID is displayed. Before Use Basic Guide Advanced Guide 1 Camera Basics 2 Auto Mode / Hybrid Auto Mode 3 Other Shooting Modes 4 P Mode 5 Tv, Av, aMn,danMdMCoMdeodes 6 Playback Mode 7 Wi-Fi Functions 8 Set-Up Menu 9 Accessories 10 Appendix Index 127
-
 1
1 -
2
-
3
-
4
-
5
-
6
-
7
-
8
-
9
-
10
-
11
-
12
-
13
-
14
-
15
-
16
-
17
-
18
-
19
-
20
-
21
-
22
-
23
-
24
-
25
-
26
-
27
-
28
-
29
-
30
-
31
-
32
-
33
-
34
-
35
-
36
-
37
-
38
-
39
-
40
-
41
-
42
-
43
-
44
-
45
-
46
-
47
-
48
-
49
-
50
-
51
-
52
-
53
-
54
-
55
-
56
-
57
-
58
-
59
-
60
-
61
-
62
-
63
-
64
-
65
-
66
-
67
-
68
-
69
-
70
-
71
-
72
-
73
-
74
-
75
-
76
-
77
-
78
-
79
-
80
-
81
-
82
-
83
-
84
-
85
-
86
-
87
-
88
-
89
-
90
-
91
-
92
-
93
-
94
-
95
-
96
-
97
-
98
-
99
-
100
-
101
-
102
-
103
-
104
-
105
-
106
-
107
-
108
-
109
-
110
-
111
-
112
-
113
-
114
-
115
-
116
-
117
-
118
-
119
-
120
-
121
-
 122
122 -
 123
123 -
 124
124 -
 125
125 -
 126
126 -
 127
127 -
 128
128 -
 129
129 -
 130
130 -
 131
131 -
 132
132 -
133
-
134
-
135
-
136
-
137
-
138
-
139
-
140
-
141
-
142
-
143
-
144
-
145
-
146
-
147
-
148
-
149
-
150
-
151
-
152
-
153
-
154
-
155
-
156
-
157
-
158
-
159
-
160
-
161
-
162
-
163
-
164
-
165
-
166
-
167
-
168
-
169
-
170
-
171
-
172
-
173
-
174
-
175
-
176
-
177
-
178
-
179
-
180
-
181
-
182
-
183
-
184
-
185
-
186
-
187
-
188
-
189
-
190
-
191
-
192
-
193
-
194
-
195
-
196
-
197
-
198
-
199
-
200
-
201
 |
 |
