Canon I470D i470D Quick Start Guide - Page 16
Select the Photo Optimizer PRO check box.
 |
UPC - 013803025569
View all Canon I470D manuals
Add to My Manuals
Save this manual to your list of manuals |
Page 16 highlights
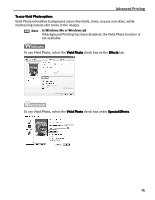
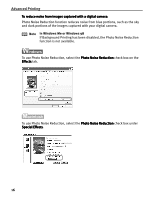
Advanced Printing To automatically optimize the image: Photo Optimizer PRO automatically adjusts the photographic image created with a digital camera. Use this feature to compensate for unsatisfactory color balance and over- or under-exposure before printing. 1 Open the Printer Properties dialog box. See"Opening the Printer Properties Dialog Box from Your Application Program" on page 11. 2 Click the Effects tab. 3 Select the Photo Optimizer PRO check box. 4 Click OK. 1 Open the Print dialog box. See "Printing with Macintosh" on page 9. 2 Click Print Mode and select Manual, then click Details... to open the Detailed Setting dialog box. 3 Click (Special effects). 4 Select the Photo Optimizer PRO check box. 5 Click OK. 14
-
 1
1 -
2
-
3
-
4
-
5
-
6
-
7
-
8
-
9
-
10
-
 11
11 -
 12
12 -
 13
13 -
 14
14 -
 15
15 -
 16
16 -
 17
17 -
 18
18 -
 19
19 -
 20
20 -
 21
21 -
22
-
23
-
24
-
25
-
26
-
27
-
28
-
29
-
30
-
31
-
32
-
33
-
34
-
35
-
36
-
37
-
38
-
39
-
40
-
41
-
42
-
43
-
44
-
45
-
46
-
47
-
48
-
49
-
50
-
51
-
52
-
53
-
54
-
55
-
56
-
57
-
58
-
59
-
60
 |
 |

Advanced Printing
14
To automatically optimize the image:
To automatically optimize the image:
To automatically optimize the image:
To automatically optimize the image:
Photo Optimizer PRO automatically adjusts the photographic image created with a digital
camera. Use this feature to compensate for unsatisfactory color balance and over- or
under-exposure before printing.
1
Open the Printer Properties dialog box.
See"Opening the Printer Properties Dialog Box from Your Application Program
Opening the Printer Properties Dialog Box from Your Application Program
Opening the Printer Properties Dialog Box from Your Application Program
Opening the Printer Properties Dialog Box from Your Application Program"
on page 11.
2
Click the Effects tab.
3
Select the Photo Optimizer PRO check box.
4
Click OK.
1
Open the Print dialog box.
See "Printing with Macintosh
Printing with Macintosh
Printing with Macintosh
Printing with Macintosh" on page 9.
2
Click Print Mode and select Manual, then click Details... to open the
Detailed Setting dialog box.
3
Click
(Special effects).
4
Select the Photo Optimizer PRO check box.
5
Click OK.