Canon I470D i470D Quick Start Guide - Page 36
Printing Maintenance, Print the pattern., Align the Print Head.
 |
UPC - 013803025569
View all Canon I470D manuals
Add to My Manuals
Save this manual to your list of manuals |
Page 36 highlights
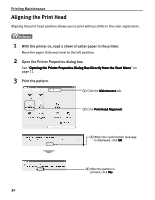
Printing Maintenance 3 Print the pattern. (1) Select Test Print from the pull-down menu. (2) Click Print Head Alignment. (3) When the confirmation message is displayed, click OK. 4 Align the Print Head. (1) Look at the print out. From the patterns, select the most even, least irregular patterns and enter the number that corresponds. (2) Enter the numbers. (3) Click Send. Note If it is difficult to pick up the best pattern on Column H, pick the setting that produces the least noticeable vertical white stripes. Less noticeable white stripes 34 More noticeable white stripes
-
 1
1 -
2
-
3
-
4
-
5
-
6
-
7
-
8
-
9
-
10
-
11
-
12
-
13
-
14
-
15
-
16
-
17
-
18
-
19
-
20
-
21
-
22
-
23
-
24
-
25
-
26
-
27
-
28
-
29
-
30
-
 31
31 -
 32
32 -
 33
33 -
 34
34 -
 35
35 -
 36
36 -
 37
37 -
 38
38 -
 39
39 -
 40
40 -
 41
41 -
42
-
43
-
44
-
45
-
46
-
47
-
48
-
49
-
50
-
51
-
52
-
53
-
54
-
55
-
56
-
57
-
58
-
59
-
60
 |
 |

Printing Maintenance
34
3
Print the pattern.
(3)
When the confirmation message is displayed, click OK
OK
OK
OK.
4
Align the Print Head.
(1)
Look at the print out. From the patterns, select the most even, least irregular
patterns and enter the number that corresponds.
Note
If it is difficult to pick up the best pattern on Column H, pick the setting
that produces the least noticeable vertical white stripes.
(1)
(1)
(1)
(1)
Select Test Print
Test Print
Test Print
Test Print from
the pull-down menu.
(2)
(2)
(2)
(2)
Click Print Head Alignment
Print Head Alignment
Print Head Alignment
Print Head Alignment.
(2)
Enter the numbers.
(3)
Click Send
Send
Send
Send.
Less noticeable white stripes
More noticeable white stripes