Canon LV-7265 LV User's Manual - Page 36
Adjusting the Picture Size and Position
 |
View all Canon LV-7265 manuals
Add to My Manuals
Save this manual to your list of manuals |
Page 36 highlights
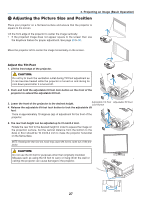
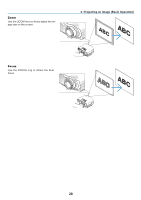
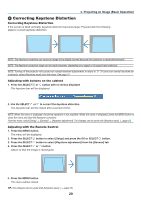
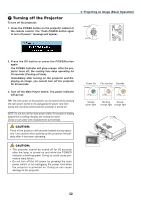
3. Projecting an Image (Basic Operation) ❸ Adjusting the Picture Size and Position Place your projector on a flat level surface and ensure that the projector is square to the screen. Lift the front edge of the projector to center the image vertically. • If the projected image does not appear square to the screen then use the Keystone feature for proper adjustment. See page 29 to 30. Move the projector left to center the image horizontally on the screen. +VOL BACK MENU KEYSTONE Adjust the Tilt Foot 1. Lift the front edge of the projector. CAUTION: 1 Do not try to touch the ventilation outlet during Tilt Foot adjustment as it can become heated while the projector is turned on and during its cool down period after it is turned off. AUTO PC INPUT -VOL E R R LAMP WARNING POW 2. Push and hold the adjustable tilt foot lock button on the front of the projector to extend the adjustable tilt foot. 2 3. Lower the front of the projector to the desired height. Adjustable Tilt Foot Adjustable Tilt Foot Lock Button +VOL BACK MENU KEYSTONE AUTO PC INPUT -VOL 4. Release the adjustable tilt foot lock button to lock the adjustable tilt LAMP foot. 3 WARNING POWE There is approximately 10 degrees (up) of adjustment for the front of the projector. 5. The rear foot height can be adjusted up to 10 mm/0.4 inch. Rotate the rear foot to the desired height in order to square the image on the projection surface, but the vertical distance from the bottom to the 4 desk or floor should be 10 mm/0.4 inch to make the projector horizontal on the flat surface. NOTE: Rotating the rear foot too much may cause the foot to come out of the projector. CAUTION: Do not use the tilt-foot for purposes other than originally intended. Misuses such as using the tilt foot to carry or hang (from the wall or ceiling) the projector can cause damage to the projector. Up Down 27
-
 1
1 -
2
-
3
-
4
-
5
-
6
-
7
-
8
-
9
-
10
-
11
-
12
-
13
-
14
-
15
-
16
-
17
-
18
-
19
-
20
-
21
-
22
-
23
-
24
-
25
-
26
-
27
-
28
-
29
-
30
-
 31
31 -
 32
32 -
 33
33 -
 34
34 -
 35
35 -
 36
36 -
 37
37 -
 38
38 -
 39
39 -
 40
40 -
 41
41 -
42
-
43
-
44
-
45
-
46
-
47
-
48
-
49
-
50
-
51
-
52
-
53
-
54
-
55
-
56
-
57
-
58
-
59
-
60
-
61
-
62
-
63
-
64
-
65
-
66
-
67
-
68
-
69
-
70
-
71
-
72
-
73
-
74
-
75
-
76
-
77
-
78
-
79
-
80
-
81
-
82
-
83
 |
 |
