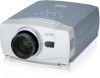
Canon LV-7545 Owners Manual
Canon LV-7545 Manual
 |
View all Canon LV-7545 manuals
Add to My Manuals
Save this manual to your list of manuals |
Canon LV-7545 manual content summary:
- Canon LV-7545 | Owners Manual - Page 1
Multimedia Projector LV-7545 Owner's Manual E English - Canon LV-7545 | Owners Manual - Page 2
projector from the power outlet. READ AND KEEP THIS OWNER'S MANUAL FOR LATER USE. CAUTION RISK OF ELECTRIC SHOCK DO NOT OPEN CAUTION : TO REDUCE THE RISK OF ELECTRIC SHOCK, DO NOT REMOVE COVER (OR BACK). NO USERSERVICEABLE PARTS INSIDE EXCEPT LAMP REPLACEMENT. REFER SERVICING TO QUALIFIED SERVICE - Canon LV-7545 | Owners Manual - Page 3
and retain them for later use. Unplug this projector from AC power supply before cleaning. Do not use liquid or aerosol cleaners. Use a damp cloth for cleaning. Follow all warnings and instructions marked on the projector. For added protection to the projector during a lightning storm, or when it is - Canon LV-7545 | Owners Manual - Page 4
, commercial and light industry environment. Canadian Radio Interference Regulations This Class B digital apparatus meets all requirements of the Canadian Interference-Causing Equipment Regulations. AC POWER CORD REQUIREMENT The AC Power Cord supplied with this projector meets the requirement - Canon LV-7545 | Owners Manual - Page 5
38 38 CLEANING PROJECTION LENS 38 TURNING ON / OFF PROJECTOR 19 LAMP REPLACEMENT 39 ADJUSTING SCREEN ZOOM ADJUSTMENT 20 LAMP REPLACE COUNTER 39 20 TROUBLESHOOTING 40 FOCUS ADJUSTMENT 20 TECHNICAL SPECIFICATIONS 42 LENS SHIFT ADJUSTMENT 20 KEYSTONE ADJUSTMENT 20 TURBO BRIGHT - Canon LV-7545 | Owners Manual - Page 6
from a computer. x Laser Pointer Function Remote Control Unit supplied with this projector includes Laser Pointer function. This function helps you to make a smart presentation on a projected screen. x Wireless Mouse Remote Control Unit supplied with this projector has Wireless Mouse function for - Canon LV-7545 | Owners Manual - Page 7
area, especially screws and metallic parts. This area will become hot while a projector is used. This projector detects internal temperature and automatically controls operating power of Cooling Fans. LAMP COVER TERMINALS AND CONNECTORS CARRYING HANDLE BOTTOM OF CABINET ADJUSTABLE FEET AND FEET - Canon LV-7545 | Owners Manual - Page 8
shock, do not plug into any other type of power system. Consult your authorized dealer or service station if you are not sure of the type of power supply being in use. Connect a projector with a peripheral equipment before turning a projector on. (Refer to pages 11 ~ 13 for connection.) CAUTION - Canon LV-7545 | Owners Manual - Page 9
on a flat projection surface. q The projector can be focused from 4.6' (1.4m) ~ 48.3' (14.7m). q Refer to the figure below to adjust a screen size. ROOM LIGHT The brightness in a room has a great influence on picture quality. It is recommended to limit ambient lighting in order to provide the best - Canon LV-7545 | Owners Manual - Page 10
the Carry Handle when moving a Projector. When moving a projector, replace the lens cover and retract the feet to prevent damage to the lens and cabinet. When a projector is not in use for an extended period, put it into the case (dust cover) supplied with a projector. FEET LOCK LATCHES CAUTION IN - Canon LV-7545 | Owners Manual - Page 11
-L S-VIDEO (MONO) INPUT 3 R/C JACK When using the Wired/Wireless Remote Control Unit as Wired Remote Control, Connect the Wired Remote Control Unit to this jack with Remote Control Cable (supplied). CONTROL PORT CONNECTOR When controlling the computer with Remote Control Unit of this projector - Canon LV-7545 | Owners Manual - Page 12
CONTROL PORT AUDIO 2 G B R H/V V VIDEO/Y Cb/Pb Cr/Pr INPUT 2 VIDEO/Y Cb/Pb Cr/Pr R-AUDIO-L S-VIDEO (MONO) INPUT 3 Terminals of the Projector Use one of these Control the cable, the power cords of both the projector and the external equipment should be disconnected from AC outlet. Turn the - Canon LV-7545 | Owners Manual - Page 13
1 RGB ANALOG RGB DIGITAL R/C JACK AUDIO 1 RESET CONTROL PORT AUDIO 2 G B R H/V V VIDEO/Y Cb/Pb Cr/Pr INPUT 2 VIDEO/Y Cb/Pb Cr/Pr R-AUDIO-L S-VIDEO (MONO) INPUT 3 NOTE : When connecting the cable, the power cords of both the projector and the external equipment should be disconnected - Canon LV-7545 | Owners Manual - Page 14
Light Window. POWER ZOOM FOCUS VOLUME ALL OFF ON MENU BUTTON Used to select MENU operation. (P17, 18) MUTE D.ZOOM INPUT MENU BRIGHT ALL-OFF SWITCH When using Remote Control SHOW FREEZE AUTO PC ADJ. IMAGE P-TIMER POWER ON-OFF BUTTON Used to turn projector on or off. (P19) INPUT BUTTON Used - Canon LV-7545 | Owners Manual - Page 15
. (P23) POWER ZOOM FOCUS VOLUME Remote Control Unit. q If a battery has leaked on Remote Control Unit, carefully wipe the case clean and install new batteries. q Danger of explosion if battery is incorrectly replaced. q Dispose of used batteries according to batteries manufacturers instructions - Canon LV-7545 | Owners Manual - Page 16
This projector has CONTROL BUTTONS (TOP CONTROLS) and INDICATORS on its top. LAMP REPLACE INDICATOR Turns to yellow when the life of projection lamp draws to an end. (P39) WARNING TEMP. INDICATOR Flashes red while internal projector temperature is too high. (P38) READY INDICATOR Lights green - Canon LV-7545 | Owners Manual - Page 17
HOW TO OPERATE ON-SCREEN MENU You can control and adjust this projector through ON-SCREEN MENU. Refer to the following pages to operate each adjustment on ON-SCREEN MENU. 1 DISPLAY MENU Press MENU button to display ON-SCREEN MENU. WIRELESS REMOTE CONTROL POINT BUTTON Used to move the Pointer UP - Canon LV-7545 | Owners Manual - Page 18
to PC input source. GUIDE WINDOW Shows selected item Refer to P29) SETTING MENU Used to change settings of projector or reset Lamp Replace Counter. (Refer to P35-37) INPUT MENU Used to source. AV SYSTEM MENU Used to select system of selected video source. (Refer to P31) IMAGE ADJUST MENU Used to - Canon LV-7545 | Owners Manual - Page 19
disappears after 30 seconds. TURNING OFF PROJECTOR 1 Press POWER ON-OFF button on Top Control or on Remote Control Unit, and a message "Power off?" appears on a screen. 2 Press POWER ON-OFF button again to turn off projector. LAMP Indicator lights bright and READY Indicator turns off. After - Canon LV-7545 | Owners Manual - Page 20
FOCUS v/w button or POINT UP/DOWN button(s) . Focus Message disappears after 4 seconds. LENS SHIFT ADJUSTMENT 1 Press LENS SHIFT button on Top Control or on Remote Control Unit. The message "Lens shift" is displayed. 2 Press POINT UP button to move image up, press POINT DOWN button to move image - Canon LV-7545 | Owners Manual - Page 21
the picture on-screen. To cancel FREEZE function, press FREEZE button again or press any other button. NO SHOW FUNCTION Press NO SHOW button on Remote Control Unit to black out the image. To restore to normal, press NO SHOW button again or press any other button. No show Message disappears after - Canon LV-7545 | Owners Manual - Page 22
COMPUTER INPUT SELECTING INPUT SOURCE DIRECT OPERATION Choose Computer by pressing INPUT button on Top Control or on Remote Control Unit. If projector cannot reproduce proper image, select correct input source through MENU OPERATION (see below). INPUT button INPUT 1 INPUT 2 INPUT 3 MENU - Canon LV-7545 | Owners Manual - Page 23
XGA or SXGA (refer to "COMPATIBLE COMPUTER SPECIFICATION" on page 26). When selecting Computer, this projector automatically tunes to incoming signal and projects proper image without any special setting. (Some computers need setting manually.) Note : Projector button on Remote Control Unit. PC - Canon LV-7545 | Owners Manual - Page 24
to precisely adjust several parameters to match with those special signal formats. This projector has 5 independent memory areas to memorize those parameters manually adjusted. This enables you to recall the setting for a specific computer whenever you use it. Note : This PC ADJUST Menu cannot be - Canon LV-7545 | Owners Manual - Page 25
SET button at Display area icon and Display area dialog box appears. Display area Display area V Adjustment of vertical area displayed with this projector. Press POINT LEFT/RIGHT button(s) to decrease/increase value and then press SET button. Full screen Press POINT LEFT/RIGHT button(s) to switch - Canon LV-7545 | Owners Manual - Page 26
COMPUTER INPUT COMPATIBLE COMPUTER SPECIFICATIONS Basically this projector can accept the signal from all computers with V-Freq. (Hz) 59.940 60.317 ON-SCREEN DISPLAY RESOLUTION D-XGA 1024 x 768 NOTE : Specifications are subject to change without notice. H-Freq. (kHz) 48.363 V-Freq. (Hz) 60.004 - Canon LV-7545 | Owners Manual - Page 27
(DIRECT) Select image level among Standard, High contrast and Custom by pressing IMAGE button on Remote Control Unit. Standard Normal picture adjustment preset on this projector. IMAGE button Standard High contrast High contrast Picture adjustment improved in reproduction of halftones. This - Canon LV-7545 | Owners Manual - Page 28
level, move a red frame pointer to Store icon and press SET button. The message "OK?" will appear. Select [Yes] to store manual adjustment. To set this manual adjustment, select Custom by pressing IMAGE button or through IMAGE SELECT MENU (refer to P27). Other icons operates as follows. Reset - Canon LV-7545 | Owners Manual - Page 29
this projector enters "Digital zoom +" mode automatically. Wide Provides image to fit wide video aspect also expanded by pressing D.ZOOM v button on Remote Control Unit. Digital Zoom - When Digital zoom - to the lower before connecting projector. q The image data in other than XGA (1024 x 768) is - Canon LV-7545 | Owners Manual - Page 30
Select Menu will appear. 3 Move a pointer to source that you want to select and then press SET button. Video When video input signal is connected to VIDEO jack, select Video. Y,Pb/Cb,Pr/Cr When video input signal is connected to Y-Pb/CbPr/Cr jacks, select Y, Pb/Cb, Pr/Cr. Input 2 INPUT Menu icon - Canon LV-7545 | Owners Manual - Page 31
, and adjusts itself to optimize its performance. When Video System is PAL-M or PAL-N, select system manually. PAL / SECAM / NTSC / NTSC4.43 / PAL-M / PAL-N If projector cannot reproduce proper video image, it is necessary to select a specific broadcast signal format among PAL, SECAM, NTSC, NTSC - Canon LV-7545 | Owners Manual - Page 32
VIDEO INPUT PICTURE IMAGE ADJUSTMENTS IMAGE LEVEL SELECT (DIRECT) Select image level among Standard, Cinema, and Custom by pressing IMAGE button on Remote Control Unit. Standard Normal picture level preset on this projector. IMAGE button Standard Cinema Cinema Picture level adjusted for the - Canon LV-7545 | Owners Manual - Page 33
or PAL-N. Noise Reduction cannot be operated when the video signal types and systems as follow. q Composite video signal (SECAM, NTSC4.43, PAL-M and PAL-N systems). q S-video signal (SECAM, PAL-M and PAL-N systems). q Component video signal. Progressive cannot be operated when "480p", "575p", "720p - Canon LV-7545 | Owners Manual - Page 34
VIDEO INPUT 3 Store To store manually preset image level, move a red frame pointer to Store icon and press SET button. The message "OK?" will appear. Select [Yes] to store manual adjustment. To set this manual Store icon PICTURE SCREEN ADJUSTMENT This projector has a picture screen resize - Canon LV-7545 | Owners Manual - Page 35
back When this function is "On," this projector will produce a blue image instead of the video noise on the screen when any input source is Displays disappeared except; q ON-SCREEN MENU q "Power off?" message Logo When this function is "On," projector displays our logo when starting up. Move a - Canon LV-7545 | Owners Manual - Page 36
normal code (Code 1), operate both projector and Remote Control in the ways above again. NOTE : When batteries of Remote Control Unit are replaced or ALLOFF switch is turned to "ALL-OFF," the remote transmit code automatically returns to the normal code (Code 1). Lamp counter reset This function is - Canon LV-7545 | Owners Manual - Page 37
" when controlling a computer with Remote Control of this projector. Projector mode Select " " when controlling a projector with computer. NOTE: Before you control a projector by computer, install USB driver (optionally sold parts) and set up computer following instruction in USB driver package - Canon LV-7545 | Owners Manual - Page 38
Replace Air Filter properly. Make sure that Air Filter is fully inserted. CAUTION Do not operate the projector with Air Filter removed. Dust may accumulate on LCD above symptoms are noticed, contact your authorized dealer or service station for proper cleaning. CLEANING PROJECTION LENS Follow these - Canon LV-7545 | Owners Manual - Page 39
. q Model No. of your projector : LV-7545 q Replacement Lamp Type No. : LV-LP13 (610 293 5868) LAMP REPLACE COUNTER Be sure to reset Lamp Replace Counter when Lamp Assembly is replaced. When Lamp Replace Counter is reset, LAMP REPLACE Indicator stops lighting. 1 Turn projector on, press MENU button - Canon LV-7545 | Owners Manual - Page 40
. Problem: No power. Try these Solutions q Plug a projector into your AC outlet. q Make sure READY Indicator lights. q Wait 90 seconds after a projector is turned OFF when turning a projector back on. NOTE : After pressing Power ON-OFF button to OFF, make sure a projector works as follows: 1. LAMP - Canon LV-7545 | Owners Manual - Page 41
WARNING : High voltages are used to operate this projector. Do not attempt to open the cabinet. If the problem still persists after following all operating instructions, contact the sales dealer where you purchased the projector or the service center. Give the model number and explain the difficulty - Canon LV-7545 | Owners Manual - Page 42
1mW / Wave length : 650±20nm) Owner's Manual AC Power Cord Wireless/Wired Remote Control Transmitter and Batteries Wired remote cable VGA Cable MAC/VGA Adapter 3 Types Control Cable (For PS/2, Serial and ADB port) Protective Dust Cover Lens Cover q The specifications are subject to change without - Canon LV-7545 | Owners Manual - Page 43
supplied). When connecting the Macintosh computer, MAC Adapter (not supplied) is required. Pin Configuration 54 32 1 10 9 8 7 6 15 14 13 12 11 1 Red Input 9 +5V Power with Control Cable. (Control Cable for PS/2 port is supplied, and Control Cables for Serial port and ADB port are not supplied.) - Canon LV-7545 | Owners Manual - Page 44
. 30-2, Shimomaruko 3-chome, Ohta-ku, Tokyo 146-8501, Japan CANON U.S.A., INC. NEW YORK OFFICE One Canon Plaza, Lake Success, NY 11042-1198, U.S.A. CANON U.S.A., INC. LOS ANGELES OFFICE 15955 Alton Parkway, Irvine, CA 92718-3616, U.S.A. CANON CANADA, INC. 6390 Dixie Road Mississauga, Ontario L5T 1P7
-
 1
1 -
 2
2 -
 3
3 -
 4
4 -
 5
5 -
 6
6 -
 7
7 -
8
-
9
-
10
-
11
-
12
-
13
-
14
-
15
-
16
-
17
-
18
-
19
-
20
-
21
-
22
-
23
-
24
-
25
-
26
-
27
-
28
-
29
-
30
-
31
-
32
-
33
-
34
-
35
-
36
-
37
-
38
-
39
-
40
-
41
-
42
-
43
-
44
 |
 |

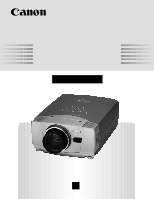
E
English
Multimedia Projector
Owner’s Manual
LV-7545