Canon MultiPASS C5500 User Guide - Page 308
Appendix B Using the MultiPASS C5500 as a Stand-alone Fax, LCD Menu System
 |
View all Canon MultiPASS C5500 manuals
Add to My Manuals
Save this manual to your list of manuals |
Page 308 highlights
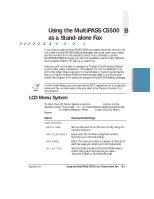
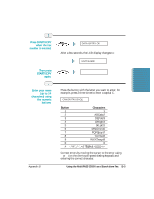
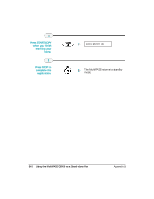
Stand-alone Fax Using the MultiPASS C5500 B as a Stand-alone Fax If you plan to use the MultiPASS C5500 as a stand-alone fax, and you do not install the MultiPASS Desktop Manager, you must enter your name and fax number from the operator panel. If you choose to use the MultiPASS C5500 this way, you will not be able to use its many features, such as speed dialing, PC faxing, or scanning. Also, you will not be able to change the Transmit Confirmation Report to print after every transaction. (The default for the TX REPORT is to print only when there is an error in transmission.) Canon recommends that you install the MultiPASS software as described in the Quick Start Guide. See Chapter 3 for details on using the MultiPASS Desktop Manager. N In the United States, you are required by FCC regulations to include your name and fax number every time you send a fax. Be sure to enter this information. LCD Menu System To enter the LCD Menu System, press the FUNCTION button on the operator panel. Then press < or > to move between selections and press START/COPY to make a selection. Press STOP to exit the LCD Menu System. Option Description/Settings USER SETTINGS DATE & TIME UNIT TELEPHONE # UNIT NAME TEL LINE TYPE Set the date and time (24-hour clock) using the numeric buttons. Enter your fax number using the numeric buttons (up to 20 characters). Enter the name you want to appear at the top of each fax page you send (up to 24 characters). Sets the dialing method the MultiPASS uses to match the type of phone line you have- TOUCH TONE or ROTARY/PULSE. Appendix B Using the MultiPASS C5500 as a Stand-alone Fax B-1
-
 1
1 -
2
-
3
-
4
-
5
-
6
-
7
-
8
-
9
-
10
-
11
-
12
-
13
-
14
-
15
-
16
-
17
-
18
-
19
-
20
-
21
-
22
-
23
-
24
-
25
-
26
-
27
-
28
-
29
-
30
-
31
-
32
-
33
-
34
-
35
-
36
-
37
-
38
-
39
-
40
-
41
-
42
-
43
-
44
-
45
-
46
-
47
-
48
-
49
-
50
-
51
-
52
-
53
-
54
-
55
-
56
-
57
-
58
-
59
-
60
-
61
-
62
-
63
-
64
-
65
-
66
-
67
-
68
-
69
-
70
-
71
-
72
-
73
-
74
-
75
-
76
-
77
-
78
-
79
-
80
-
81
-
82
-
83
-
84
-
85
-
86
-
87
-
88
-
89
-
90
-
91
-
92
-
93
-
94
-
95
-
96
-
97
-
98
-
99
-
100
-
101
-
102
-
103
-
104
-
105
-
106
-
107
-
108
-
109
-
110
-
111
-
112
-
113
-
114
-
115
-
116
-
117
-
118
-
119
-
120
-
121
-
122
-
123
-
124
-
125
-
126
-
127
-
128
-
129
-
130
-
131
-
132
-
133
-
134
-
135
-
136
-
137
-
138
-
139
-
140
-
141
-
142
-
143
-
144
-
145
-
146
-
147
-
148
-
149
-
150
-
151
-
152
-
153
-
154
-
155
-
156
-
157
-
158
-
159
-
160
-
161
-
162
-
163
-
164
-
165
-
166
-
167
-
168
-
169
-
170
-
171
-
172
-
173
-
174
-
175
-
176
-
177
-
178
-
179
-
180
-
181
-
182
-
183
-
184
-
185
-
186
-
187
-
188
-
189
-
190
-
191
-
192
-
193
-
194
-
195
-
196
-
197
-
198
-
199
-
200
-
201
-
202
-
203
-
204
-
205
-
206
-
207
-
208
-
209
-
210
-
211
-
212
-
213
-
214
-
215
-
216
-
217
-
218
-
219
-
220
-
221
-
222
-
223
-
224
-
225
-
226
-
227
-
228
-
229
-
230
-
231
-
232
-
233
-
234
-
235
-
236
-
237
-
238
-
239
-
240
-
241
-
242
-
243
-
244
-
245
-
246
-
247
-
248
-
249
-
250
-
251
-
252
-
253
-
254
-
255
-
256
-
257
-
258
-
259
-
260
-
261
-
262
-
263
-
264
-
265
-
266
-
267
-
268
-
269
-
270
-
271
-
272
-
273
-
274
-
275
-
276
-
277
-
278
-
279
-
280
-
281
-
282
-
283
-
284
-
285
-
286
-
287
-
288
-
289
-
290
-
291
-
292
-
293
-
294
-
295
-
296
-
297
-
298
-
299
-
300
-
301
-
302
-
 303
303 -
 304
304 -
 305
305 -
 306
306 -
 307
307 -
 308
308 -
 309
309 -
 310
310 -
 311
311 -
 312
312 -
 313
313 -
314
-
315
-
316
-
317
-
318
-
319
-
320
-
321
-
322
-
323
-
324
-
325
-
326
-
327
-
328
-
329
-
330
-
331
-
332
 |
 |