Canon PIXMA MX472 User Manual - Page 121
Aligning the Print Head Position Automatically from Your, Computer - scan instructions
 |
View all Canon PIXMA MX472 manuals
Add to My Manuals
Save this manual to your list of manuals |
Page 121 highlights
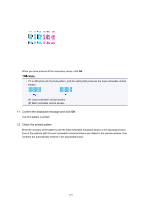
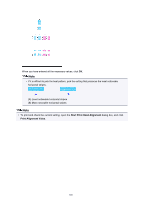
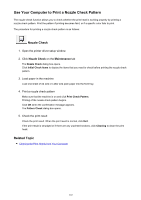
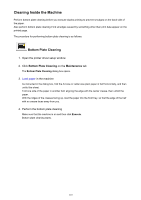
Aligning the Print Head Position Automatically from Your Computer Print head alignment corrects the installation positions of the print head and improves deviated colors and lines. This machine supports two head alignment methods: automatic head alignment and manual head alignment. Normally, the machine is set for automatic head alignment. If the printing results of automatic print head alignment are not satisfactory, perform manual head alignment. The procedure for performing automatic print head alignment is as follows: Print Head Alignment 1. Open the printer driver setup window 2. Click Print Head Alignment on the Maintenance tab The Start Print Head Alignment dialog box opens. 3. Load paper in the machine Load one sheet of A4 size or Letter size plain paper into the front tray. Note • The number of sheets to be used differs when you select the manual head alignment. 4. Print head alignment pattern printing Make sure that the machine is on and click Align Print Head. The adjustment pattern is printed. Important • Do not open the paper output cover while printing is in progress. 5. Adjustment pattern scanning After the adjustment pattern is printed, a message is displayed. As instructed in the message, load the adjustment pattern onto the platen, and press the Start button on the machine. Print head alignment starts. Note • To print and check the current setting, open the Start Print Head Alignment dialog box, and click Print Alignment Value. 121
-
 1
1 -
2
-
3
-
4
-
5
-
6
-
7
-
8
-
9
-
10
-
11
-
12
-
13
-
14
-
15
-
16
-
17
-
18
-
19
-
20
-
21
-
22
-
23
-
24
-
25
-
26
-
27
-
28
-
29
-
30
-
31
-
32
-
33
-
34
-
35
-
36
-
37
-
38
-
39
-
40
-
41
-
42
-
43
-
44
-
45
-
46
-
47
-
48
-
49
-
50
-
51
-
52
-
53
-
54
-
55
-
56
-
57
-
58
-
59
-
60
-
61
-
62
-
63
-
64
-
65
-
66
-
67
-
68
-
69
-
70
-
71
-
72
-
73
-
74
-
75
-
76
-
77
-
78
-
79
-
80
-
81
-
82
-
83
-
84
-
85
-
86
-
87
-
88
-
89
-
90
-
91
-
92
-
93
-
94
-
95
-
96
-
97
-
98
-
99
-
100
-
101
-
102
-
103
-
104
-
105
-
106
-
107
-
108
-
109
-
110
-
111
-
112
-
113
-
114
-
115
-
 116
116 -
 117
117 -
 118
118 -
 119
119 -
 120
120 -
 121
121 -
 122
122 -
 123
123 -
 124
124 -
 125
125 -
 126
126 -
127
-
128
-
129
-
130
-
131
-
132
-
133
-
134
-
135
-
136
-
137
-
138
-
139
-
140
-
141
-
142
-
143
-
144
-
145
-
146
-
147
-
148
-
149
-
150
-
151
-
152
-
153
-
154
-
155
-
156
-
157
-
158
-
159
-
160
-
161
-
162
-
163
-
164
-
165
-
166
-
167
-
168
-
169
-
170
-
171
-
172
-
173
-
174
-
175
-
176
-
177
-
178
-
179
-
180
-
181
-
182
-
183
-
184
-
185
-
186
-
187
-
188
-
189
-
190
-
191
-
192
-
193
-
194
-
195
-
196
-
197
-
198
-
199
-
200
-
201
-
202
-
203
-
204
-
205
-
206
-
207
-
208
-
209
-
210
-
211
-
212
-
213
-
214
-
215
-
216
-
217
-
218
-
219
-
220
-
221
-
222
-
223
-
224
-
225
-
226
-
227
-
228
-
229
-
230
-
231
-
232
-
233
-
234
-
235
-
236
-
237
-
238
-
239
-
240
-
241
-
242
-
243
-
244
-
245
 |
 |