Canon PIXMA SELPHY CP510 SELPHY CP710/CP510 User Guide - Page 32
Placing the Printer
 |
View all Canon PIXMA SELPHY CP510 manuals
Add to My Manuals
Save this manual to your list of manuals |
Page 32 highlights
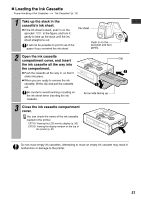
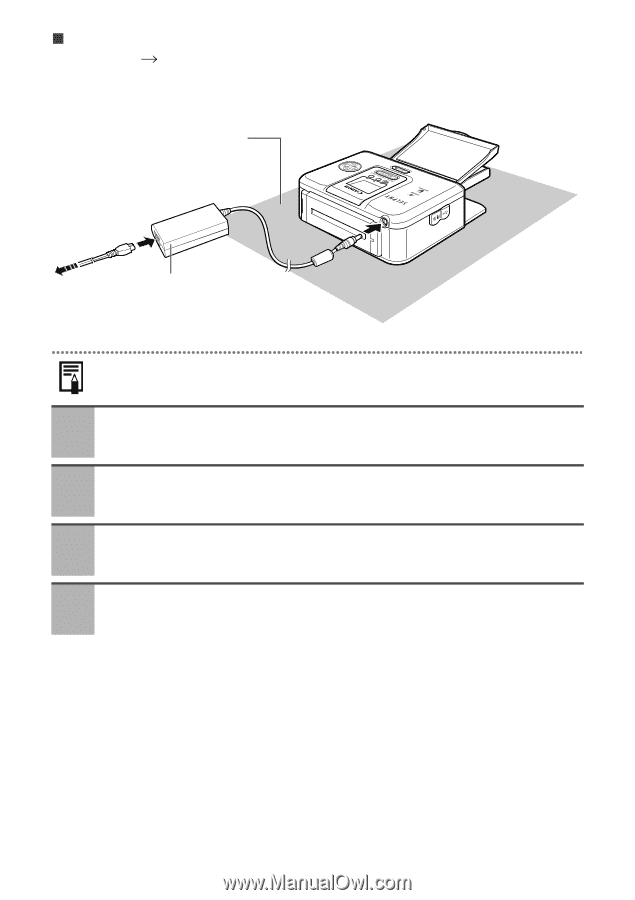
„ Placing the Printer Usage Location "Usage Location" (p. 14) Refer to the figure below when placing the printer. Numbers in the figure correspond to the steps in the procedure below. 1 15 cm (6 in.) at the front and back of the device and 10 cm (4 in.) on both sides or more of open space 2 3 To power outlet Compact power 4 adapter The battery pack (sold separately) also can be used (p. 55). 1 Place the printer on a flat area. 2 Connect the supplied power cord to the supplied Compact Power Adapter CA-CP200. 3 Insert the plug in a power outlet. 4 Connect the compact power adapter cable to the printer. 30
-
 1
1 -
2
-
3
-
4
-
5
-
6
-
7
-
8
-
9
-
10
-
11
-
12
-
13
-
14
-
15
-
16
-
17
-
18
-
19
-
20
-
21
-
22
-
23
-
24
-
25
-
26
-
 27
27 -
 28
28 -
 29
29 -
 30
30 -
 31
31 -
 32
32 -
 33
33 -
 34
34 -
 35
35 -
 36
36 -
 37
37 -
38
-
39
-
40
-
41
-
42
-
43
-
44
-
45
-
46
-
47
-
48
-
49
-
50
-
51
-
52
-
53
-
54
-
55
-
56
-
57
-
58
-
59
-
60
-
61
-
62
-
63
-
64
-
65
-
66
-
67
-
68
-
69
 |
 |
30
Placing the Printer
Usage Location
"Usage Location" (p. 14)
Refer to the figure below when placing the printer. Numbers in the figure correspond to
the steps in the procedure below.
The battery pack (sold separately) also can be used (p. 55).
1
Place the printer on a flat area.
2
Connect the supplied power cord to the supplied Compact Power
Adapter CA-CP200.
3
Insert the plug in a power outlet.
4
Connect the compact power adapter cable to the printer.
To power outlet
Compact power
adapter
15 cm (6 in.) at the front and
back of the device
and 10 cm (4 in.) on both sides
or more of open space
1
2
3
4