Canon PowerShot A40 PowerShot A40/A30 Camera User Guide - Page 68
Compose the next shot, taking care
 |
View all Canon PowerShot A40 manuals
Add to My Manuals
Save this manual to your list of manuals |
Page 68 highlights
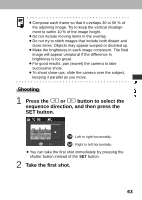
3 Compose the next shot, taking care to overlap the previous image. ¡Minor discrepancies in the o verlapping portions can be corrected when the images are stitched together . ¡If you are not satisfied with the pre vious shot, you can use or button to return to that shot and reshoot it. 4 Take additional shots for the panorama in the same way. ¡You can take as many as 26 images. 5 After taking the final image, press the SET button. ¡For information on the settings you can change, see "Functions Available in Each Shooting Mode" (p. 82). ¡The settings in place for the first image are locked in and cannot be changed for subsequent shots. ¡It is not possible to display the images that appear on the LCD monitor on a TV monitor when shooting in Stitch Assist mode. 64
-
 1
1 -
2
-
3
-
4
-
5
-
6
-
7
-
8
-
9
-
10
-
11
-
12
-
13
-
14
-
15
-
16
-
17
-
18
-
19
-
20
-
21
-
22
-
23
-
24
-
25
-
26
-
27
-
28
-
29
-
30
-
31
-
32
-
33
-
34
-
35
-
36
-
37
-
38
-
39
-
40
-
41
-
42
-
43
-
44
-
45
-
46
-
47
-
48
-
49
-
50
-
51
-
52
-
53
-
54
-
55
-
56
-
57
-
58
-
59
-
60
-
61
-
62
-
 63
63 -
 64
64 -
 65
65 -
 66
66 -
 67
67 -
 68
68 -
 69
69 -
 70
70 -
 71
71 -
 72
72 -
 73
73 -
74
-
75
-
76
-
77
-
78
-
79
-
80
-
81
-
82
-
83
-
84
-
85
-
86
-
87
-
88
-
89
-
90
-
91
-
92
-
93
-
94
-
95
-
96
-
97
-
98
-
99
-
100
-
101
-
102
-
103
-
104
-
105
-
106
-
107
-
108
-
109
-
110
-
111
-
112
-
113
-
114
-
115
-
116
-
117
-
118
-
119
-
120
-
121
-
122
-
123
-
124
-
125
-
126
-
127
-
128
-
129
-
130
-
131
-
132
-
133
-
134
-
135
-
136
-
137
-
138
-
139
-
140
-
141
-
142
-
143
-
144
-
145
-
146
-
147
-
148
-
149
-
150
-
151
-
152
-
153
-
154
-
155
-
156
-
157
-
158
-
159
-
160
-
161
-
162
-
163
-
164
-
165
-
166
-
167
-
168
-
169
-
170
-
171
-
172
-
173
-
174
-
175
-
176
-
177
-
178
-
179
-
180
-
181
-
182
-
183
 |
 |
