Canon PowerShot Pro70 PowerShot Pro70 Hardware Guide
Canon PowerShot Pro70 Manual
 |
View all Canon PowerShot Pro70 manuals
Add to My Manuals
Save this manual to your list of manuals |
Canon PowerShot Pro70 manual content summary:
- Canon PowerShot Pro70 | PowerShot Pro70 Hardware Guide - Page 1
Hardware Guide This guide explains the functions of this product. Please read it to understand the correct handling procedures before using the product. - Canon PowerShot Pro70 | PowerShot Pro70 Hardware Guide - Page 2
Introduction Thank you for purchasing a Canon PowerShot Pro70 Digital Camera. The PowerShot Pro70 is a high-quality, high-resolution digital camera. Equipped with a diverse range of advanced functions, the PowerShot Pro70 can accommodate the needs of any photographer with its easy-to-use auto mode, - Canon PowerShot Pro70 | PowerShot Pro70 Hardware Guide - Page 3
camera distributor if you should find anything missing. • PowerShot Pro70 • Lens Cap • Shoulder Strap SS-PS200 • CompactFlash™ Card (CF card) • Battery Pack NB-4H • Compact Power Adapter CA-PS200 • DC Coupler DR-200 • Power Cord • Video Cable VC-100 • Hardware Guide (this guide) • Software Guide - Canon PowerShot Pro70 | PowerShot Pro70 Hardware Guide - Page 4
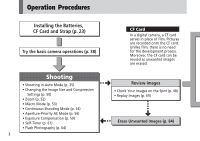
(p. 52) • Macro Mode (p. 53) • Continuous Shooting Mode (p. 54) • Aperture-Priority AE Mode (p. 56) • Exposure Compensation (p. 59) • Self-Timer (p. 61) • Flash Photography (p. 64) 2 CF Card In a digital camera, a CF card serves in place of film. Pictures are recorded onto the CF card. Unlike film - Canon PowerShot Pro70 | PowerShot Pro70 Hardware Guide - Page 5
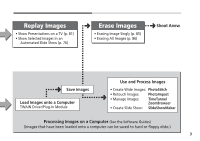
Images onto a Computer TWAIN Driver/Plug-In Module Use and Process Images • Create Wide Images: PhotoStitch • Retouch Images: PhotoImpact • Manage Images: TimeTunnel ZoomBrowser • Create Slide Show: SlideShowMaker Processing Images on a Computer (See the Software Guides) (Images that have - Canon PowerShot Pro70 | PowerShot Pro70 Hardware Guide - Page 6
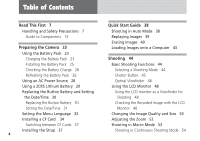
and Safety Precautions 7 Guide to Components 13 Preparing the Camera 23 Using the Battery Pack 23 Charging the Battery Pack 23 Installing the Battery Pack 25 Checking the Battery Charge 26 Refreshing the Battery Pack 26 Using an AC Power Source 28 Using a 2CR5 Lithium Battery 29 Replacing the Button - Canon PowerShot Pro70 | PowerShot Pro70 Hardware Guide - Page 7
AE Mode Settings 56 Exposure Compensation 59 Shooting with the Self-Timer 61 Shooting with the EOS Remote Switch 63 Attaching the Remote Switch 63 Shooting with the EOS Remote Switch 63 Shooting with a Flash 64 Using a 220EX or 380EX Flash 64 Using Other Flashes 66 Adding a Sound Annotation to - Canon PowerShot Pro70 | PowerShot Pro70 Hardware Guide - Page 8
the Power Save Settings 91 Setting the Date/Time 93 Setting the Language 93 Resetting the File Number 94 Formatting a CF Card 95 Copying Images between CF Cards 96 Copying Images Singly 96 Copying All the Images 97 6 Appendices 98 Camera Maintenance 98 Optional Accessories 99 Troubleshooting - Canon PowerShot Pro70 | PowerShot Pro70 Hardware Guide - Page 9
Precautions Thank you for purchasing a Canon product. Please ensure that you read and understand these handling and safety precautions before you operate your PowerShot Pro70 Digital Camera. Once you have read these instructions, we recommend that you keep the camera with you and try each function - Canon PowerShot Pro70 | PowerShot Pro70 Hardware Guide - Page 10
instruct you in the safe and correct operation of the camera and its accessories to prevent injuries or damage to yourself, other persons and equipment. • In the next few pages, the term "equipment" refers primarily to the camera and its power supply accessories to the camera or batteries by a child - Canon PowerShot Pro70 | PowerShot Pro70 Hardware Guide - Page 11
in fire or electrical shock. Immediately shut off the camera's power switch and remove the camera battery or unplug the power adapter cord from the electrical outlet. Please consult your camera distributor or the closest Canon Customer Support Help Desk. • Prevent the equipment from contact with - Canon PowerShot Pro70 | PowerShot Pro70 Hardware Guide - Page 12
or other hazards. Use only the recommended compact power adapter and accessories. • Power down the computer and unplug the power adapter cord before attempting to connect the interface cable to avoid the risk of electrical shock. • Do not place the battery pack near a heat source or expose it to - Canon PowerShot Pro70 | PowerShot Pro70 Hardware Guide - Page 13
only recommended batteries and accessories. • Use only the recommended compact power adapter to charge rechargeable batteries. Use of chargers not expressly recommended may result in overheating, distortion, fire or electrical shock. • Disconnect the compact power adapter from both the camera and - Canon PowerShot Pro70 | PowerShot Pro70 Hardware Guide - Page 14
malfunctions or corrupt image data. Avoid Condensation Related Problems Moving the equipment rapidly between hot and cold Camera Stop using the camera immediately if you detect condensation. Continued use may damage the equipment. Remove the CF card, batteries and power adapter cord from the camera - Canon PowerShot Pro70 | PowerShot Pro70 Hardware Guide - Page 15
Holder (p. 37) Self-Timer Lamp (p. 61) Shutter Button (p. 45) Filter Mount Accepts generic filters (37 mm diameter) Please note that a portion of the filter may appear on the edges of the image with some brands of filter. Protect the lens with the supplied cap when the camera is not being - Canon PowerShot Pro70 | PowerShot Pro70 Hardware Guide - Page 16
Optical Viewfinder Turn this dial to adjust the viewfinder focus. LCD Monitor (p. 20) Bottom View CF Card Slot Cover 14 (p. 34) Control Panel (p. 17) Button Battery Cover (p. 30) Strap Holder (p. 37) + Button Set Button - Button Indicators (p. 15) Tripod Socket - Canon PowerShot Pro70 | PowerShot Pro70 Hardware Guide - Page 17
) Flashing Green (Slow): Writing/Reading to/ from CF card Flashing Red: Camera blur warning (low light warning) • Lower Indicator Orange: Macro Mode • Flash Attached When a flash (EOS Speedlite Series 220EX/380EX) is attached and turned on, pressing the shutter button halfway causes the - Canon PowerShot Pro70 | PowerShot Pro70 Hardware Guide - Page 18
the optional EOS Remote Switch RS-80N3 here. Terminal Cover Video Out Terminal Attach a video cable here to connect to a TV. Digital Terminal Attach an interface cable here to connect to a computer. 16 Mode Dial The mode dial can be used to select the camera mode and turn the camera power on and - Canon PowerShot Pro70 | PowerShot Pro70 Hardware Guide - Page 19
Read This First Control Panel CF Button (p. 35) Menu Button LCD/Video Button (pp. 48, 81) Multi/Quality Button (pp. 50, 69) Jump/Drive Button (pp. 55, 61, 70) Macro Button ( ) (p. 53) Microphone Button ( ) (pp. 67, 74) Info/+/- Button (pp. 56, 59, 72) Display Panel (p. 18) The names of the three - Canon PowerShot Pro70 | PowerShot Pro70 Hardware Guide - Page 20
Read This First Display Panel Icons, symbols and numbers indicating the camera status (such as camera settings, the battery charge and the approximate number of images remaining) are shown here. CF Card Status CF card in slot 1 1 1 (Flashing) CF card in slot 1 is selected - Canon PowerShot Pro70 | PowerShot Pro70 Hardware Guide - Page 21
(Flashing) Non-operable (Flashing) Low button battery Date/time not set (Flashing) Shooting Mode Settings Macro Mode Self-Timer Mode 12 -2 -1 0 +1 +2 Exposure Compensation Settings Single Mode Continuous Shooting Mode Remaining Images and Camera Status The approximate number of images remaining - Canon PowerShot Pro70 | PowerShot Pro70 Hardware Guide - Page 22
Read This First LCD Monitor Open the LCD monitor to view a subject during shooting, to replay images in play mode and to change menu settings. The LCD monitor can be moved within the following ranges. Opens 180° to the left. Locks at the 90° position. The LCD monitor automatically shuts off when - Canon PowerShot Pro70 | PowerShot Pro70 Hardware Guide - Page 23
on the LCD monitor and the image will appear in its natural orientation. Please note that, unless the LCD monitor is fully folded against the camera body (until it clicks), the image will show as a mirror reflection and icons or messages will not appear. • White or bright-colored vertical smears - Canon PowerShot Pro70 | PowerShot Pro70 Hardware Guide - Page 24
if 5 minutes pass without a function being accessed while the camera is connected to a computer. The camera will power down if another minute passes without a function being accessed. 22 • If the camera has powered down with the power save function, power can be restored by turning the mode dial or - Canon PowerShot Pro70 | PowerShot Pro70 Hardware Guide - Page 25
the camera for use. Using the Battery Pack Use rechargeable Battery Pack NB-4H, which is bundled with the camera, as the battery power source. Ensure that the battery pack has been fully charged before you install it in the camera. • Compact Power Adapter CA-PS200 can be used with power supplies - Canon PowerShot Pro70 | PowerShot Pro70 Hardware Guide - Page 26
, the indicator will change to a steady green. Battery Pack NB-4H • The compact power adapter will not charge while the DC Coupler DR-200 is connect. Ensure that the DC coupler is not connected before attempting to charge the battery pack. Compact Power Adapter CA-PS200 24 Charging Indicator - Canon PowerShot Pro70 | PowerShot Pro70 Hardware Guide - Page 27
products other than the specified Canon products. • The battery pack continues to discharge a minimal portion of its power while installed in the camera, even with the camera power off. This will shorten the battery life. • Remove the battery pack from the camera during extended periods of disuse - Canon PowerShot Pro70 | PowerShot Pro70 Hardware Guide - Page 28
pack has not been used for an extended period of time. • It takes approximately 6 hours and 30 minutes to refresh the battery pack (with Compact Power Adapter CA-PS200 according to standard Canon testing conditions). s Refresh times will vary with the ambient temperature and charge state of the - Canon PowerShot Pro70 | PowerShot Pro70 Hardware Guide - Page 29
pack. Leave it in this state until the charging indicator shines steady green to indicate that charging is complete. • Compact Power Adapter CA-PS200 will not refresh the battery pack while the DC Coupler DR-200 is connect. Ensure that the DC coupler is not connected before attempting to refresh - Canon PowerShot Pro70 | PowerShot Pro70 Hardware Guide - Page 30
. 3. Install DC Coupler DR-200 in the camera as shown below and attach it to the DC terminal on the compact power adapter. The camera indicator will shine red, indicating that the camera is ready to use. DC Coupler DR-200 Camera Indicator Compact Power Adapter CA-PS200 Cable Cover DC Terminal - Canon PowerShot Pro70 | PowerShot Pro70 Hardware Guide - Page 31
4H is unavailable, use a generic 2CR5 lithium battery in the camera. Install a 2CR5 lithium battery as shown. 2CR5 • It is advisable to use Battery Pack NB-4H or an AC power source as the standard power source for the camera. • It is best to avoid using lithium batteries for long periods of time in - Canon PowerShot Pro70 | PowerShot Pro70 Hardware Guide - Page 32
CR 2025 lithium cell and reset the date and time. • The initial button battery is installed in the camera at the factory for testing purposes. • The button battery icon will continue to flash in the display panel even if the button battery has been replaced if the date and time have not been reset - Canon PowerShot Pro70 | PowerShot Pro70 Hardware Guide - Page 33
Preparing the Camera 4. Remove the button battery. Shift it in the direction shown to allow its removal. Setting the Date/Time After the button battery has been replaced, follow the procedures below to reset the date and time settings. 1. Set the mode dial to play, auto or program. 5. Install the - Canon PowerShot Pro70 | PowerShot Pro70 Hardware Guide - Page 34
Preparing the Camera -+ SET 5. Press the + or - button to change the setting and the set button to advance to the next field. A 24-hour clock is used. (Example: - Canon PowerShot Pro70 | PowerShot Pro70 Hardware Guide - Page 35
Preparing the Camera Setting the Menu Language 1. Set the mode dial to play. 2. While you press and hold the set button, press the jump button. The language menu - Canon PowerShot Pro70 | PowerShot Pro70 Hardware Guide - Page 36
a CF Card Install CF cards as the storage media for the images recorded by the camera. Up to two CF cards may be installed at once. • One CF card is bundled with the camera. Please purchase another to install a second card. 1. Set the mode dial to lock. 2. Slide the CF card cover - Canon PowerShot Pro70 | PowerShot Pro70 Hardware Guide - Page 37
into lock position and close the cover. Lock Lever (Lock Position) Preparing the Camera • Ensure that the lock lever is set in the lock position after installing a reflect standard shooting conditions established by Canon. Actual totals may vary according to the subject and shooting conditions - Canon PowerShot Pro70 | PowerShot Pro70 Hardware Guide - Page 38
• Do not remove the battery or remove a CF card while the camera is writing to a CF card, erasing images or reading from a CF card. • A CF card is a high-precision electronic component. Do not bend, apply force to, - Canon PowerShot Pro70 | PowerShot Pro70 Hardware Guide - Page 39
Preparing the Camera Switching between CF Cards If two CF cards are installed, use you wish to use in the display panel. CF Installing the Strap A shoulder strap is supplied with this camera. Follow the procedures below to install the strap. 1. Insert the end of the strap down through the strap - Canon PowerShot Pro70 | PowerShot Pro70 Hardware Guide - Page 40
Quick Start Guide Quick Start Guide Now that the camera is ready to use, explore its features with some actual Mode Dial 1. Set the mode dial to auto. The camera will power up and the number of remaining images, the battery status mark and other applicable icons will display in the display - Canon PowerShot Pro70 | PowerShot Pro70 Hardware Guide - Page 41
shutter button all the way, but your subject may not be in focus. You can view your images on the camera's LCD monitor immediately after taking them. Mode Dial Quick Start Guide 4. After the beeps, press the shutter button all the way. A single beep after the shutter button is pressed indicates - Canon PowerShot Pro70 | PowerShot Pro70 Hardware Guide - Page 42
Quick Start Guide 3. Press the + or - button to view the next or previous image. - - Button: Displays the previous image + + Button: Displays the next image 4. When finished viewing, set the mode dial to lock. • The camera also features additional playback functions, such as the multi image display - Canon PowerShot Pro70 | PowerShot Pro70 Hardware Guide - Page 43
Quick Start Guide 3. Press the + or - button to advance the selection to [Erase]. Press the set button. 5. The image in step 1 will appear. Press the + or - button as - Canon PowerShot Pro70 | PowerShot Pro70 Hardware Guide - Page 44
Quick Start Guide 7. When you have finished erasing unwanted images, press the menu button. Pressing the menu button a second time closes the play menu. • In addition to the procedures for erasing described above, the camera features a shortcut method ( which involves pressing and holding the set - Canon PowerShot Pro70 | PowerShot Pro70 Hardware Guide - Page 45
you have shot onto a computer and save them to disk and edit or retouch them. For instructions on how to load images onto a computer, please read the Software Guide. PC Interface Cable IFC-100PC PowerShot Pro70 v Windows® Computer v v Macintosh Interface Cable IFC-100MC Macintosh Computer 43 - Canon PowerShot Pro70 | PowerShot Pro70 Hardware Guide - Page 46
the mode dial to program. Mode Dial • Auto Mode Set the mode dial to auto. In auto mode, you simply point and shoot because the camera sets all of the settings for you. • The image quality can be set to either normal or fine (p. 50). 44 • The image size is fixed - Canon PowerShot Pro70 | PowerShot Pro70 Hardware Guide - Page 47
, but your subject may not be in focus. • The upper indicator will flash red if there is insufficient light and a risk that hand tremors or camera movement will blur the image. • In macro mode, the lower indicator will shine orange. • If the LCD monitor is on in exposure compensation mode, the - Canon PowerShot Pro70 | PowerShot Pro70 Hardware Guide - Page 48
display the word "busy." • If the LCD monitor is on, or the review function is set to on with the setup menu, the image will display after the long as the shutter button remains fully depressed. Optical Viewfinder The camera features an optical viewfinder for use in taking standard shots. Shutter - Canon PowerShot Pro70 | PowerShot Pro70 Hardware Guide - Page 49
places. Focus Lock Lock the focus by pressing the shutter button halfway and holding it there. This allows you to shift the orientation of the camera without changing the focal distance. This function is particularly useful for composing an image in which the main subject is off to one side or - Canon PowerShot Pro70 | PowerShot Pro70 Hardware Guide - Page 50
LCD/Video button again. Checking the Recorded Image with the LCD Monitor The review function allows you to check the image on the LCD monitor after it the monitor has not been turned on. This function conserves the battery charge since the LCD monitor remains off except while the image is being - Canon PowerShot Pro70 | PowerShot Pro70 Hardware Guide - Page 51
2. Press the menu button. MENU -+ SET 3. Select [Review] by pressing the + or - button. Press the set button. 4. Select [On] by pressing the + or - button. Press the set button. 5. Press the menu button to - Canon PowerShot Pro70 | PowerShot Pro70 Hardware Guide - Page 52
Shooting Changing the Image Quality and Size The camera can shoot with the following image quality and size 1536 x 1024) CCD RAW (No Compression) 1,940 KB Figures noted herein reflect standard Canon shooting conditions. Actual file sizes may vary with different subjects. • Large and small sizes - Canon PowerShot Pro70 | PowerShot Pro70 Hardware Guide - Page 53
2. Press the quality button repeatedly until the desired quality and size combination appears in the display panel. • In Auto Mode MULTI QUALITY • In Program Mode MULTI QUALITY Shooting The settings are effective until the quality and size settings are next changed. 51 - Canon PowerShot Pro70 | PowerShot Pro70 Hardware Guide - Page 54
in macro mode, which can focus on an object as close as 12 cm to the lens tip. Macro mode can be used with the camera set to either auto or program. 1. Open the LCD monitor and set the mode dial to auto or program. 2. Press the macro button ( ). The macro - Canon PowerShot Pro70 | PowerShot Pro70 Hardware Guide - Page 55
Shooting up to approximately a 49 mm setting if the zoom lever is pushed in the direction of the wide angle setting. 3. Set the LCD monitor to a comfortable position for viewing and press the LCD/ Video button. LCD/VIDEO 4. Confirm the composition in the LCD monitor and shoot the image. • In macro - Canon PowerShot Pro70 | PowerShot Pro70 Hardware Guide - Page 56
and continue to hold it. Continuous shooting will commence and a beep will sound each time a frame is shot. While the shutter button is held, the camera will continue to take up to 20 shots unless the CF card is full. - Canon PowerShot Pro70 | PowerShot Pro70 Hardware Guide - Page 57
indicator will flash green while the images are being written to the CF card and no other camera functions can be operated. • Any flash connected to the camera will not fire while the camera is set to the continuous shooting mode. • In continuous shooting mode, the image size is automatically set - Canon PowerShot Pro70 | PowerShot Pro70 Hardware Guide - Page 58
Shooting Shooting in Aperture-Priority AE Mode In aperture-priority AE mode, you can select the aperture setting to control the depth of field. The shutter speed will automatically be set to match your choice of aperture setting and the brightness of the subject. 3. Press the menu button. MENU • - Canon PowerShot Pro70 | PowerShot Pro70 Hardware Guide - Page 59
4. Select [Aperture] by pressing the + or button. Press the set button. -+ SET 5. Select an aperture setting by pressing the + or - button. Press the set button. Full Open: Aperture set to maximum. The F-Stop value will vary with the zoom setting. Wide Angle (28 mm): F2.0 Telephoto (70 mm): F2.4 F2 - Canon PowerShot Pro70 | PowerShot Pro70 Hardware Guide - Page 60
the shutter speed will display in red. Reset the aperture to a smaller value or proceed with the shot taking care to prevent hand tremors or camera movement from blurring the image. • If the aperture setting you have chosen results in the subject being to bright, the shutter speed will display in - Canon PowerShot Pro70 | PowerShot Pro70 Hardware Guide - Page 61
AE mode. - Turning off the LCD monitor. - Closing the LCD monitor. - Powering down the camera with the power save function. To shoot for extended periods of time in aperturepriority AE mode, it is advisable to turn off the power save function (p. 83). - Setting the mode dial to a setting other than - Canon PowerShot Pro70 | PowerShot Pro70 Hardware Guide - Page 62
AE mode, please note that the exposure compensation function cannot be used with a flash. • Dark images can be brightened with image processing application software when the images have been loaded onto a computer. However, please note that it is difficult to darken images that are over-exposed. - Canon PowerShot Pro70 | PowerShot Pro70 Hardware Guide - Page 63
double beep and then press the shutter button all the way. The self-timer will activate, 10 seconds later a single beep will sound and the shot will be taken. The self-timer lamp on the front of the camera will flash while the self-timer is working. The flashing will speed up two seconds before the - Canon PowerShot Pro70 | PowerShot Pro70 Hardware Guide - Page 64
4. When you have finished with the selftimer, press the drive button again. The self-timer icon will disappear from the display panel. • The self-timer mode is canceled by setting the mode dial to a new position. • The self-timer lamp may not be visible from some angles in front of the camera. 62 - Canon PowerShot Pro70 | PowerShot Pro70 Hardware Guide - Page 65
with the EOS Remote Switch The camera can be used with the optional EOS Remote Switch RS-80N3. It can also be used with the optional EOS Remote Switch 60T3, an older version, with the optional RAN3 Adapter. Attaching the Remote Switch Open the terminal cover and attach the remote switch to the - Canon PowerShot Pro70 | PowerShot Pro70 Hardware Guide - Page 66
less than one meter may be inconsistently illuminated. • Please read the manual accompanying the flash. Attach the flash to the camera's accessory shoe as shown. Using a 220EX or 380EX Flash 1. Turn on the flash's power switch and set the camera's mode dial to auto or program. • Auto Mode The flash - Canon PowerShot Pro70 | PowerShot Pro70 Hardware Guide - Page 67
of firing Select the optimal aperture setting according to the flash guide number and the distance from the subject. 2. Press the shutter the shot. • The camera is not compatible with high- speed sync (Focal Plane Flash) and multiple flash setup photography. • The camera is compatible with the auto - Canon PowerShot Pro70 | PowerShot Pro70 Hardware Guide - Page 68
the flash's power switch and set the camera's mode dial Select the optimal aperture setting according to the flash guide number and the distance from the subject. • an aperture value. 66 3. Press the shutter button halfway. The camera's indicator will flash green when it is ready to shoot. Check - Canon PowerShot Pro70 | PowerShot Pro70 Hardware Guide - Page 69
Adding a Sound Annotation to an Image A sound annotation can be added with the camera's microphone to an image immediately The microphone icon ( ) will display in the display panel and LCD monitor while after it is shot. The recorded sound - Canon PowerShot Pro70 | PowerShot Pro70 Hardware Guide - Page 70
Shooting Listening to a Sound Annotation A sound annotation can be replayed on a computer. Please read the Software Guide for details. 68 - Canon PowerShot Pro70 | PowerShot Pro70 Hardware Guide - Page 71
Replaying This section describes the play function. In addition to basic replay functions, the camera features slide show and TV replay functions. Single Image Playback You can view recorded images one at a time on the LCD monitor. 1. Set the mode - Canon PowerShot Pro70 | PowerShot Pro70 Hardware Guide - Page 72
Multi Image Playback You can display sets of nine recorded images on the LCD monitor. 1. Set the mode dial to play. The last recorded image will display on the LCD monitor. 2. Press the multi button. MULTI QUALITY Selected Image 3. Move the selection frame within the display by pressing the + or - - Canon PowerShot Pro70 | PowerShot Pro70 Hardware Guide - Page 73
Jumping Images In jump mode, you can shift the display by 10 images in single image playback. In multi image playback, the jump mode shifts the display to the next or previous set of nine images. Jumping in Single Image Playback 1. Press the jump button. JUMP DRIVE The jump bar will display in - Canon PowerShot Pro70 | PowerShot Pro70 Hardware Guide - Page 74
Replaying 3. Press the jump button again to cancel the jump mode. Jumping in Multi Image Playback 1. Press the jump button. The jump bar will display in the LCD monitor. Jump Bar 2. The following actions can be taken. To Display the Set of Nine Images Ahead or Behind • Press the + button to display - Canon PowerShot Pro70 | PowerShot Pro70 Hardware Guide - Page 75
shot in Stitch Assist mode with a Canon PowerShot A5 or other camera. • The information displayed in multi image playback includes the frame number of the selected image and the total number of images. When the total number of images exceeds four digits, the number appears as [####]. 73 Replaying - Canon PowerShot Pro70 | PowerShot Pro70 Hardware Guide - Page 76
Adding Sound Annotations during Playback Replaying A sound annotation may be added to an image with the camera's microphone while it is displayed in play mode. The recorded sound annotation may be replayed on a computer. 1. In play mode, display the image to which - Canon PowerShot Pro70 | PowerShot Pro70 Hardware Guide - Page 77
Listening to Sound Annotations A sound annotation can be replayed on a computer. Please read the Software Guide for details. Automated Playback (Slide Show) The camera is equipped with a slide show function that automatically replays a CF card's images consecutively. The images in a slide show can - Canon PowerShot Pro70 | PowerShot Pro70 Hardware Guide - Page 78
3. Select [Slide Show] by pressing the + or - button. Press the set button. The slide show menu will display. Marking Images This function is used to mark or unmark images for replay in a slide show. An image can be marked for inclusion in slide shows 1 to 3. 1. Display the slide show menu. 2. - Canon PowerShot Pro70 | PowerShot Pro70 Hardware Guide - Page 79
4. Select the first image you wish to show by pressing the + or - button to display it and the set button to mark it. Use the same procedure to mark additional images for replay in the order they are marked. Slide Number • You can unmark a marked image by selecting it and pressing the set button. • - Canon PowerShot Pro70 | PowerShot Pro70 Hardware Guide - Page 80
button. Press the set button. 3. Select a play time by pressing the + or button. Press the set button. The selected setting will be saved by the camera. The +/- Manual option allows you to manually advance a show during replay. - Canon PowerShot Pro70 | PowerShot Pro70 Hardware Guide - Page 81
3. Select [On] by pressing the + or button. Press the set button. • The play time will be effective until you change the setting or the camera battery is replaced. Setting a Slide Show to Repeat You can set it so that a slide show either finishes after it has displayed all of its images - Canon PowerShot Pro70 | PowerShot Pro70 Hardware Guide - Page 82
80 restart the show. Press the menu button to stop the slide show. • +/- Manual Play Time Setting Press the + or - button to display the next or previous or if the +/Manual setting has been selected. • When it is set to on, the power save function will not power down the camera while a slide show - Canon PowerShot Pro70 | PowerShot Pro70 Hardware Guide - Page 83
to lock. Turn off the TV. 2. Use the supplied video cable to connect the camera's video out terminal to the TV's video in terminal. Video In Terminal on the on the TV and switch it to the video setting (TV/Video). 4. Set the camera's mode dial to play. 5. If the LCD monitor turns on, press the LCD - Canon PowerShot Pro70 | PowerShot Pro70 Hardware Guide - Page 84
Marking Images for Automatic Printing This function marks images on a CF card for automatic printing with a digital printer. Place a marked CF card into the optional CD-200 digital printer to automatically print the selected images in one step. 1. Set the mode dial to play. 2. Press the menu - Canon PowerShot Pro70 | PowerShot Pro70 Hardware Guide - Page 85
convenient for navigating if there are numerous images on the CF card. 6. When you have finished marking images, press the menu button. The mark data will be saved to the CF card. • A maximum of 100 images can be marked for printing. This number may be smaller, however, if the CF card is close to - Canon PowerShot Pro70 | PowerShot Pro70 Hardware Guide - Page 86
Erasing Erasing This section explains how to erase recorded images from a CF card. Erasing the Display Image Directly If you come across an unwanted image in single image playback, you can easily erase it with the following procedure. 1. Set the mode dial to play and display images in single - Canon PowerShot Pro70 | PowerShot Pro70 Hardware Guide - Page 87
Erasing Images Singly This function allows you to erase images oneby-one as they display on the LCD monitor. The sound annotations associated with images can be erased independently of the images. 1. Set the mode dial to play. The last recorded image will display on the LCD monitor. 2. Press the - Canon PowerShot Pro70 | PowerShot Pro70 Hardware Guide - Page 88
Erasing 5. Select the image you wish to erase by pressing the + or - button. • To Erase the Image Press the set button. • To Erase the Sound Annotation Only Press the microphone ( ) button. A confirmation message will display. Select [OK] by pressing the + or - button. Press the set button. 6. When - Canon PowerShot Pro70 | PowerShot Pro70 Hardware Guide - Page 89
3. Select [Erase] by pressing the + or button. Press the set button. 4. Select [All] by pressing the + or button. Press the set button. Protecting Images An image can be protected from accidental erasure by turning on its protection setting. The protection setting can be turned off when you wish to - Canon PowerShot Pro70 | PowerShot Pro70 Hardware Guide - Page 90
3. Select [Protect] by pressing the + or button. Press the set button. 4. Select the image you wish to protect by pressing the + or - button. Press the set button to turn on the protection setting. Erasing The last recorded image will display on the LCD monitor. Protection Mark You can turn off - Canon PowerShot Pro70 | PowerShot Pro70 Hardware Guide - Page 91
Additional Functions This section explains additional settings, such as date/time, LCD monitor brightness and menu language settings, and functions, such as copying images between CF cards and formatting CF cards. Displaying the Setup Menu You can display the setup menu from either the record menu - Canon PowerShot Pro70 | PowerShot Pro70 Hardware Guide - Page 92
Additional Functions Closing the Setup Menu 1. Press the menu button to close the setup menu. Each time you press the menu button it will either display the previous menu or close the menu. The setup options for which you pressed the set button will now become effective. Closing the Setup Menu in - Canon PowerShot Pro70 | PowerShot Pro70 Hardware Guide - Page 93
. Press the set button. 3. Select [On] or [Off] by pressing the + or - button. Press the set button. Setting the Power Save Settings The power save function, which powers down the camera if it remains unused for a set period of time, can be turned on or off. 1. Display the setup menu. 2. Select - Canon PowerShot Pro70 | PowerShot Pro70 Hardware Guide - Page 94
if 5 minutes pass without a function being accessed while the camera is connected to a computer. The camera will power down if another minute passes without a function being accessed. 92 • If the camera has powered down with the power save function, power can be restored by turning the mode dial or - Canon PowerShot Pro70 | PowerShot Pro70 Hardware Guide - Page 95
Setting the Date/Time Use this setting to adjust the camera's date and time settings and display formats. Ensure that you adjust this setting after replacing the button battery (p. 30). 1. Display the setup menu. 2. Select [Date/Time] by pressing the + or button. Press the set button. 3. Press the + - Canon PowerShot Pro70 | PowerShot Pro70 Hardware Guide - Page 96
CF Card Contains No Previously Recorded Images After the reset, the first new image is assigned the number one. • Standard File Number Assignment Method The camera records the number of the last image that was recorded. When an image is next shot, it adds one to the previous number to create - Canon PowerShot Pro70 | PowerShot Pro70 Hardware Guide - Page 97
1. Set the mode dial to auto or program. 2. Press the menu button. The record menu will display on the LCD monitor. 3. Select [Reset File No.] by pressing the + or - button. Press the set button. The current file number will display to the right of the menu option. 4. A confirmation message will - Canon PowerShot Pro70 | PowerShot Pro70 Hardware Guide - Page 98
Copying Images between CF Cards When two CF cards are installed in a camera, images can be copied from one card to the other. You can copy single images or all of the images on a CF card. At this - Canon PowerShot Pro70 | PowerShot Pro70 Hardware Guide - Page 99
copy additional images. An error message will display if there is insufficient free space on the target CF card. 8. When you have finished copying CF card to another. 1. Follow steps 1 to 4 in the Copying Images Singly instructions. 2. Select [All] by pressing the + or - button. Press the set button - Canon PowerShot Pro70 | PowerShot Pro70 Hardware Guide - Page 100
soft cloth or eyeglass lens wiper. If particularly stubborn dirt accumulates, contact your camera retailer or the closest Canon Customer Support Help Desk. Optical Viewfinder Use a lens blower to remove dust and dirt. or pressing firmly on it may lead to damage or other problems. Appendices - Canon PowerShot Pro70 | PowerShot Pro70 Hardware Guide - Page 101
The following optional accessories are available for the PowerShot Pro70. Battery Pack NB-4H Canon Battery Pack NB-4H is a nickel-hydride battery pack intended for exclusive use with the PowerShot Pro70. The battery pack can be charged with Compact Power Adapter CAPS200 for up to approximately - Canon PowerShot Pro70 | PowerShot Pro70 Hardware Guide - Page 102
slot in a computer. Semi-Hard Case SHC-PS200 Protects the camera from shocks and dust. Install it with the following procedures. Appendices Digital Printer CD-200 An easily operated printer into which a CF card containing images shot by a PowerShot Pro70 can be inserted to print out high-quality - Canon PowerShot Pro70 | PowerShot Pro70 Hardware Guide - Page 103
shoulder strap, pull it free of the case as shown below. Hard Strap HS-PS200 This strap is useful to prevent the camera from being accidentally dropped when camera, tempo- rarily detach the strap from the strap holder by the display panel. In addition, remove the buckle and strap guide from - Canon PowerShot Pro70 | PowerShot Pro70 Hardware Guide - Page 104
by fitting its screw into the tripod socket on the camera bottom. 3. Thread either end of the hard strap through the holders on the camera body and the hard strap holder. On the display panel side of the camera, thread the strap through the narrow slit for the shoulder strap. 4. Bend the strap - Canon PowerShot Pro70 | PowerShot Pro70 Hardware Guide - Page 105
flash, both clip-on type flashes that fit the camera's accessory shoe, are available for use with the PowerShot Pro70. These flashes work with the PowerShot Pro70 to take natural appearing images even in difficult lighting situations. EOS Remote Switch RS-80N3 When used with a tripod, the EOS - Canon PowerShot Pro70 | PowerShot Pro70 Hardware Guide - Page 106
Troubleshooting Problem Camera will not operate Cause(s) Lock lever in the CF card slot not locked Solution(s) • Close lock lever all the way and close the CF card slot cover all the way. Insufficient battery power • Use a fully charged battery pack. • Replace the battery. • Use an approved AC - Canon PowerShot Pro70 | PowerShot Pro70 Hardware Guide - Page 107
Problem Camera will not shoot Camera will not replay images Cause(s) Optional flash is charging ( not work, the logic circuits of the CF card may be faulty or damaged. Please consult the nearest Canon Customer Support Help Desk. Mode dial is set to lock • Set the mode dial to play. No CF card - Canon PowerShot Pro70 | PowerShot Pro70 Hardware Guide - Page 108
Problem Images will not display on TV Cause(s) Video cable incorrectly connected Solution(s) • Attach the video cable correctly to the video out terminal on the camera and the video in terminal on the TV. Camera is not set to video • Press the LCD/Video button on the output camera to switch to - Canon PowerShot Pro70 | PowerShot Pro70 Hardware Guide - Page 109
Problem Image is blurred or out of focus, or your desired composition could not be shot Cause(s) Subject is out of focal range Optical viewfinder was - Canon PowerShot Pro70 | PowerShot Pro70 Hardware Guide - Page 110
Problem Images are too bright Battery consumption is too fast Cause(s) Solution(s) Light is shining directly on • Change the shooting angle. or reflected onto camera from the subject Low ambient temperature • Use the battery pack at tempera- has lowered battery tures over 0° C. Keep the - Canon PowerShot Pro70 | PowerShot Pro70 Hardware Guide - Page 111
Problem Battery pack will not charge Cause(s) Solution(s) Poor connection between • Seat the battery pack more firmly battery pack and compact into the charger. power adapter • Check the AC power cord connection between the electrical outlet and the charger. DC Coupler DR-200 is • The - Canon PowerShot Pro70 | PowerShot Pro70 Hardware Guide - Page 112
to a computer in PC mode Exx (xx = number) Camera malfunction. Set mode dial to lock, then reset it to auto, program or play and retry shot or replay. Problem exists if error code reappears. Note the number and contact Canon Customer Support Help Desk. If an error code displays directly after - Canon PowerShot Pro70 | PowerShot Pro70 Hardware Guide - Page 113
) CF card has experienced an anomaly The file could not be created because there is a file with the same name as the directory that the camera is attempting to create, or the highest possible file number has already been reached. Reformat the CF card. All of the existing images and data - Canon PowerShot Pro70 | PowerShot Pro70 Hardware Guide - Page 114
Major Specifications PowerShot Pro70 Camera Format: Digital still camera Viewfinder: Secondary focused real-image zoom finder Storage: CompactFlash™ cards File Format: CIFF (Camera Image File Format) Images: JPEG and proprietary Canon format (CRW) Thumbnails: JPEG Sound Annotations: - Canon PowerShot Pro70 | PowerShot Pro70 Hardware Guide - Page 115
RAW) 1/2 - 1/8000 sec. (small) Self-Timer: 10-second delay Autofocus Format: TTL phase accessory shoe Auto Metering: Hybrid external sensor + through-the lens method White Balance Control: TTL auto white balance Camera Modes: Auto/program/play/PC Interface: RS-232C/video out/remote - Canon PowerShot Pro70 | PowerShot Pro70 Hardware Guide - Page 116
Battery Pack NB-4H (190-frame/70-minute replay capacity)/Compact Power Adapter CA-PS200 Test conditions: 2CR5 lithium battery: new cell; Battery Pack lithium button battery 0° - 40°C 10 - 90% 145 x 85 x 132 mm Approximately 680 g without battery or CF card • All data is based on Canon's standard - Canon PowerShot Pro70 | PowerShot Pro70 Hardware Guide - Page 117
cell 4.8 V 1400 mAh Approximately 300 times 0° -40°C 33 x 31 x 55 mm Approximately 120 g Compact Power Adapter CA-PS200 Input Voltage: AC 100 - 240 volts (50/60 Hz) Appendices Rated Output: Charging: 6.5V/1.5A Camera power supply: 5.3V/12A Input Rating: Charging: 24 - 34 VA (100 - 240 - Canon PowerShot Pro70 | PowerShot Pro70 Hardware Guide - Page 118
30 Replacing 30 Button Battery Cover 14 C Camera Indicators 28 CCD RAW 50 CF Button 37 CF Card 34, 99 Capacity 35 Installing 34 Formatting 95 Slot Cover 14 Switching Between 37 Charge 26 Charging Indicator 23 Checking Images 48 Cleaning 98 Compact Power Adapter CA-PS200 23, 28 Compression Method - Canon PowerShot Pro70 | PowerShot Pro70 Hardware Guide - Page 119
14, 20, 48 Brightness 90 LCD/Video Button 81 Lens 13 Light Sensor 13 Lithium Batteries 29 Loading Images 43 Lock 16 M Macro Button 53 Macro Mode 53 Mark Clearing 78 14 Target Marks 46 P PC 16 PCMCIA Card Adapter 100 Play 16, 69 Single Image Playback 69 Multi Image Playback 70 117 Appendices - Canon PowerShot Pro70 | PowerShot Pro70 Hardware Guide - Page 120
Capacity 35 Refresh Button 27 Remote Switch 63 Remote Terminal 16, 56 Repeat 79 Replaying 69-83 Single Image Playback 69 Multi Image Playback 70 Reset 94 118 S Self-Timer 61 Self-Timer Lamp 13 Setup Menu 89 Shooting 44-68 Continuous 54 Macro Mode 53 Mode 44 Reviewing Images 48 Shoulder Strap 37 - Canon PowerShot Pro70 | PowerShot Pro70 Hardware Guide - Page 121
723 (Calls may be recorded.) Fax No.: 0990 143 340 BBS No.: 0990 143 350 Canon S.A.V. Photo Video France Hotline: (1) 49 04 01 00 Télécopie: (1) 49 04 01 01 Canon Deutschland GmbH Canon-Hotline-Service Customer-Support: 02151/349-555 Telefax: 02151/349-588 Info-Desk: 02151/349-566 Info-Desk Fax - Canon PowerShot Pro70 | PowerShot Pro70 Hardware Guide - Page 122
#09-01 / 06, Singapore 079906 Phone: (65) 532 4400 Fax: (65) 221 7577 Canon Marketing Services 2 Alexandra Road, #04-01A, Delta House, Singapore 159919 Phone: (65) 273 5311 Fax: (65) 273 6786 Canon Marketing (Malaysia) Sdn. Bhd. 13A Jalan 219, 46100 Petaling Jaya, Selangor D.E., Malaysia Phone: (60 - Canon PowerShot Pro70 | PowerShot Pro70 Hardware Guide - Page 123
Systems, Inc. (Taiwan) Tel: +886-2-8787-6740 Fax: +886-2-8787-6741 Ulead Systems, Inc. (USA) Tel: +1-310-523-9393 Fax: +1-310-523-9399 Germany Ulead Support Center Tel: +49-2602-917-329 Fax: +49-2602-917-327 France Center d'assistance Ulead Tel: +33-1-30-76-10-30 Fax: +33-1-30-76 - Canon PowerShot Pro70 | PowerShot Pro70 Hardware Guide - Page 124
H-IE-XXX-VXA XX98ABX.X ©CANON INC. 1998 PRINTED IN JAPAN
-
 1
1 -
 2
2 -
 3
3 -
 4
4 -
 5
5 -
 6
6 -
 7
7 -
8
-
9
-
10
-
11
-
12
-
13
-
14
-
15
-
16
-
17
-
18
-
19
-
20
-
21
-
22
-
23
-
24
-
25
-
26
-
27
-
28
-
29
-
30
-
31
-
32
-
33
-
34
-
35
-
36
-
37
-
38
-
39
-
40
-
41
-
42
-
43
-
44
-
45
-
46
-
47
-
48
-
49
-
50
-
51
-
52
-
53
-
54
-
55
-
56
-
57
-
58
-
59
-
60
-
61
-
62
-
63
-
64
-
65
-
66
-
67
-
68
-
69
-
70
-
71
-
72
-
73
-
74
-
75
-
76
-
77
-
78
-
79
-
80
-
81
-
82
-
83
-
84
-
85
-
86
-
87
-
88
-
89
-
90
-
91
-
92
-
93
-
94
-
95
-
96
-
97
-
98
-
99
-
100
-
101
-
102
-
103
-
104
-
105
-
106
-
107
-
108
-
109
-
110
-
111
-
112
-
113
-
114
-
115
-
116
-
117
-
118
-
119
-
120
-
121
-
122
-
123
-
124
 |
 |
This guide explains the functions of this product.
Please read it to understand the correct handling procedures before using the product.
Hardware Guide