Canon REALiS WUX4000 D Pro AV Multimedia Projector WUX4000 User's Manual - Page 27
Bottom Side, Mounting the Projector on the Ceiling
 |
View all Canon REALiS WUX4000 D Pro AV manuals
Add to My Manuals
Save this manual to your list of manuals |
Page 27 highlights
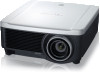
■Bottom Side Part Names Screw holes for installation of ceiling attachment Before Use Adjustable feet (P116) Mounting the Projector on the Ceiling You can mount the projector on the ceiling. The ceiling attachment (part No.: RS-CL11) is required in order to mount the projector on the ceiling. Depending on the installation environment, an extension pipe (part No.: RS-CL08 or RS-CL09) may also be required. Contact a Canon dealer where you purchased the projector for more detailed information. • Make sure to use the optional ceiling attachment. • You should never install the ceiling attachment by yourself. • If you mount the projector on the ceiling, you have to invert the projected image by selecting [Image flip H/V] from the menu. (P83) 27
-
 1
1 -
2
-
3
-
4
-
5
-
6
-
7
-
8
-
9
-
10
-
11
-
12
-
13
-
14
-
15
-
16
-
17
-
18
-
19
-
20
-
21
-
 22
22 -
 23
23 -
 24
24 -
 25
25 -
 26
26 -
 27
27 -
 28
28 -
 29
29 -
 30
30 -
 31
31 -
 32
32 -
33
-
34
-
35
-
36
-
37
-
38
-
39
-
40
-
41
-
42
-
43
-
44
-
45
-
46
-
47
-
48
-
49
-
50
-
51
-
52
-
53
-
54
-
55
-
56
-
57
-
58
-
59
-
60
-
61
-
62
-
63
-
64
-
65
-
66
-
67
-
68
-
69
-
70
-
71
-
72
-
73
-
74
-
75
-
76
-
77
-
78
-
79
-
80
-
81
-
82
-
83
-
84
-
85
-
86
-
87
-
88
-
89
-
90
-
91
-
92
-
93
-
94
-
95
-
96
-
97
-
98
-
99
-
100
-
101
-
102
-
103
-
104
-
105
-
106
-
107
-
108
-
109
-
110
-
111
-
112
-
113
-
114
-
115
-
116
-
117
-
118
-
119
-
120
-
121
-
122
-
123
-
124
-
125
-
126
-
127
-
128
-
129
-
130
-
131
-
132
-
133
-
134
-
135
-
136
-
137
-
138
-
139
-
140
-
141
-
142
-
143
-
144
-
145
-
146
-
147
-
148
-
149
-
150
-
151
-
152
-
153
-
154
-
155
-
156
-
157
-
158
-
159
-
160
-
161
-
162
-
163
-
164
-
165
-
166
-
167
-
168
-
169
-
170
-
171
-
172
-
173
-
174
-
175
-
176
-
177
-
178
-
179
-
180
-
181
-
182
-
183
-
184
-
185
-
186
 |
 |

27
Part Names
Before Use
■
Bottom Side
Mounting the Projector on the Ceiling
You can mount the projector on the ceil-
ing.
The ceiling attachment (part No.: RS-CL11)
is required in order to mount the projector on
the ceiling. Depending on the installation
environment, an extension pipe (part No.:
RS-CL08 or RS-CL09) may also be required.
Contact a Canon dealer where you pur-
chased the projector for more detailed infor-
mation.
•
Make sure to use the optional ceiling
attachment.
•
You should never install the ceiling
attachment by yourself.
•
If you mount the projector on the ceil-
ing, you have to invert the projected
image by selecting [Image flip H/V]
from the menu. (
P83
)
Adjustable feet (
P116
)
Screw holes for installation of ceiling
attachment