Canon RP10 for CR-120/150 imageFORMULA CR-150 / CR-120 User Manual - Page 5
Preparation Before Use, Setting Up the Scanner
 |
View all Canon RP10 for CR-120/150 manuals
Add to My Manuals
Save this manual to your list of manuals |
Page 5 highlights
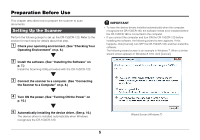
Preparation Before Use This chapter describes how to prepare the scanner to scan documents. Setting Up the Scanner Perform the following steps to set up the CR-150/CR-120. Refer to the section for each step for details about that step. A Check your operating environment. (See "Checking Your Operating Environment" on p. 6.) B Install the software. (See "Installing the Software" on p. 7.) Install the Scanning Utility provided with the CR-150/CR-120. C Connect the scanner to a computer. (See "Connecting the Scanner to a Computer" on p. 8.) D Turn ON the power. (See "Turning ON the Power" on p. 10.) E Automatically installing the device driver. (See p. 10.) The device driver is installed automatically when Windows recognizes the CR-150/CR-120. IMPORTANT • To have the device drivers installed automatically when the computer recognizes the CR-150/CR-120, the software needs to be installed before the CR-150/CR-120 is connected to the computer. • If you connect the computer and turn ON the CR-150/CR-120 before installing the software, the following wizard screen appears. If this happens, click [Cancel], turn OFF the CR-150/CR-120, and then install the software. The following wizard screen is an example in Windows 7. When a similar wizard screen appears in Windows 8.1/10, click [Cancel]. Wizard Screen (Windows 7) 5
-
 1
1 -
 2
2 -
 3
3 -
 4
4 -
 5
5 -
 6
6 -
 7
7 -
 8
8 -
 9
9 -
 10
10 -
 11
11 -
12
-
13
-
14
-
15
-
16
-
17
-
18
-
19
-
20
-
21
-
22
-
23
-
24
-
25
-
26
-
27
-
28
-
29
-
30
-
31
-
32
-
33
-
34
-
35
-
36
-
37
-
38
-
39
-
40
-
41
-
42
-
43
-
44
-
45
-
46
-
47
-
48
-
49
-
50
-
51
-
52
-
53
-
54
-
55
-
56
-
57
-
58
-
59
-
60
-
61
-
62
-
63
-
64
-
65
-
66
-
67
-
68
-
69
-
70
-
71
-
72
-
73
-
74
-
75
-
76
-
77
-
78
-
79
-
80
-
81
-
82
 |
 |
